spring boot

Deploy a Spring Boot App with HTTPS by using JKS File into OpenShift 4

For this sample, im planning on creating a spring boot but with an SSL endpoint and deploy it to OpenShift 4 with a passthrough route.

So lets start with creating a JKS file, and put “password” as its password variable.

$ keytool -genkey -alias app-key -keyalg RSA -keystore app.jks

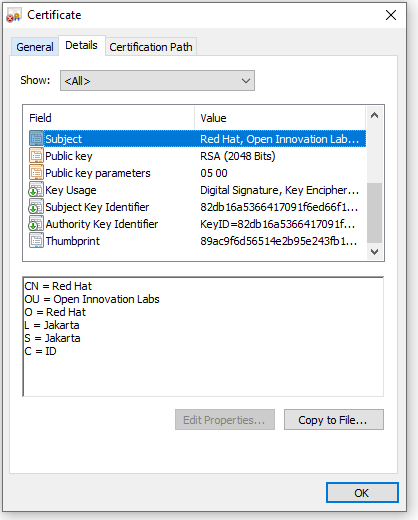
where for this example im using below variables for creating JKS file

C=ID; ST=Jakarta; L=Jakarta; O=Red Hat; OU=Open Innovation Labs; CN=Red Hat

Now we start creating a spring boot app,

package com.redhat.openinnovationlabs.sample.jks;

import org.springframework.boot.SpringApplication;
import org.springframework.boot.autoconfigure.SpringBootApplication;

@SpringBootApplication
public class Application {
    public static void main(String[] args) {
        SpringApplication.run(Application.class, args);
    }
}
package com.redhat.openinnovationlabs.sample.jks.controller;

import org.springframework.web.bind.annotation.GetMapping;
import org.springframework.web.bind.annotation.RestController;

import java.util.HashMap;
import java.util.Map;

@RestController
public class HelloWorldController {
    @GetMapping("/")
    public Map index() {
        return new HashMap() {{
            put("hello", "world");
        }};
    }
}

Now is the most important thing, a properties file where we store all the configurations. For this sample, we would take the configurations from environment variables.

server.port=8443

server.ssl.enabled=true
server.ssl.key-alias=app-key
server.ssl.key-store-type=JKS
server.ssl.key-store-password=${JKS_PASSWORD}
server.ssl.key-store=file:${JKS_LOCATION}

Create a Dockerfile to create our java image

FROM openjdk:11.0.7-jre-slim-buster

LABEL base-image="openjdk:11.0.7-jre-slim-buster" \
      java-version="11.0.7" \
      purpose="Hello World with SSL, Java and Dockerfile"

MAINTAINER Muhammad Edwin < edwin at redhat dot com >

WORKDIR /deployments

COPY target/*.jar app.jar

USER 185

EXPOSE 8443

CMD ["java", "-jar","app.jar"]

And deploy it into OpenShift 4

$ oc new-build --strategy docker --binary \ 
	--docker-image openjdk:11.0.7-jre-slim-buster --name spring-boot-jks

$ oc start-build spring-boot-jks --from-dir . --follow

$ oc new-app --name=spring-boot-jks \ 
	--image-stream=test-project/spring-boot-jks:latest -n test-project

But apps will not work since it is missing a JKS file and some configurations. Therefore we need to create some Secrets in OpenShift 4 by using below command,

$ oc create secret generic spring-boot-jks-file --from-file app.jks

$ oc create secret generic spring-boot-secrets \
	--from-literal=JKS_PASSWORD=password \ 
	--from-literal=JKS_LOCATION=/tmp/jks/app.jks

And assign them into our apps,

$ oc set volume dc/spring-boot-jks --add \
	--name=spring-boot-jks-mnt --secret-name=spring-boot-jks-file \
	--mount-path=/tmp/jks/

$ oc set env dc/spring-boot-jks --from=secret/spring-boot-secrets

Expose our apps endpoint by using a passthrough Route

$ oc create route passthrough  --service spring-boot-jks --port=8443

And run some curl to our apps to see our application’s ssl configuration.

curl -kv https://<apps-ip>

* SSL connection using TLSv1.2 / ECDHE-RSA-AES256-GCM-SHA384
* ALPN, server did not agree to a protocol
* Server certificate:
*  subject: C=ID; ST=Jakarta; L=Jakarta; O=Red Hat; OU=Open Innovation Labs; CN=Red Hat
*  start date: Apr 11 12:27:14 2022 GMT
*  expire date: Jul 10 12:27:14 2022 GMT
*  issuer: C=ID; ST=Jakarta; L=Jakarta; O=Red Hat; OU=Open Innovation Labs; CN=Red Hat
*  SSL certificate verify result: self signed certificate (18), continuing anyway.
Code for this sample can be accessed here,

https://github.com/edwin/spring-boot-jks

Dynamic Spring Boot Configuration using ConfigMap on top of OpenShift 4

OpenShift is a family of containerization software products developed by Red Hat. Its flagship product is the OpenShift Container Platform — an on-premises platform as a service built around Linux containers orchestrated and managed by Kubernetes on a foundation of Red Hat Enterprise Linux.

In this article im trying to leverage one of Kubernetes feature, which is ConfigMap and create an Spring Boot app that can read a ConfigMap dynamically. Which means we can replace, refresh, and reload the content of ConfigMap anytime and application will read it without have to restart.

Basically we can see on this diagram below what is the approach,

First lets create a file with the name of application-ocp-dev.properties,

spring.application.name=hello-world
spring.cloud.config.enabled=false
management.endpoints.web.exposure.include=refresh

name=edwin

and upload it into OpenShift as a ConfigMap,

$ oc create configmap ocp-dev-config --from-file=application-ocp-dev.properties

Next lets create a Spring Boot app. We can see that other than a regular Spring Boot libraries, i also add Spring Cloud libraries there as well.

<?xml version="1.0" encoding="UTF-8"?>
<project xmlns="http://maven.apache.org/POM/4.0.0"
         xmlns:xsi="http://www.w3.org/2001/XMLSchema-instance"
         xsi:schemaLocation="http://maven.apache.org/POM/4.0.0 http://maven.apache.org/xsd/maven-4.0.0.xsd">
    <modelVersion>4.0.0</modelVersion>

    <groupId>com.edw</groupId>
    <artifactId>spring-cloud-client</artifactId>
    <version>1.0-SNAPSHOT</version>

    <parent>
        <groupId>org.springframework.boot</groupId>
        <artifactId>spring-boot-starter-parent</artifactId>
        <version>2.5.10</version>
        <relativePath/> 
    </parent>

    <properties>
        <java.version>11</java.version>
        <spring-cloud.version>2020.0.5</spring-cloud.version>
    </properties>
    
    <dependencies>
        <dependency>
            <groupId>org.springframework.boot</groupId>
            <artifactId>spring-boot-starter-actuator</artifactId>
        </dependency>
        <dependency>
            <groupId>org.springframework.boot</groupId>
            <artifactId>spring-boot-starter-web</artifactId>
        </dependency>
        <dependency>
            <groupId>org.springframework.cloud</groupId>
            <artifactId>spring-cloud-starter-config</artifactId>
        </dependency>

        <dependency>
            <groupId>org.springframework.boot</groupId>
            <artifactId>spring-boot-starter-test</artifactId>
            <scope>test</scope>
        </dependency>
    </dependencies>
    <dependencyManagement>
        <dependencies>
            <dependency>
                <groupId>org.springframework.cloud</groupId>
                <artifactId>spring-cloud-dependencies</artifactId>
                <version>${spring-cloud.version}</version>
                <type>pom</type>
                <scope>import</scope>
            </dependency>
        </dependencies>
    </dependencyManagement>

    <build>
        <plugins>
            <plugin>
                <groupId>org.springframework.boot</groupId>
                <artifactId>spring-boot-maven-plugin</artifactId>
            </plugin>
        </plugins>
    </build>
</project>

Now lets create 2 Java files to make this apps runs,

package com.edw;

import org.springframework.boot.SpringApplication;
import org.springframework.boot.autoconfigure.SpringBootApplication;

@SpringBootApplication
public class Application {
    public static void main(String[] args) {
        SpringApplication.run(Application.class, args);
    }
}
package com.edw.controllers;

import org.springframework.beans.factory.annotation.Value;
import org.springframework.cloud.context.config.annotation.RefreshScope;
import org.springframework.web.bind.annotation.GetMapping;
import org.springframework.web.bind.annotation.RestController;

@RefreshScope
@RestController
public class IndexController {
    @Value("${name:Somewhat Default}")
    private String message;

    @GetMapping("/")
    public String getMessage() {
        return this.message;
    }
}

Lets deploy our Java app to Openshift using RHEL 8 with OpenJDK 11 as its based image

$ oc new-build . --name=spring-cloud-client -i openshift/openjdk-11-rhel8:1.0

$ oc start-build spring-cloud-client  --from-dir=. --follow --wait

$ oc new-app spring-cloud-client

We can see that apps would deployed to OpenShift but perhaps cannot start at all due to missing configuration. This is where we can leverage OpenShift ConfigMap, we can start with mounting ConfigMap into the apps where we mount it into /tmp/configs folder.

$ oc set volume dc/spring-cloud-client --add \
	--name=app-config-mnt --configmap-name=ocp-dev-config \
	--mount-path=/tmp/configs

And set our apps configuration so that it would point to the new ConfigMap by setting SPRING_CONFIG_LOCATION environment variables.

$ oc set env dc/spring-cloud-client \ 
	SPRING_CONFIG_LOCATION=/tmp/configs/application-ocp-dev.properties

We can see that application now able to read value from our application configuration which resides on ConfigMap.

$ curl -k https://spring-cloud-client.openshift.com/

edwin                                                 

Lets try to replace the content of our properties file,

Save it and wait for one-two minutes in order for Kubelet and ConfirMaps to sync. AFter that we can refresh our apps’s configuration by running a CURL command to this URL

curl -kv -L -X POST 'https://spring-cloud-client.openshift.com/actuator/refresh'

And see the result from CURL,

$ curl -k https://spring-cloud-client.openshift.com/

my other name                                                                                        

And all the code on this article can be accessed here,

https://github.com/edwin/dynamic-spring-boot-configuration-on-openshift-4

Have fun with Spring Boot.

ps. if we think that syncing ConfigMap into mounted Pods took too long (around 2mins), we can accelerate them by annotate the Pods where ConfigMaps are mounted to.

$ oc annotate pod -l app=spring-cloud-client random-annotate-value="put some random string here"  --overwrite

Deploying Fuse 7 on Top of Spring Boot to Openshift 4

Red Hat Fuse is an Open Source Integration platform which provide a very agile and lightweight artifact, which make it very suitable for a microservice deployment. And in this sample, im going to deploy Fuse on top of Red Hat OpenShift Container Platform.

First as always, we need to create a simple pom file. In here im using the latest version of Fuse. And that is 7.9.

<?xml version="1.0" encoding="UTF-8"?>
<project xmlns="http://maven.apache.org/POM/4.0.0"
         xmlns:xsi="http://www.w3.org/2001/XMLSchema-instance"
         xsi:schemaLocation="http://maven.apache.org/POM/4.0.0 http://maven.apache.org/xsd/maven-4.0.0.xsd">
    <modelVersion>4.0.0</modelVersion>

    <groupId>com.edw</groupId>
    <artifactId>hello-world-fuse-on-ocp</artifactId>
    <version>1.0-SNAPSHOT</version>

    <properties>
        <project.build.sourceEncoding>UTF-8</project.build.sourceEncoding>
        <fuse.version>7.9.0.fuse-sb2-790065-redhat-00001</fuse.version>
        <spring-boot.version>2.1.4.RELEASE-redhat-00001</spring-boot.version>
    </properties>

    <dependencyManagement>
        <dependencies>
            <dependency>
                <groupId>org.jboss.redhat-fuse</groupId>
                <artifactId>fuse-springboot-bom</artifactId>
                <version>${fuse.version}</version>
                <type>pom</type>
                <scope>import</scope>
            </dependency>
        </dependencies>
    </dependencyManagement>

    <dependencies>
        <dependency>
            <groupId>org.apache.camel</groupId>
            <artifactId>camel-spring-boot-starter</artifactId>
        </dependency>
        <dependency>
            <groupId>org.springframework.boot</groupId>
            <artifactId>spring-boot-starter-web</artifactId>
        </dependency>
        <dependency>
            <groupId>org.springframework.boot</groupId>
            <artifactId>spring-boot-starter-actuator</artifactId>
        </dependency>
        <dependency>
            <groupId>org.apache.camel</groupId>
            <artifactId>camel-http-starter</artifactId>
        </dependency>
        <dependency>
            <groupId>org.apache.camel</groupId>
            <artifactId>camel-servlet-starter</artifactId>
        </dependency>
    </dependencies>

    <build>
        <pluginManagement>
            <plugins>
                <plugin>
                    <groupId>org.jboss.redhat-fuse</groupId>
                    <artifactId>spring-boot-maven-plugin</artifactId>
                    <version>${fuse.version}</version>
                </plugin>
            </plugins>
        </pluginManagement>
        <plugins>
            <plugin>
                <artifactId>maven-compiler-plugin</artifactId>
                <configuration>
                    <source>8</source>
                    <target>8</target>
                </configuration>
            </plugin>
            <plugin>
                <groupId>org.springframework.boot</groupId>
                <artifactId>spring-boot-maven-plugin</artifactId>
                <version>${spring-boot.version}</version>
                <executions>
                    <execution>
                        <goals>
                            <goal>repackage</goal>
                        </goals>
                    </execution>
                </executions>
            </plugin>
        </plugins>
    </build>

</project>

Create a main class,

package com.edw;

import org.springframework.boot.SpringApplication;
import org.springframework.boot.autoconfigure.SpringBootApplication;

@SpringBootApplication
public class Application {
    public static void main(String[] args) {
        SpringApplication.run(Application.class, args);
    }
}

Create its route,

package com.edw.routes;

import org.apache.camel.Exchange;
import org.apache.camel.builder.RouteBuilder;
import org.springframework.stereotype.Component;

@Component
public class HelloWorldRoute extends RouteBuilder {

    @Override
    public void configure() throws Exception {
        rest()
                .get("hello")
                .route()
                .setHeader(Exchange.HTTP_RESPONSE_CODE, simple("200"))
                .setHeader(Exchange.CONTENT_TYPE, simple("application/json"))
                .setBody(constant("{\"hello\":\"world\"}"))
                .endRest()
        ;
    }
}

Set application.properties for our application’s configuration. One of the most important is settingup Camel’s context path for serving API endpoints.

# The Camel context name
camel.springboot.name=hello-world-fuse-on-ocp

# enable all management endpoints
endpoints.enabled=true
management.security.enabled=false

camel.component.servlet.mapping.contextPath=/api/*
logging.level.root=info

And a settings.xml file for providing Red Hat repository location,

<?xml version="1.0"?>
<settings>

    <profiles>
        <profile>
            <id>extra-repos</id>
            <activation>
                <activeByDefault>true</activeByDefault>
            </activation>
            <repositories>
                <repository>
                    <id>central</id>
                    <url>https://repo1.maven.org/maven2</url>
                    <releases>
                        <enabled>true</enabled>
                    </releases>
                    <snapshots>
                        <enabled>false</enabled>
                    </snapshots>
                </repository>
                <repository>
                    <id>redhatga</id>
                    <name>Enterprise Releases</name>
                    <url>https://maven.repository.redhat.com/ga</url>
                </repository>
                <repository>
                    <id>redhatearly</id>
                    <name>Enterprise Releases</name>
                    <url>https://maven.repository.redhat.com/earlyaccess/all</url>
                </repository>
            </repositories>

            <pluginRepositories>
                <pluginRepository>
                    <id>central</id>
                    <url>https://repo1.maven.org/maven2</url>
                    <releases>
                        <enabled>true</enabled>
                    </releases>
                    <snapshots>
                        <enabled>false</enabled>
                    </snapshots>
                </pluginRepository>
                <pluginRepository>
                    <id>redhatga</id>
                    <name>Enterprise Releases</name>
                    <url>https://maven.repository.redhat.com/ga</url>
                </pluginRepository>
                <pluginRepository>
                    <id>redhatearly</id>
                    <name>Enterprise Releases</name>
                    <url>https://maven.repository.redhat.com/earlyaccess/all</url>
                </pluginRepository>
            </pluginRepositories>
        </profile>
    </profiles>

</settings>

Execute below command to run on our local,

$ mvn spring-boot:run -s settings.xml

And run curl to see whether our application’s endpoint is ready to accept request or not,

$ curl -kv http://localhost:8080/api/hello

*   Trying ::1:8080...
* TCP_NODELAY set
* Connected to localhost (::1) port 8080 (#0)
> GET /api/hello HTTP/1.1
> Host: localhost:8080
> User-Agent: curl/7.65.0
> Accept: */*
>
* Mark bundle as not supporting multiuse
< HTTP/1.1 200
< accept: */*
< breadcrumbId: 123
< user-agent: curl/7.65.0
< Content-Type: application/json
< Transfer-Encoding: chunked
< Date: Tue, 17 Aug 2021 14:21:05 GMT
<
* Connection #0 to host localhost left intact
{"hello":"world"} 

Once we are confident that the code is working, we can deploy it to Openshift Container Platform by using below command.

oc new-app registry.access.redhat.com/ubi8/openjdk-8~https://github.com/edwin/hello-world-fuse-on-ocp

Full code for this sample can be downloaded on below link.

https://github.com/edwin/hello-world-fuse-on-ocp

Thanks for reading and dont forget to have fun using Fuse.

Injecting Openshift Secret and Reading it as an Environment Variables in Spring Boot

In this writing, im planning to create a simple Spring Boot application but with a dynamic configuration that is going to be fetched from environment variables. Usually we are using this for securing some sensitive values such as Database credentials or endpoints.

For this scenario, im trying to make password variables as parameterized inside Spring Boot’s application.properties. Binds it with environment variables with the name of OPENSHIFT_APP_PASSWORD.

server.port=8080
server.password=${OPENSHIFT_APP_PASSWORD}

And call it from our controller,

package com.edw.controller;

import org.springframework.beans.factory.annotation.Value;
import org.springframework.web.bind.annotation.GetMapping;
import org.springframework.web.bind.annotation.RestController;

import java.util.HashMap;
import java.util.Map;

@RestController
public class IndexController {

    @Value("${server.password}")
    private String serverPassword;

    @GetMapping("/")
    public Map helloWorld() {
        return new HashMap() {{
            put("hello", "world");
            put("password", serverPassword);
        }};
    }
}

Dont forget setting up maven’s configuration,

<?xml version="1.0" encoding="UTF-8"?>
<project xmlns="http://maven.apache.org/POM/4.0.0"
         xmlns:xsi="http://www.w3.org/2001/XMLSchema-instance"
         xsi:schemaLocation="http://maven.apache.org/POM/4.0.0 http://maven.apache.org/xsd/maven-4.0.0.xsd">
    <modelVersion>4.0.0</modelVersion>

    <groupId>com.edw</groupId>
    <artifactId>ocpsecret</artifactId>
    <version>1.0-SNAPSHOT</version>

    <repositories>
        <repository>
            <id>redhat-early-access</id>
            <name>Red Hat Early Access Repository</name>
            <url>https://maven.repository.redhat.com/earlyaccess/all/</url>
        </repository>
        <repository>
            <id>redhat-ga</id>
            <name>Red Hat GA Repository</name>
            <url>https://maven.repository.redhat.com/ga/</url>
        </repository>
    </repositories>

    <pluginRepositories>
        <pluginRepository>
            <id>redhat-early-access</id>
            <name>Red Hat Early Access Repository</name>
            <url>https://maven.repository.redhat.com/earlyaccess/all/</url>
        </pluginRepository>
        <pluginRepository>
            <id>redhat-ga</id>
            <name>Red Hat GA Repository</name>
            <url>https://maven.repository.redhat.com/ga/</url>
        </pluginRepository>
    </pluginRepositories>

    <properties>
        <snowdrop-bom.version>2.3.6.Final-redhat-00001</snowdrop-bom.version>
        <spring-boot.version>2.1.4.RELEASE-redhat-00001</spring-boot.version>
        <maven.compiler.source>11</maven.compiler.source>
        <maven.compiler.target>11</maven.compiler.target>
        <start-class>com.edw.Main</start-class>
    </properties>

    <dependencyManagement>
        <dependencies>
            <dependency>
                <groupId>dev.snowdrop</groupId>
                <artifactId>snowdrop-dependencies</artifactId>
                <version>${snowdrop-bom.version}</version>
                <type>pom</type>
                <scope>import</scope>
            </dependency>
        </dependencies>
    </dependencyManagement>

    <dependencies>
        <dependency>
            <groupId>org.springframework.boot</groupId>
            <artifactId>spring-boot-starter-web</artifactId>
        </dependency>
    </dependencies>

    <build>
        <plugins>
            <plugin>
                <groupId>org.springframework.boot</groupId>
                <artifactId>spring-boot-maven-plugin</artifactId>
                <version>${spring-boot.version}</version>
                <executions>
                    <execution>
                        <goals>
                            <goal>repackage</goal>
                        </goals>
                    </execution>
                </executions>
            </plugin>
        </plugins>
    </build>
</project>

After we commit all the code into github, we can pull them from Openshift with a simple oc command.

$ oc new-app registry.access.redhat.com/ubi8/openjdk-11~https://github.com/edwin/spring-boot-and-ocp-secret

We can create a variable as a Secret by using below oc command

$ oc create secret generic mypassword --from-literal=OPENSHIFT_APP_PASSWORD=whatever

And inject it into our application,

$ oc set env --from=secret/mypassword dc/spring-boot-and-ocp-secret

Expose our app’s endpoint,

$ oc expose service spring-boot-and-ocp-secret

And do a curl to see that variable “password” has been filled with “whatever” which comes from our OCP Secret.

$ curl -kv http://ocp-endpoint/

* Mark bundle as not supporting multiuse
< HTTP/1.1 200
< Content-Type: application/json
<
{"password":"whatever","hello":"world"}

Code for this can be found on below link

https://github.com/edwin/spring-boot-and-ocp-secret

Creating an Embeddable JMS Server using Artemis for Unit Testing

In this blog now we are trying to implement an embeddable JMS server for doing testing in Java. Embeddable JMS server is needed to reduce the dependency to a third party, in this case is JMS provider like ActiveMQ, and it is very lightweight therefore we can run it very fast and in multiple times. It is also needed for integration test to see whether our code can integrate smoothly with others. For this scenario im using JUnit 5, which is perhaps the latest version of JUnit at this time.

So lets start with a pom file, for describing what libraries are needed to this. For this example, im using snowdrop bom from Red Hat.

<?xml version="1.0" encoding="UTF-8"?>
<project xmlns="http://maven.apache.org/POM/4.0.0"
         xmlns:xsi="http://www.w3.org/2001/XMLSchema-instance"
         xsi:schemaLocation="http://maven.apache.org/POM/4.0.0 http://maven.apache.org/xsd/maven-4.0.0.xsd">
    <modelVersion>4.0.0</modelVersion>

    <groupId>com.edw</groupId>
    <artifactId>embeddable-artemis-mq-junit5</artifactId>
    <version>1.0-SNAPSHOT</version>

    <properties>
        <java.version>11</java.version>
        <spring-boot.version>2.1.6.RELEASE</spring-boot.version>
        <spring-boot-bom.version>2.3.6.Final-redhat-00001</spring-boot-bom.version>
        <junit-version>5.7.2</junit-version>

        <maven.compiler.source>11</maven.compiler.source>
        <maven.compiler.target>11</maven.compiler.target>
    </properties>

    <dependencies>

        <dependency>
            <groupId>org.springframework.boot</groupId>
            <artifactId>spring-boot-starter-web</artifactId>
            <exclusions>
                <!-- Exclude the Tomcat dependency -->
                <exclusion>
                    <groupId>org.springframework.boot</groupId>
                    <artifactId>spring-boot-starter-tomcat</artifactId>
                </exclusion>
            </exclusions>
        </dependency>

        <dependency>
            <groupId>org.springframework.boot</groupId>
            <artifactId>spring-boot-starter-undertow</artifactId>
        </dependency>

        <dependency>
            <groupId>org.springframework.boot</groupId>
            <artifactId>spring-boot-starter-artemis</artifactId>
        </dependency>

        <!-- artemis -->
        <dependency>
            <groupId>org.apache.activemq</groupId>
            <artifactId>artemis-server</artifactId>
            <version>2.12.0</version>
            <scope>test</scope>
        </dependency>
        <dependency>
            <groupId>org.apache.activemq</groupId>
            <artifactId>artemis-core-client</artifactId>
            <version>2.12.0</version>
        </dependency>
        <!-- artemis -->

        <dependency>
            <groupId>org.junit.jupiter</groupId>
            <artifactId>junit-jupiter-api</artifactId>
            <version>${junit-version}</version>
            <scope>test</scope>
        </dependency>
        <dependency>
            <groupId>org.junit.jupiter</groupId>
            <artifactId>junit-jupiter-engine</artifactId>
            <version>${junit-version}</version>
            <scope>test</scope>
        </dependency>
        <dependency>
            <groupId>org.junit.platform</groupId>
            <artifactId>junit-platform-commons</artifactId>
            <version>1.7.2</version>
            <scope>test</scope>
        </dependency>

        <dependency>
            <groupId>org.springframework.boot</groupId>
            <artifactId>spring-boot-starter-test</artifactId>
            <scope>test</scope>
            <exclusions>
                <exclusion>
                    <groupId>junit</groupId>
                    <artifactId>junit</artifactId>
                </exclusion>
                <exclusion>
                    <groupId>org.junit.vintage</groupId>
                    <artifactId>junit-vintage-engine</artifactId>
                </exclusion>
            </exclusions>
        </dependency>

    </dependencies>

    <dependencyManagement>
        <dependencies>
            <dependency>
                <groupId>dev.snowdrop</groupId>
                <artifactId>snowdrop-dependencies</artifactId>
                <version>${spring-boot-bom.version}</version>
                <type>pom</type>
                <scope>import</scope>
            </dependency>
        </dependencies>
    </dependencyManagement>


    <build>
        <plugins>
            <plugin>
                <groupId>org.apache.maven.plugins</groupId>
                <artifactId>maven-compiler-plugin</artifactId>
                <version>3.8.1</version>
                <configuration>
                    <source>11</source>
                    <target>11</target>
                </configuration>
            </plugin>

            <plugin>
                <groupId>org.springframework.boot</groupId>
                <artifactId>spring-boot-maven-plugin</artifactId>
                <version>2.1.3.RELEASE</version>
                <configuration>
                    <mainClass>com.edw.Main</mainClass>
                </configuration>
                <executions>
                    <execution>
                        <goals>
                            <goal>repackage</goal>
                        </goals>
                    </execution>
                </executions>
            </plugin>

            <plugin>
                <artifactId>maven-surefire-plugin</artifactId>
                <version>3.0.0-M5</version>
            </plugin>

        </plugins>
    </build>

</project>

One of the most important thing is we need to create an xml file called broker.xml. The purpose is to store configuration for our embeddable JMS, one of the most important configuration would be the roles and type of privileges.

<?xml version="1.0" encoding="UTF-8" standalone="no"?>
<configuration xmlns="urn:activemq" xmlns:xsi="http://www.w3.org/2001/XMLSchema-instance" xsi:schemaLocation="urn:activemq ../../../../src/schema/artemis-configuration.xsd">
    <core xmlns="urn:activemq:core">
        <bindings-directory>./data/messaging/bindings</bindings-directory>
        <journal-directory>./data/messaging/journal</journal-directory>
        <large-messages-directory>./data/messaging/largemessages</large-messages-directory>
        <paging-directory>./data/messaging/paging</paging-directory>
        <management-notification-address>notificationsTopic</management-notification-address>
        <acceptors>
            <acceptor name="netty">tcp://localhost:61616</acceptor>
        </acceptors>

        <max-disk-usage>100</max-disk-usage>

        <security-settings>
            <security-setting match="#">
                <permission roles="admin" type="createDurableQueue"/>
                <permission roles="admin" type="deleteDurableQueue"/>
                <permission roles="admin" type="createNonDurableQueue"/>
                <permission roles="admin" type="deleteNonDurableQueue"/>
                <permission roles="admin" type="consume"/>
                <permission roles="admin" type="browse"/>
                <permission roles="admin" type="send"/>
                <permission roles="admin" type="createAddress"/>
                <permission roles="admin" type="deleteAddress"/>
            </security-setting>
        </security-settings>
    </core>
</configuration>

Last step is creating a simple java files, dont forget to create a user and give them a role based on the defined roles in broker.xml.

package com.edw.jms;

import org.apache.activemq.artemis.core.config.impl.SecurityConfiguration;
import org.apache.activemq.artemis.core.server.embedded.EmbeddedActiveMQ;
import org.apache.activemq.artemis.spi.core.security.ActiveMQJAASSecurityManager;
import org.apache.activemq.artemis.spi.core.security.jaas.InVMLoginModule;
import org.junit.jupiter.api.*;
import org.springframework.beans.factory.annotation.Autowired;
import org.springframework.boot.test.context.SpringBootTest;

@SpringBootTest
public class JMSServiceTest {

    @Autowired
    private JMSService jmsService;

    private static EmbeddedActiveMQ embedded = new EmbeddedActiveMQ();

    @BeforeAll
    public static void before() throws Exception {
        SecurityConfiguration configuration = new SecurityConfiguration();
        configuration.addUser("user", "password");
        configuration.addRole("user", "admin");

        final ActiveMQJAASSecurityManager securityManager = new ActiveMQJAASSecurityManager (InVMLoginModule.class.getName(), configuration);

        embedded.setSecurityManager(securityManager);
        embedded.start();
    }

    @AfterAll
    public static void after() throws Exception {
        embedded.stop();
    }

    /**
     * send message to local embeddable jms, and read it.
     *
     * @throws Exception
     */
    @Test
    @DisplayName("This test is to check if a valid message is being sent to MQ thru JMS is success, and we can read it after")
    public void sendJMSData_expectSuccess() throws Exception {
        Assertions.assertDoesNotThrow(()-> jmsService.send("trysmething"));
        Thread.sleep(2000);
        Assertions.assertEquals("trysmething", jmsService.read());
    }

}

Run the test cases by using below command,

$ mvn clean package -s settings.xml

And for the full code for this article can be found here,

https://github.com/edwin/embeddable-artemis-server-and-junit-5