Programming

basic programming

How to Use S2I to Deploy Dockerfile to Openshift Container Platform

Lets say i have a Java application,

<?xml version="1.0" encoding="UTF-8"?>
<project xmlns="http://maven.apache.org/POM/4.0.0"
         xmlns:xsi="http://www.w3.org/2001/XMLSchema-instance"
         xsi:schemaLocation="http://maven.apache.org/POM/4.0.0 http://maven.apache.org/xsd/maven-4.0.0.xsd">
    <modelVersion>4.0.0</modelVersion>

    <groupId>com.edw</groupId>
    <artifactId>hello-world-containerized-quarkus-on-jvm</artifactId>
    <version>1.0-SNAPSHOT</version>

    <properties>
        <compiler-plugin.version>3.15.0</compiler-plugin.version>
        <maven.compiler.release>21</maven.compiler.release>
        <project.build.sourceEncoding>UTF-8</project.build.sourceEncoding>
        <project.reporting.outputEncoding>UTF-8</project.reporting.outputEncoding>
        <quarkus.platform.artifact-id>quarkus-bom</quarkus.platform.artifact-id>
        <quarkus.platform.group-id>io.quarkus.platform</quarkus.platform.group-id>
        <quarkus.platform.version>3.39.2</quarkus.platform.version>
        <skipITs>true</skipITs>
        <surefire-plugin.version>3.5.6</surefire-plugin.version>
    </properties>

    <dependencyManagement>
        <dependencies>
            <dependency>
                <groupId>${quarkus.platform.group-id}</groupId>
                <artifactId>${quarkus.platform.artifact-id}</artifactId>
                <version>${quarkus.platform.version}</version>
                <type>pom</type>
                <scope>import</scope>
            </dependency>
        </dependencies>
    </dependencyManagement>

    <dependencies>
        <dependency>
            <groupId>io.quarkus</groupId>
            <artifactId>quarkus-arc</artifactId>
        </dependency>
        <dependency>
            <groupId>io.quarkus</groupId>
            <artifactId>quarkus-rest</artifactId>
        </dependency>
        <dependency>
            <groupId>io.quarkus</groupId>
            <artifactId>quarkus-junit</artifactId>
            <scope>test</scope>
        </dependency>
        <dependency>
            <groupId>io.rest-assured</groupId>
            <artifactId>rest-assured</artifactId>
            <scope>test</scope>
        </dependency>
    </dependencies>

    <build>
        <plugins>
            <plugin>
                <groupId>${quarkus.platform.group-id}</groupId>
                <artifactId>quarkus-maven-plugin</artifactId>
                <version>${quarkus.platform.version}</version>
                <extensions>true</extensions>
                <executions>
                    <execution>
                        <goals>
                            <goal>build</goal>
                            <goal>generate-code</goal>
                            <goal>generate-code-tests</goal>
                        </goals>
                    </execution>
                </executions>
            </plugin>
            <plugin>
                <artifactId>maven-compiler-plugin</artifactId>
                <version>${compiler-plugin.version}</version>
                <configuration>
                    <parameters>true</parameters>
                </configuration>
            </plugin>
            <plugin>
                <artifactId>maven-surefire-plugin</artifactId>
                <version>${surefire-plugin.version}</version>
                <configuration>
                    <argLine>@{argLine}</argLine>
                    <systemPropertyVariables>
                        <java.util.logging.manager>org.jboss.logmanager.LogManager</java.util.logging.manager>
                        <maven.home>${maven.home}</maven.home>
                    </systemPropertyVariables>
                </configuration>
            </plugin>
            <plugin>
                <artifactId>maven-failsafe-plugin</artifactId>
                <version>${surefire-plugin.version}</version>
                <executions>
                    <execution>
                        <goals>
                            <goal>integration-test</goal>
                            <goal>verify</goal>
                        </goals>
                    </execution>
                </executions>
                <configuration>
                    <argLine>@{argLine}</argLine>
                    <systemPropertyVariables>
                        <native.image.path>${project.build.directory}/${project.build.finalName}-runner</native.image.path>
                        <java.util.logging.manager>org.jboss.logmanager.LogManager</java.util.logging.manager>
                        <maven.home>${maven.home}</maven.home>
                    </systemPropertyVariables>
                </configuration>
            </plugin>
        </plugins>
    </build>

    <profiles>
        <profile>
            <id>native</id>
            <activation>
                <property>
                    <name>native</name>
                </property>
            </activation>
            <properties>
                <quarkus.package.jar.enabled>false</quarkus.package.jar.enabled>
                <skipITs>false</skipITs>
                <quarkus.native.enabled>true</quarkus.native.enabled>
            </properties>
        </profile>
    </profiles>

</project>
package com.edw.controller;

import jakarta.ws.rs.GET;
import jakarta.ws.rs.Path;
import jakarta.ws.rs.Produces;
import jakarta.ws.rs.core.MediaType;
import jakarta.ws.rs.core.Response;

import java.util.HashMap;

@Path("/")
public class IndexController {
    @GET
    @Produces(MediaType.APPLICATION_JSON)
    public Response index() {
        return Response.ok(new HashMap(){{
                    put("hello", "world");
                }})
                .build();
    }
}

And a very simple Dockerfile for a multistage build, where we do a maven build there

## Stage 1 : build with maven builder image with native capabilities
FROM registry.redhat.io/ubi9/openjdk-21:1.24 AS build
COPY --chown=185 --chmod=0755 mvnw /code/mvnw
COPY --chown=185 .mvn /code/.mvn
COPY --chown=185 pom.xml /code/
USER 185
WORKDIR /code
COPY src /code/src
RUN ./mvnw clean package


## Stage 2 : create the docker final image
FROM registry.access.redhat.com/ubi9/openjdk-21-runtime:1.24

LABEL BASE_IMAGE="registry.access.redhat.com/ubi9/openjdk-21-runtime:1.24"
LABEL JAVA_VERSION="21"

ENV LANGUAGE='en_US:en'
ENV TZ='Asia/Jakarta'

ENV JAVA_OPTS_APPEND="-Dquarkus.http.host=0.0.0.0 -Djava.util.logging.manager=org.jboss.logmanager.LogManager -XX:TieredStopAtLevel=1 -noverify -XX:+AlwaysPreTouch -XX:+UseNUMA -Xlog:gc*,safepoint=debug:file=/tmp/gc.log.%p:time,uptime:filecount=5,filesize=50M -XX:+HeapDumpOnOutOfMemoryError -XX:HeapDumpPath=/tmp/"
ENV JAVA_APP_JAR="/deployments/quarkus-run.jar"
ENV GC_CONTAINER_OPTIONS="-XX:+UseShenandoahGC"

COPY --from=build --chown=185 /code/target/quarkus-app/lib/ /deployments/lib/
COPY --from=build --chown=185 /code/target/quarkus-app/*.jar /deployments/
COPY --from=build --chown=185 /code/target/quarkus-app/app/ /deployments/app/
COPY --from=build --chown=185 /code/target/quarkus-app/quarkus/ /deployments/quarkus/

EXPOSE 8080
USER 185

ENTRYPOINT [ "/opt/jboss/container/java/run/run-java.sh" ]

This is the project structure,

$ tree
.
- Dockerfile
- mvnw
- pom.xml
- readme.md
- src
    + main
        + java
        |   + com
        |       + edw
        |           + controller
        |               + IndexController.java
        + resources
            + application.properties

We can use the below command to build this Dockerfile inside Openshift,

$ oc new-build --strategy docker --binary \ 
	--name hello-world-containerized-quarkus-on-jvm
    
	* A Docker build using binary input will be created
      * The resulting image will be pushed to image stream tag "hello-world-containerized-quarkus-on-jvm:latest"
      * A binary build was created, use 'oc start-build --from-dir' to trigger a new build

--> Creating resources with label build=hello-world-containerized-quarkus-on-jvm ...
    imagestream.image.openshift.io "hello-world-containerized-quarkus-on-jvm" created
    buildconfig.build.openshift.io "hello-world-containerized-quarkus-on-jvm" created
--> Success


$ oc start-build hello-world-containerized-quarkus-on-jvm \
	--from-dir . --follow
	
Uploading directory "." as binary input for the build ...
..........
Uploading finished
build.build.openshift.io/hello-world-containerized-quarkus-on-jvm-1 started
Receiving source from STDIN as archive ...
time="2026-09-12T08:10:52Z" level=info msg="Not using native diff for overlay, this may cause degraded performance for building images: kernel has CONFIG_OVERLAY_FS_REDIRECT_DIR enabled"
I0912 08:10:52.582538       1 defaults.go:112] Defaulting to storage driver "overlay" with options [mountopt=metacopy=on].
Caching blobs under "/var/cache/blobs".

.....

Pushing image image-registry.openshift-image-registry.svc:5000/api/hello-world-containerized-quarkus-on-jvm:latest ...
Getting image source signatures
Copying blob sha256:b8969f72c7c3e136de5b0da7xx354ab8c17d19792f4149091e7141cfad15xxxx
Copying config sha256:132e66ed9a99d36f7cd493xxc7158a19235665e71914157ec7d4f2cfc9xxxx
Writing manifest to image destination
Successfully pushed image-registry.openshift-image-registry.svc:5000/api/hello-world-containerized-quarkus-on-jvm@sha256:f466627c0e10aad58037e3059b5f8d15bf9d8e26d9c2c2a60f09be9a98999e39
Push successful


$ oc new-app --name hello-world-containerized-quarkus-on-jvm \ 
	--image-stream=api/hello-world-containerized-quarkus-on-jvm:latest
	
--> Found image 132e66e (28 minutes old) in image stream "api/hello-world-containerized-quarkus-on-jvm" under tag "latest" for "api/hello-world-containerized-quarkus-on-jvm:latest"

    Java Applications
    -----------------
    Platform for running plain Java applications (fat-jar and flat classpath)

    Tags: java


--> Creating resources ...
    deployment.apps "hello-world-containerized-quarkus-on-jvm" created
    service "hello-world-containerized-quarkus-on-jvm" created
--> Success
    Application is not exposed. You can expose services to the outside world by executing one or more of the commands below:
     'oc expose service/hello-world-containerized-quarkus-on-jvm'
    Run 'oc status' to view your app.

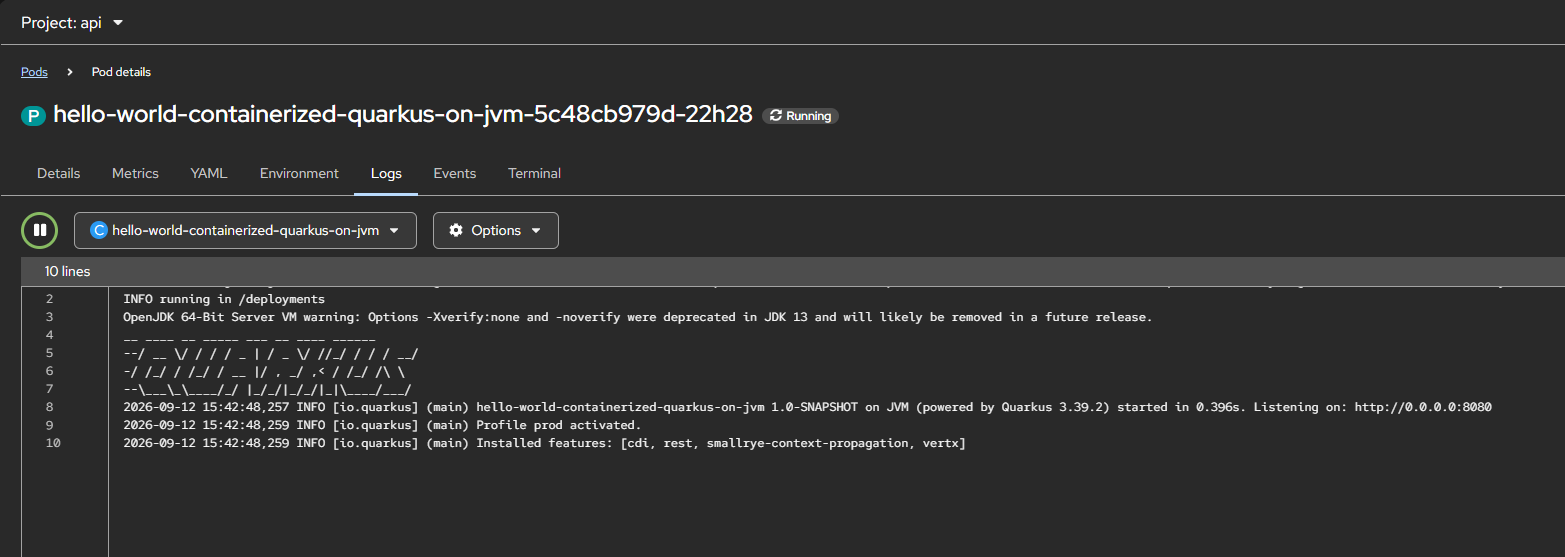
And we can see that our application is deployed successfully,

Source code for this project can be accessed here,

https://github.com/edwin/hello-world-containerized-quarkus-on-jvm

Creating a Sample Distributable WAR File for JBoss EAP 8.1

JBoss EAP 8.1 supports HTTP session clustering, replicating a session across multiple JBoss EAP instances. This post won’t go deep into configuring the cluster itself, instead it focuses on the application side. Here’s a minimal WAR file you can deploy to an already-clustered JBoss EAP 8.1 environment to verify that session replication is working.

Below is my pom.xml

<?xml version="1.0" encoding="UTF-8"?>
<project xmlns="http://maven.apache.org/POM/4.0.0"
         xmlns:xsi="http://www.w3.org/2001/XMLSchema-instance"
         xsi:schemaLocation="http://maven.apache.org/POM/4.0.0 http://maven.apache.org/xsd/maven-4.0.0.xsd">
    <modelVersion>4.0.0</modelVersion>

    <groupId>com.edw</groupId>
    <artifactId>jboss-eap-distributable</artifactId>
    <version>1.0-SNAPSHOT</version>
    <packaging>war</packaging>

    <properties>
        <maven.compiler.source>21</maven.compiler.source>
        <maven.compiler.target>21</maven.compiler.target>
        <project.build.sourceEncoding>UTF-8</project.build.sourceEncoding>
        <failOnMissingWebXml>false</failOnMissingWebXml>
    </properties>

    <dependencyManagement>
        <dependencies>
            <dependency>
                <groupId>org.jboss.bom</groupId>
                <artifactId>jboss-eap-ee</artifactId>
                <version>8.1.0.GA-redhat-00001</version>
                <type>pom</type>
                <scope>import</scope>
            </dependency>
        </dependencies>
    </dependencyManagement>

    <dependencies>
        <dependency>
            <groupId>jakarta.servlet</groupId>
            <artifactId>jakarta.servlet-api</artifactId>
            <scope>provided</scope>
        </dependency>
    </dependencies>

    <build>
        <finalName>${project.artifactId}</finalName>
        <plugins>
            <plugin>
                <groupId>org.apache.maven.plugins</groupId>
                <artifactId>maven-war-plugin</artifactId>
                <version>3.3.2</version>
            </plugin>
        </plugins>
    </build>

</project>

And web.xml

<?xml version="1.0" encoding="UTF-8"?>
<web-app xmlns="https://jakarta.ee/xml/ns/jakartaee"
         xmlns:xsi="http://www.w3.org/2001/XMLSchema-instance"
         xsi:schemaLocation="https://jakarta.ee/xml/ns/jakartaee https://jakarta.ee/xml/ns/jakartaee/web-app_6_0.xsd"
         version="6.0">

    <display-name>JBoss EAP Distributable Hello World</display-name>

    <distributable/>

</web-app>

The element is what tells EAP this webapp’s sessions are eligible for replication across the cluster.

This is my Java file which i use,

package com.edw;

import jakarta.servlet.ServletException;
import jakarta.servlet.annotation.WebServlet;
import jakarta.servlet.http.HttpServlet;
import jakarta.servlet.http.HttpServletRequest;
import jakarta.servlet.http.HttpServletResponse;
import jakarta.servlet.http.HttpSession;
import java.io.IOException;
import java.io.PrintWriter;
import java.util.Date;

@WebServlet("/hello")
public class HelloWorldServlet extends HttpServlet {

    private static final String COUNT_KEY = "count";

    @Override
    protected void doGet(HttpServletRequest req, HttpServletResponse resp) throws ServletException, IOException {
        HttpSession session = req.getSession(true);
        Integer count = (Integer) session.getAttribute(COUNT_KEY);
        if (count == null) {
            count = 0;
        }
        count++;
        session.setAttribute(COUNT_KEY, count);

        resp.setContentType("text/html");
        PrintWriter out = resp.getWriter();
        out.println("<html><body>");
        out.println("<h1>Hello World!</h1>");
        out.println("<p>This application is cluster-aware (distributable).</p>");
        out.println("<p>Session ID: " + session.getId() + "</p>");
        out.println("<p>Session Count: " + count + "</p>");
        out.println("<p>Server Time: " + new Date() + "</p>");
        out.println("<p>Check your server logs to see session replication in action if running in a cluster.</p>");
        out.println("</body></html>");
    }
}

Once we have deployed this WAR to a cluster, say two EAP instances at 192.168.5.180 and 192.168.5.181, we can confirm the session is being replicated by reusing the same cookie jar across both nodes,

$ curl -kv http://192.168.5.180:8080/jboss-eap-distributable/hello -c cookies.txt -b cookies.txt

$ curl -kv http://192.168.5.181:8080/jboss-eap-distributable/hello -c cookies.txt -b cookies.txt

If clustering is configured correctly, the second request should return the same session ID and an incremented session count, even though it hit a different node. If the session ID changes or the count resets to 1, that’s a sign session replication (or your load balancer’s sticky-session config) isn’t working as expected.

The whole source code for this project can be seen on the below repository,

https://github.com/edwin/jboss-eap-distributable

Creating a Self-Signed Certificate on JBoss EAP 8.1

There are times when we want our JBoss EAP instances to be accessed via a secure connection (HTTPS) instead of plain, insecure HTTP. The fastest way to achieve this in a development or testing environment is to generate and apply a self-signed certificate.

First, let’s create the self-signed certificate. Be sure to replace your-hostname and your-ipaddress with the actual details of your JBoss EAP server:

$ keytool -genkeypair -alias server \ 
	-keyalg RSA -keysize 4096 -sigalg SHA256withRSA \ 
	-validity 3650 -storetype PKCS12 -keystore keystore.p12 \ 
	-storepass password -keypass password \ 
	-dname "CN=jboss,OU=RH,O=Edwin,C=ID" -ext SAN=dns:your-hostname,ip:your-ipaddress

This command generates a keystore.p12 file. Move this file into your JBOSS_HOME/standalone/configuration/ directory.

Next, we need to reference this new keystore in our standalone.xml. Locate the section within the elytron subsystem and update the applicationKS definition to point to your new keystore.p12 file:

<tls>
	<key-stores>
		<key-store name="applicationKS">
			<credential-reference clear-text="password"/>
			<implementation type="PKCS12"/>
			<file path="keystore.p12" relative-to="jboss.server.config.dir"/>
		</key-store>
	</key-stores>
	
	<key-managers>
		<key-manager name="applicationKM" key-store="applicationKS">
			<credential-reference clear-text="password"/>
		</key-manager>
	</key-managers>
	
	<server-ssl-contexts>
		<server-ssl-context name="applicationSSC" key-manager="applicationKM"/>
	</server-ssl-contexts>
</tls>

Start your JBoss EAP and see whether JBoss EAP is leveraging our certificate or not by using a curl command,

$ curl -Ikv https://localhost:8443
* Host localhost:8443 was resolved.
* IPv6: ::1
* IPv4: 127.0.0.1
*   Trying [::1]:8443...
* connect to ::1 port 8443 from ::1 port 40968 failed: Connection refused
*   Trying 127.0.0.1:8443...
* ALPN: curl offers h2,http/1.1
* TLSv1.3 (OUT), TLS handshake, Client hello (1):
* TLSv1.3 (IN), TLS handshake, Server hello (2):
* TLSv1.2 (IN), TLS handshake, Certificate (11):
* TLSv1.2 (IN), TLS handshake, Server key exchange (12):
* TLSv1.2 (IN), TLS handshake, Server finished (14):
* TLSv1.2 (OUT), TLS handshake, Client key exchange (16):
* TLSv1.2 (OUT), TLS change cipher, Change cipher spec (1):
* TLSv1.2 (OUT), TLS handshake, Finished (20):
* TLSv1.2 (IN), TLS handshake, Finished (20):
* SSL connection using TLSv1.2 / ECDHE-RSA-AES256-GCM-SHA384 / x25519 / RSASSA-PSS
* ALPN: server accepted h2
* Server certificate:
*  subject: C=ID; O=Edwin; OU=RH; CN=jboss
*  start date: Jul 27 12:42:48 2026 GMT
*  expire date: Jul 24 12:42:48 2036 GMT
*  issuer: C=ID; O=Edwin; OU=RH; CN=jboss
*  SSL certificate verify result: self-signed certificate (18), continuing anyway.
*   Certificate level 0: Public key type RSA (4096/152 Bits/secBits), signed using sha256WithRSAEncryption
* Connected to localhost (127.0.0.1) port 8443
* using HTTP/2
* [HTTP/2] [1] OPENED stream for https://localhost:8443/
* [HTTP/2] [1] [:method: HEAD]
* [HTTP/2] [1] [:scheme: https]
* [HTTP/2] [1] [:authority: localhost:8443]
* [HTTP/2] [1] [:path: /]
* [HTTP/2] [1] [user-agent: curl/8.15.0]
* [HTTP/2] [1] [accept: */*]
> HEAD / HTTP/2
> Host: localhost:8443
> User-Agent: curl/8.15.0
> Accept: */*
>
* Request completely sent off
< HTTP/2 200
HTTP/2 200
< last-modified: Tue, 29 Jul 2025 01:49:24 GMT
last-modified: Tue, 29 Jul 2025 01:49:24 GMT
< content-length: 1720
content-length: 1720
< content-type: text/html
content-type: text/html
< accept-ranges: bytes
accept-ranges: bytes
< date: Mon, 27 Jul 2026 12:50:15 GMT
date: Mon, 27 Jul 2026 12:50:15 GMT
<

JBoss EAP 8.1 Daily and Size-Based Rolling File Logging

I recently had a requirement to configure JBoss logging to rotate both on a daily basis and by file size. The goal was to generate an output structure that looks like this

server.log.2026-06-24.3
server.log.2026-06-24.2
server.log.2026-06-24.1
server.log

To achieve this, I use the in my JBoss configuration. Here is the XML snippet:

        <subsystem xmlns="urn:jboss:domain:logging:8.0">

			<periodic-size-rotating-file-handler name="DAILY_SIZE_FILE" autoflush="true">
				<formatter>
					<named-formatter name="PATTERN"/>
				</formatter>
				<file relative-to="jboss.server.log.dir" path="server.log"/>
				<suffix value=".yyyy-MM-dd"/>
				<rotate-size value="200m"/>
				<max-backup-index value="30"/>
				<append value="true"/>
			</periodic-size-rotating-file-handler>
			
            <root-logger>
                <level name="INFO"/>
                <handlers>
                    <handler name="DAILY_SIZE_FILE"/>
                </handlers>
            </root-logger>

        </subsystem>

The configuration above perfectly combines both strategies. It performs a daily log rotation, but it will also trigger the creation of a newly indexed log file whenever the current file size exceeds 200MB within that same day.

Infinispan Deployment.YAML on OpenShift Container Platform

Deploying Infinispan to OpenShift can be done easily by using either Operator or Helm chart. However, there is an even easier way to deploy it, and that is by using a single YAML file.

---
kind: Deployment
apiVersion: apps/v1
metadata:
  name: infinispan
  namespace: cache
  labels:
    app: infinispan
spec:
  replicas: 1
  selector:
    matchLabels:
      app: infinispan
  template:
    metadata:
      labels:
        app: infinispan
    spec:
      volumes:
        - name: data-volume
          persistentVolumeClaim:
            claimName: ispn-pv
      containers:
        - name: infinispan
          image: 'quay.io/infinispan/server:16.1'
          imagePullPolicy: IfNotPresent
          resources:
            limits:
              memory: 1Gi
            requests:
              memory: 1Gi
          env:
            - name: USER
              value: admin
            - name: PASS
              value: password
          ports:
            - name: infinispan
              containerPort: 11222
              protocol: TCP
          volumeMounts:
            - name: data-volume
              mountPath: /opt/infinispan/server/data
---
kind: Service
apiVersion: v1
metadata:
  name: infinispan
  namespace: cache
spec:
  ports:
    - protocol: TCP
      port: 11222
      targetPort: 11222
  selector:
    app: infinispan
---
kind: PersistentVolumeClaim
apiVersion: v1
metadata:
  name: ispn-pv
  namespace: cache
spec:
  accessModes:
    - ReadWriteOnce
  resources:
    requests:
      storage: 1Gi
  volumeMode: Filesystem

We can deploy this single file directly to OpenShift and have it up and running in a few minutes. However this approach is perfect for local development, testing, or a quick proof-of-concept. If you intend to scale Infinispan into a multi-node distributed cluster for production, you should migrate this configuration to a StatefulSet or leverage the official Infinispan Operator to handle cluster discovery and data replication.