How to Use S2I to Deploy Dockerfile to Openshift Container Platform
Lets say i have a Java application,
<?xml version="1.0" encoding="UTF-8"?>
<project xmlns="http://maven.apache.org/POM/4.0.0"
         xmlns:xsi="http://www.w3.org/2001/XMLSchema-instance"
         xsi:schemaLocation="http://maven.apache.org/POM/4.0.0 http://maven.apache.org/xsd/maven-4.0.0.xsd">
    <modelVersion>4.0.0</modelVersion>

    <groupId>com.edw</groupId>
    <artifactId>hello-world-containerized-quarkus-on-jvm</artifactId>
    <version>1.0-SNAPSHOT</version>

    <properties>
        <compiler-plugin.version>3.15.0</compiler-plugin.version>
        <maven.compiler.release>21</maven.compiler.release>
        <project.build.sourceEncoding>UTF-8</project.build.sourceEncoding>
        <project.reporting.outputEncoding>UTF-8</project.reporting.outputEncoding>
        <quarkus.platform.artifact-id>quarkus-bom</quarkus.platform.artifact-id>
        <quarkus.platform.group-id>io.quarkus.platform</quarkus.platform.group-id>
        <quarkus.platform.version>3.39.2</quarkus.platform.version>
        <skipITs>true</skipITs>
        <surefire-plugin.version>3.5.6</surefire-plugin.version>
    </properties>

    <dependencyManagement>
        <dependencies>
            <dependency>
                <groupId>${quarkus.platform.group-id}</groupId>
                <artifactId>${quarkus.platform.artifact-id}</artifactId>
                <version>${quarkus.platform.version}</version>
                <type>pom</type>
                <scope>import</scope>
            </dependency>
        </dependencies>
    </dependencyManagement>

    <dependencies>
        <dependency>
            <groupId>io.quarkus</groupId>
            <artifactId>quarkus-arc</artifactId>
        </dependency>
        <dependency>
            <groupId>io.quarkus</groupId>
            <artifactId>quarkus-rest</artifactId>
        </dependency>
        <dependency>
            <groupId>io.quarkus</groupId>
            <artifactId>quarkus-junit</artifactId>
            <scope>test</scope>
        </dependency>
        <dependency>
            <groupId>io.rest-assured</groupId>
            <artifactId>rest-assured</artifactId>
            <scope>test</scope>
        </dependency>
    </dependencies>

    <build>
        <plugins>
            <plugin>
                <groupId>${quarkus.platform.group-id}</groupId>
                <artifactId>quarkus-maven-plugin</artifactId>
                <version>${quarkus.platform.version}</version>
                <extensions>true</extensions>
                <executions>
                    <execution>
                        <goals>
                            <goal>build</goal>
                            <goal>generate-code</goal>
                            <goal>generate-code-tests</goal>
                        </goals>
                    </execution>
                </executions>
            </plugin>
            <plugin>
                <artifactId>maven-compiler-plugin</artifactId>
                <version>${compiler-plugin.version}</version>
                <configuration>
                    <parameters>true</parameters>
                </configuration>
            </plugin>
            <plugin>
                <artifactId>maven-surefire-plugin</artifactId>
                <version>${surefire-plugin.version}</version>
                <configuration>
                    <argLine>@{argLine}</argLine>
                    <systemPropertyVariables>
                        <java.util.logging.manager>org.jboss.logmanager.LogManager</java.util.logging.manager>
                        <maven.home>${maven.home}</maven.home>
                    </systemPropertyVariables>
                </configuration>
            </plugin>
            <plugin>
                <artifactId>maven-failsafe-plugin</artifactId>
                <version>${surefire-plugin.version}</version>
                <executions>
                    <execution>
                        <goals>
                            <goal>integration-test</goal>
                            <goal>verify</goal>
                        </goals>
                    </execution>
                </executions>
                <configuration>
                    <argLine>@{argLine}</argLine>
                    <systemPropertyVariables>
                        <native.image.path>${project.build.directory}/${project.build.finalName}-runner</native.image.path>
                        <java.util.logging.manager>org.jboss.logmanager.LogManager</java.util.logging.manager>
                        <maven.home>${maven.home}</maven.home>
                    </systemPropertyVariables>
                </configuration>
            </plugin>
        </plugins>
    </build>

    <profiles>
        <profile>
            <id>native</id>
            <activation>
                <property>
                    <name>native</name>
                </property>
            </activation>
            <properties>
                <quarkus.package.jar.enabled>false</quarkus.package.jar.enabled>
                <skipITs>false</skipITs>
                <quarkus.native.enabled>true</quarkus.native.enabled>
            </properties>
        </profile>
    </profiles>

</project>
package com.edw.controller;

import jakarta.ws.rs.GET;
import jakarta.ws.rs.Path;
import jakarta.ws.rs.Produces;
import jakarta.ws.rs.core.MediaType;
import jakarta.ws.rs.core.Response;

import java.util.HashMap;

@Path("/")
public class IndexController {
    @GET
    @Produces(MediaType.APPLICATION_JSON)
    public Response index() {
        return Response.ok(new HashMap(){{
                    put("hello", "world");
                }})
                .build();
    }
}
And a very simple Dockerfile for a multistage build, where we do a maven build there
## Stage 1 : build with maven builder image with native capabilities
FROM registry.redhat.io/ubi9/openjdk-21:1.24 AS build
COPY --chown=185 --chmod=0755 mvnw /code/mvnw
COPY --chown=185 .mvn /code/.mvn
COPY --chown=185 pom.xml /code/
USER 185
WORKDIR /code
COPY src /code/src
RUN ./mvnw clean package


## Stage 2 : create the docker final image
FROM registry.access.redhat.com/ubi9/openjdk-21-runtime:1.24

LABEL BASE_IMAGE="registry.access.redhat.com/ubi9/openjdk-21-runtime:1.24"
LABEL JAVA_VERSION="21"

ENV LANGUAGE='en_US:en'
ENV TZ='Asia/Jakarta'

ENV JAVA_OPTS_APPEND="-Dquarkus.http.host=0.0.0.0 -Djava.util.logging.manager=org.jboss.logmanager.LogManager -XX:TieredStopAtLevel=1 -noverify -XX:+AlwaysPreTouch -XX:+UseNUMA -Xlog:gc*,safepoint=debug:file=/tmp/gc.log.%p:time,uptime:filecount=5,filesize=50M -XX:+HeapDumpOnOutOfMemoryError -XX:HeapDumpPath=/tmp/"
ENV JAVA_APP_JAR="/deployments/quarkus-run.jar"
ENV GC_CONTAINER_OPTIONS="-XX:+UseShenandoahGC"

COPY --from=build --chown=185 /code/target/quarkus-app/lib/ /deployments/lib/
COPY --from=build --chown=185 /code/target/quarkus-app/*.jar /deployments/
COPY --from=build --chown=185 /code/target/quarkus-app/app/ /deployments/app/
COPY --from=build --chown=185 /code/target/quarkus-app/quarkus/ /deployments/quarkus/

EXPOSE 8080
USER 185

ENTRYPOINT [ "/opt/jboss/container/java/run/run-java.sh" ]
This is the project structure,
$ tree
.
- Dockerfile
- mvnw
- pom.xml
- readme.md
- src
    + main
        + java
        |   + com
        |       + edw
        |           + controller
        |               + IndexController.java
        + resources
            + application.properties
We can use the below command to build this Dockerfile inside Openshift,
$ oc new-build --strategy docker --binary \
	--name hello-world-containerized-quarkus-on-jvm

	* A Docker build using binary input will be created
      * The resulting image will be pushed to image stream tag "hello-world-containerized-quarkus-on-jvm:latest"
      * A binary build was created, use 'oc start-build --from-dir' to trigger a new build

--> Creating resources with label build=hello-world-containerized-quarkus-on-jvm ...
    imagestream.image.openshift.io "hello-world-containerized-quarkus-on-jvm" created
    buildconfig.build.openshift.io "hello-world-containerized-quarkus-on-jvm" created
--> Success


$ oc start-build hello-world-containerized-quarkus-on-jvm \
	--from-dir . --follow

Uploading directory "." as binary input for the build ...
..........
Uploading finished
build.build.openshift.io/hello-world-containerized-quarkus-on-jvm-1 started
Receiving source from STDIN as archive ...
time="2026-09-12T08:10:52Z" level=info msg="Not using native diff for overlay, this may cause degraded performance for building images: kernel has CONFIG_OVERLAY_FS_REDIRECT_DIR enabled"
I0912 08:10:52.582538       1 defaults.go:112] Defaulting to storage driver "overlay" with options [mountopt=metacopy=on].
Caching blobs under "/var/cache/blobs".

.....

Pushing image image-registry.openshift-image-registry.svc:5000/api/hello-world-containerized-quarkus-on-jvm:latest ...
Getting image source signatures
Copying blob sha256:b8969f72c7c3e136de5b0da7xx354ab8c17d19792f4149091e7141cfad15xxxx
Copying config sha256:132e66ed9a99d36f7cd493xxc7158a19235665e71914157ec7d4f2cfc9xxxx
Writing manifest to image destination
Successfully pushed image-registry.openshift-image-registry.svc:5000/api/hello-world-containerized-quarkus-on-jvm@sha256:f466627c0e10aad58037e3059b5f8d15bf9d8e26d9c2c2a60f09be9a98999e39
Push successful


$ oc new-app --name hello-world-containerized-quarkus-on-jvm \
	--image-stream=api/hello-world-containerized-quarkus-on-jvm:latest

--> Found image 132e66e (28 minutes old) in image stream "api/hello-world-containerized-quarkus-on-jvm" under tag "latest" for "api/hello-world-containerized-quarkus-on-jvm:latest"

    Java Applications
    -----------------
    Platform for running plain Java applications (fat-jar and flat classpath)

    Tags: java


--> Creating resources ...
    deployment.apps "hello-world-containerized-quarkus-on-jvm" created
    service "hello-world-containerized-quarkus-on-jvm" created
--> Success
    Application is not exposed. You can expose services to the outside world by executing one or more of the commands below:
     'oc expose service/hello-world-containerized-quarkus-on-jvm'
    Run 'oc status' to view your app.
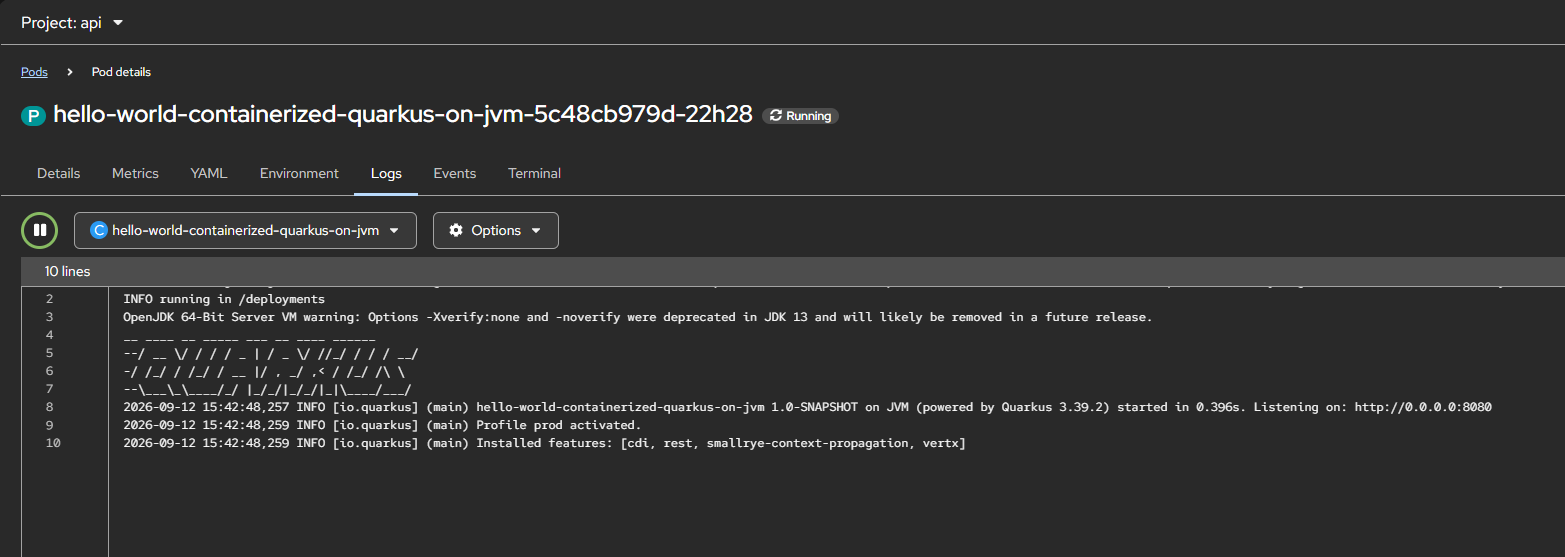
And we can see that our application is deployed successfully,
Source code for this project can be accessed here,
https://github.com/edwin/hello-world-containerized-quarkus-on-jvm