openshift

Blacklist a Specific Application URL on Openshift using Route

Sometimes we want to hide a sensitive URLs such as our prometheus or even Spring Boot’s actuator from external world, but we still want those URL to be accesible within internal cluster. Basically there are multiple ways of doing that, such as blocking it from Firewall, rewrite from Reverse Proxy, or even doing blacklisting from application level.

One thing that i want to try is to do blacklisting from Openshift Route level, which is something doable by the DevOps team since it is still within platform level.

So for this example, i want to expose all my API to external world except for actuator endpoint which can only be consume within internal network. So lets start with a sample Kubernetes Service Yaml,

kind: Service
apiVersion: v1
metadata:
  name: catalogue-service
  namespace: edwin-ns
  labels:
    app: catalogue-service
    app.kubernetes.io/component: catalogue-service
    app.kubernetes.io/instance: catalogue-service
    app.kubernetes.io/name: catalogue-service
    app.kubernetes.io/part-of: sample-app
    app.openshift.io/runtime-version: latest
  annotations:
    openshift.io/generated-by: OpenShiftWebConsole
spec:
  ports:
    - name: 8080-tcp
      protocol: TCP
      port: 8080
      targetPort: 8080
  internalTrafficPolicy: Cluster
  type: ClusterIP
  ipFamilyPolicy: SingleStack
  sessionAffinity: None
  selector:
    app: catalogue-service
    deploymentconfig: catalogue-service

And i want to expose above Service into a specific URL by using Route,

kind: Route
apiVersion: route.openshift.io/v1
metadata:
  name: catalogue-service
  namespace: edwin-ns
  labels:
    app: catalogue-service
    app.kubernetes.io/component: catalogue-service
    app.kubernetes.io/instance: catalogue-service
    app.kubernetes.io/name: catalogue-service
    app.kubernetes.io/part-of: sample-app
    app.openshift.io/runtime-version: latest
  annotations:
    openshift.io/host.generated: 'true'
spec:
  host: catalogue-service-edwin-ns.apps.openshift.com
  to:
    kind: Service
    name: catalogue-service
    weight: 100
  port:
    targetPort: 8080-tcp
  tls:
    termination: edge
    insecureEdgeTerminationPolicy: Redirect
  wildcardPolicy: None

Above configuration means that everytime external users accessing catalogue-service-edwin-ns.apps.openshift.com, they are able to access catalogue-service application APIs thru its Kubernetes Service. If we want to block a specific URL, we need to create another Route yaml specifically for blocking it based on Path variable,

kind: Route
apiVersion: route.openshift.io/v1
metadata:
  name: catalogue-service-blocking-actuator
  namespace: edwin-ns
  labels:
    app: catalogue-service
    app.kubernetes.io/component: catalogue-service
    app.kubernetes.io/instance: catalogue-service
    app.kubernetes.io/name: catalogue-service
    app.kubernetes.io/part-of: sample-app
    app.openshift.io/runtime-version: latest
  annotations:
    haproxy.router.openshift.io/rewrite-target: /go-to-some-404-url
    openshift.io/host.generated: 'true'
spec:
  host: catalogue-service-edwin-ns.apps.openshift.com
  path: /actuator
  to:
    kind: Service
    name: catalogue-service
    weight: 100
  port:
    targetPort: 8080-tcp
  tls:
    termination: edge
    insecureEdgeTerminationPolicy: Redirect
  wildcardPolicy: None

Having those 2 YAML all together making sure that we are expose all APIs that are needed, excluding the actuator URL which we “rewrite” into some 404 url.
Dockerfile for Deploying Applications in JBoss EAP 7.4, and on top of Openshift 4

Openshift have a different permission right because by default, any containers deployed in Openshift will gets a random user ID. Therefore it needs a specific approach when creating a containerized apps, especially in regards to folder access rights. A simple chmod or chown commands wont be sufficient enough for this purpose.

Long story short, we can use below Dockerfile to be use to deploy an existing war file into JBoss EAP base image and push the result into Openshift 4.

FROM registry.redhat.io/jboss-eap-7/eap74-openjdk11-openshift-rhel8

ENV DISABLE_EMBEDDED_JMS_BROKER=true

COPY target/*.war $JBOSS_HOME/standalone/deployments/

USER root
RUN chgrp -R 0 $JBOSS_HOME/standalone/deployments/ && \
	chmod -R g=u $JBOSS_HOME/standalone/deployments/
USER 185

EXPOSE 8080

Run below command to build the image, can use either Podman or Docker command for it.

$ podman build -t custom-app-name .

Canary Deployment with Openshift 4 Route

Doing a Canary deployment using Openshift is pretty much straight forward, where we can leverage Openshift’s Route feature to do routing to multiple different application versions.

Before we go far, we need to understand the difference between a Blue Green deployment, and Canary deployment. Basically in Blue Green deployment, we are having the same application but with 2 different version (blue and green version) and we can route all the request to either blue, or green version. So at Blue Green deployment, all the requests would go either to blue, or to green version.

But on Canary, it’s like Blue Green deployment but we can change the traffic percentage partially. For example 90percent of the traffic would go to blue version while 10percent go to green one.

For this demo, lets create two different apps. Both apps are using PHP, with a different content for simulating blue-green deployment.

First create our first PHP app,

$ mkdir php-hello-world-1

and create index.php file inside it

<?php
echo "<h2>We are at version one</h2>";
echo "Hello world!<br>";

Build it and deploy into Openshift

$ oc new-build --name=php-app-01 --image-stream=php:7.4-ubi8 --binary=true
$ oc start-build php-app-01  --from-dir=.
$ oc new-app php-app-01 --name=php-app-01

Next is creating our second PHP app,

$ mkdir php-hello-world-2

With index.php inside it,

<?php
echo "<h2>We are at version TWO</h2>";
echo "Hello world!<br>";

Build and deploy our second PHP app into Openshift

$ oc new-build --name=php-app-02 --image-stream=php:7.4-ubi8 --binary=true
$ oc start-build php-app-02  --from-dir=.
$ oc new-app php-app-02 --name=php-app-02

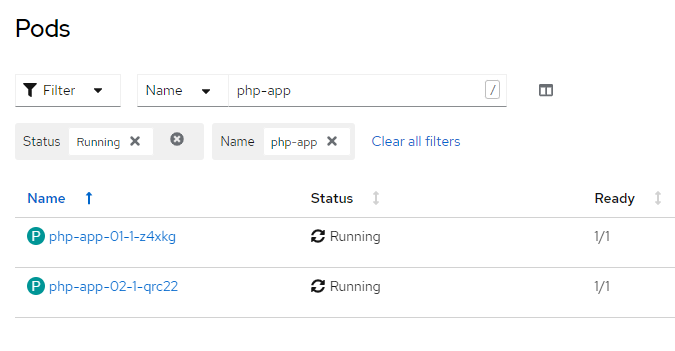
We can see the result on our Openshift dashboard

Now lets create a route,

$ oc create route edge --service php-app-01 php-app

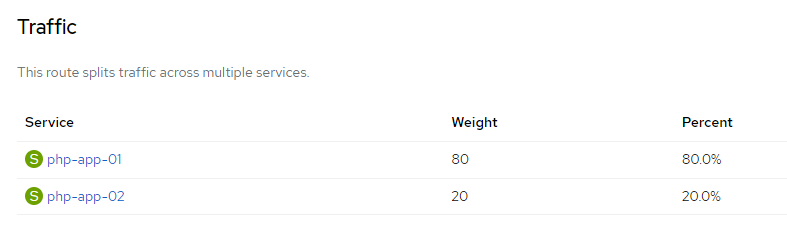
And split the route traffic, 80 percent goes to app version 1, and 20 percent goes to app version 2.

$ oc set route-backends php-app php-app-01=80 php-app-02=20

And check the result on Openshift dashboard,

Now, lets do curl testing to see whether request to that corresponding route are being distibuted into 2 different application version,

$ for i in `seq 1 20`; do curl -k https://php-app-route-url ;echo ; done
<h2>We are at version one</h2>Hello world!<br>
<h2>We are at version TWO</h2>Hello world!<br>
<h2>We are at version one</h2>Hello world!<br>
<h2>We are at version TWO</h2>Hello world!<br>
<h2>We are at version one</h2>Hello world!<br>
<h2>We are at version TWO</h2>Hello world!<br>
<h2>We are at version one</h2>Hello world!<br>
<h2>We are at version TWO</h2>Hello world!<br>

And we can see that 4 out of 20 request are being served from the second PHP application. For more testing, lets change the distribution weight

oc set route-backends php-app php-app-01=50 php-app-02=50

And do more testing,

$ for i in `seq 1 20`; do curl -k https://php-app-route-url ;echo ; done
<h2>We are at version one</h2>Hello world!<br>
<h2>We are at version TWO</h2>Hello world!<br>
<h2>We are at version one</h2>Hello world!<br>
<h2>We are at version TWO</h2>Hello world!<br>
<h2>We are at version one</h2>Hello world!<br>
<h2>We are at version TWO</h2>Hello world!<br>
<h2>We are at version one</h2>Hello world!<br>
<h2>We are at version TWO</h2>Hello world!<br>
<h2>We are at version one</h2>Hello world!<br>
<h2>We are at version TWO</h2>Hello world!<br>
<h2>We are at version one</h2>Hello world!<br>
<h2>We are at version TWO</h2>Hello world!<br>
<h2>We are at version one</h2>Hello world!<br>
<h2>We are at version TWO</h2>Hello world!<br>
<h2>We are at version one</h2>Hello world!<br>
<h2>We are at version TWO</h2>Hello world!<br>
<h2>We are at version one</h2>Hello world!<br>
<h2>We are at version TWO</h2>Hello world!<br>
<h2>We are at version one</h2>Hello world!<br>
<h2>We are at version TWO</h2>Hello world!<br>

And there we can see that requests are being split, half goes to version 1 and the rest goes to version 2.

List All Pod’s IP with a Specific Labels

In OpenShift or plain Kubernetes, we can have a multiple pods for a specific Deployment or DeploymentConfigs. But sometimes we want to know what are the IPs of those pods, lets say for a token refresh or cache refresh purpose.

Listing all pod’s IPs can be achieved by running below command,

$ kubectl get pods --output custom-columns=POD:.status.podIP \
	-l app=your-application-label --no-headers

It will gives a result of something like this,

10.128.6.66
10.128.5.181
10.130.2.12
10.131.7.74

Deploy a Spring Boot App with HTTPS by using JKS File into OpenShift 4

For this sample, im planning on creating a spring boot but with an SSL endpoint and deploy it to OpenShift 4 with a passthrough route.

So lets start with creating a JKS file, and put “password” as its password variable.

$ keytool -genkey -alias app-key -keyalg RSA -keystore app.jks

where for this example im using below variables for creating JKS file

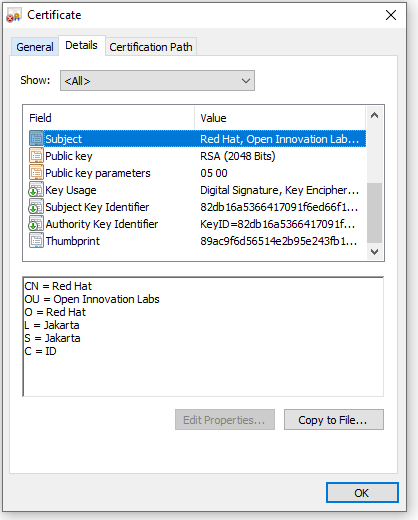
C=ID; ST=Jakarta; L=Jakarta; O=Red Hat; OU=Open Innovation Labs; CN=Red Hat

Now we start creating a spring boot app,

package com.redhat.openinnovationlabs.sample.jks;

import org.springframework.boot.SpringApplication;
import org.springframework.boot.autoconfigure.SpringBootApplication;

@SpringBootApplication
public class Application {
    public static void main(String[] args) {
        SpringApplication.run(Application.class, args);
    }
}
package com.redhat.openinnovationlabs.sample.jks.controller;

import org.springframework.web.bind.annotation.GetMapping;
import org.springframework.web.bind.annotation.RestController;

import java.util.HashMap;
import java.util.Map;

@RestController
public class HelloWorldController {
    @GetMapping("/")
    public Map index() {
        return new HashMap() {{
            put("hello", "world");
        }};
    }
}

Now is the most important thing, a properties file where we store all the configurations. For this sample, we would take the configurations from environment variables.

server.port=8443

server.ssl.enabled=true
server.ssl.key-alias=app-key
server.ssl.key-store-type=JKS
server.ssl.key-store-password=${JKS_PASSWORD}
server.ssl.key-store=file:${JKS_LOCATION}

Create a Dockerfile to create our java image

FROM openjdk:11.0.7-jre-slim-buster

LABEL base-image="openjdk:11.0.7-jre-slim-buster" \
      java-version="11.0.7" \
      purpose="Hello World with SSL, Java and Dockerfile"

MAINTAINER Muhammad Edwin < edwin at redhat dot com >

WORKDIR /deployments

COPY target/*.jar app.jar

USER 185

EXPOSE 8443

CMD ["java", "-jar","app.jar"]

And deploy it into OpenShift 4

$ oc new-build --strategy docker --binary \ 
	--docker-image openjdk:11.0.7-jre-slim-buster --name spring-boot-jks

$ oc start-build spring-boot-jks --from-dir . --follow

$ oc new-app --name=spring-boot-jks \ 
	--image-stream=test-project/spring-boot-jks:latest -n test-project

But apps will not work since it is missing a JKS file and some configurations. Therefore we need to create some Secrets in OpenShift 4 by using below command,

$ oc create secret generic spring-boot-jks-file --from-file app.jks

$ oc create secret generic spring-boot-secrets \
	--from-literal=JKS_PASSWORD=password \ 
	--from-literal=JKS_LOCATION=/tmp/jks/app.jks

And assign them into our apps,

$ oc set volume dc/spring-boot-jks --add \
	--name=spring-boot-jks-mnt --secret-name=spring-boot-jks-file \
	--mount-path=/tmp/jks/

$ oc set env dc/spring-boot-jks --from=secret/spring-boot-secrets

Expose our apps endpoint by using a passthrough Route

$ oc create route passthrough  --service spring-boot-jks --port=8443

And run some curl to our apps to see our application’s ssl configuration.

curl -kv https://<apps-ip>

* SSL connection using TLSv1.2 / ECDHE-RSA-AES256-GCM-SHA384
* ALPN, server did not agree to a protocol
* Server certificate:
*  subject: C=ID; ST=Jakarta; L=Jakarta; O=Red Hat; OU=Open Innovation Labs; CN=Red Hat
*  start date: Apr 11 12:27:14 2022 GMT
*  expire date: Jul 10 12:27:14 2022 GMT
*  issuer: C=ID; ST=Jakarta; L=Jakarta; O=Red Hat; OU=Open Innovation Labs; CN=Red Hat
*  SSL certificate verify result: self signed certificate (18), continuing anyway.

Code for this sample can be accessed here,

https://github.com/edwin/spring-boot-jks