Java

java

How to Fix “java.lang.IllegalArgumentException: Invalid characters (CR/LF) in header message”

Recently i met a weird exception when using a Rest API endpoint provided by Red Hat Fuse (or Apache Camel) and deployed on top of Spring Boot,

javax.servlet.ServletException: java.lang.IllegalArgumentException: 
Invalid characters (CR/LF) in header message
	at org.apache.camel.http.common.CamelServlet.doService(CamelServlet.java:235) 
~[camel-http-common-2.21.0.fuse-770013-redhat-00001.jar!/:2.21.0.fuse-770013-redhat-00001]
	at org.apache.camel.http.common.CamelServlet.service(CamelServlet.java:80) 
~[camel-http-common-2.21.0.fuse-770013-redhat-00001.jar!/:2.21.0.fuse-770013-redhat-00001]
	at javax.servlet.http.HttpServlet.service(HttpServlet.java:791) 
~[jboss-servlet-api_4.0_spec-1.0.0.Final.jar!/:1.0.0.Final]
	at io.undertow.servlet.handlers.ServletHandler.handleRequest(ServletHandler.java:74) 
~[undertow-servlet-2.0.30.SP1-redhat-00001.jar!/:2.0.30.SP1-redhat-00001]
	at io.undertow.servlet.handlers.FilterHandler$FilterChainImpl.doFilter(FilterHandler.java:129) 
~[undertow-servlet-2.0.30.SP1-redhat-00001.jar!/:2.0.30.SP1-redhat-00001]

It happens everytime im using below CURL command,

curl -kv -L -X POST https://url/api/  -H 'Authorization: Basic Yxxxx'  -H 'Content-Type: application/json'  
--data-raw '{
        "id": "123",
        "birthDate": "19900429"
    }'

The funny thing is, i think culprit is because i have a newline within my json body request. After i change my command into below CURL, it seems that everything is working well now.

curl -kv -L -X POST https://url/api/  -H 'Authorization: Basic Yxxxx'  -H 'Content-Type: application/json'  
--data-raw '{"id": "123","birthDate": "19900429"}'

Weird eh

Error user_session_not_found when Using Keycloak’s UserInfo API

Had this error on Keycloak console,

09:49:35,417 WARN  [org.keycloak.events] (default task-145) type=USER_INFO_REQUEST_ERROR, 
realmId=internal, clientId=my-client-id, userId=null, ipAddress=10.20.24.35, 
error=user_session_not_found, auth_method=validate_access_token

Basically it happens when a specific user hitting a UserInfo API request bringing their active JWT token. JWT token is generated after a user successfully login to Keycloak, either via Login page or Rest API, and to be used in their internal application.

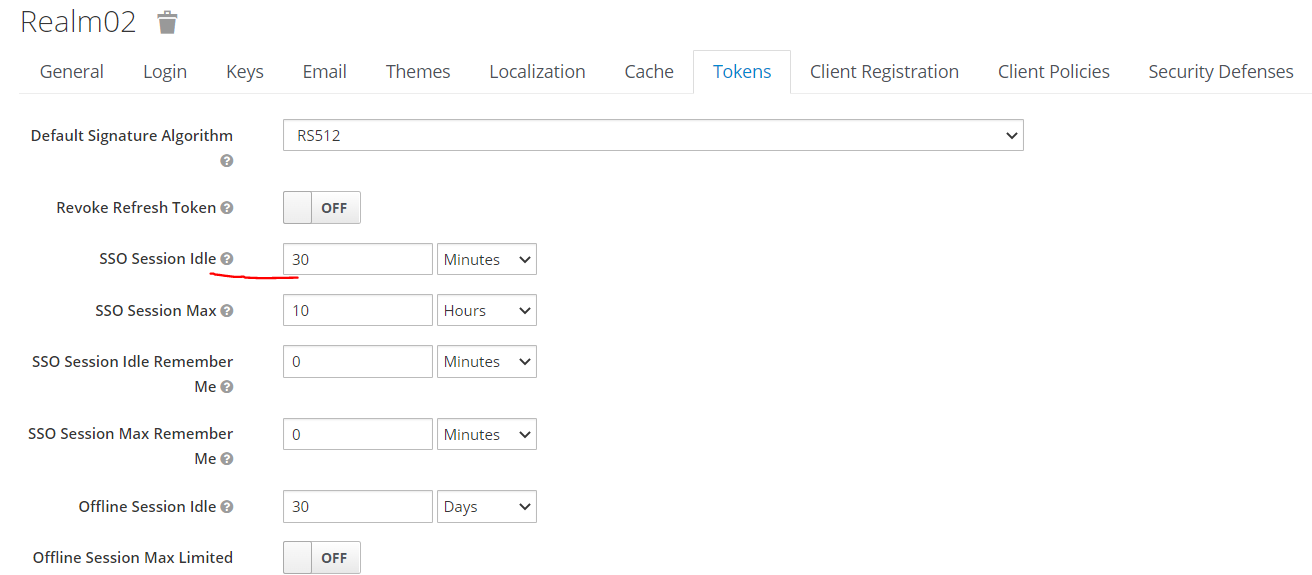
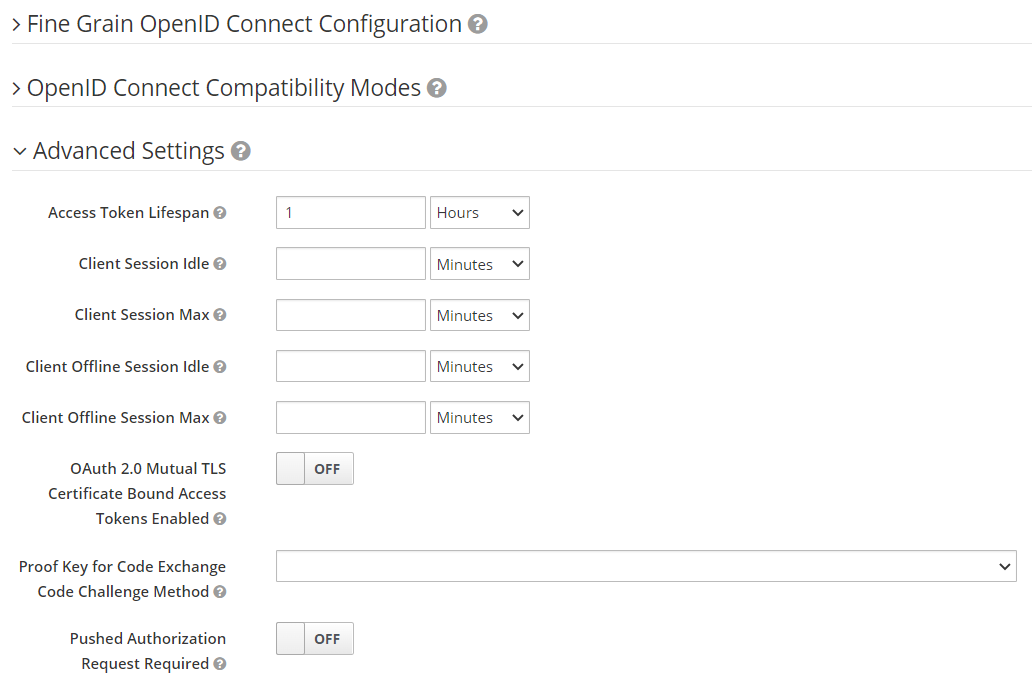
Also the error seems happening, generated JWT token seems to be invalid after 30minutes despite we update access token lifespan into 1 hour.

Finally i realized that this error keeps happening because i was updating the wrong configuration. It is supposed to be the “SSO Session Idle” configuration, in the “Tokens” tab in “Realm Settings” that need to be updated.

After change it into 1 Hour, i can see that my JWT token is successfully validated using UserInfo API for at most 1 hour after being created.

Hello World App Using Spring Boot and Apache Camel

Based on wikipedia, Apache Camel is an open source framework for message-oriented middleware with a rule-based routing and mediation engine that provides a Java object-based implementation of the Enterprise Integration Patterns.

The good thing about Apache Camel is that it also has a great flexibility where we can deploy Apache Camel on top of Spring Boot, providing an agile microservice EIP and SOA approach.

So lets start by defining what kind of libraries needed for this project,

<?xml version="1.0" encoding="UTF-8"?>
<project xmlns="http://maven.apache.org/POM/4.0.0"
         xmlns:xsi="http://www.w3.org/2001/XMLSchema-instance"
         xsi:schemaLocation="http://maven.apache.org/POM/4.0.0 http://maven.apache.org/xsd/maven-4.0.0.xsd">
    <modelVersion>4.0.0</modelVersion>

    <groupId>com.edw</groupId>
    <artifactId>camel-hello-world</artifactId>
    <version>1.0-SNAPSHOT</version>

    <properties>
        <project.build.sourceEncoding>UTF-8</project.build.sourceEncoding>
        <camel.version>3.17.0</camel.version>
        <spring-boot.version>2.7.1</spring-boot.version>
        <start-class>com.edw.Applicationn</start-class>
    </properties>

    <dependencyManagement>
        <dependencies>
            <dependency>
                <groupId>org.springframework.boot</groupId>
                <artifactId>spring-boot-dependencies</artifactId>
                <version>${spring-boot.version}</version>
                <type>pom</type>
                <scope>import</scope>
            </dependency>
            <dependency>
                <groupId>org.apache.camel.springboot</groupId>
                <artifactId>camel-spring-boot-dependencies</artifactId>
                <version>${camel.version}</version>
                <type>pom</type>
                <scope>import</scope>
            </dependency>
        </dependencies>
    </dependencyManagement>

    <dependencies>
        <!--        spring boot     -->
        <dependency>
            <groupId>org.springframework.boot</groupId>
            <artifactId>spring-boot-starter</artifactId>
        </dependency>
        <dependency>
            <groupId>org.springframework.boot</groupId>
            <artifactId>spring-boot-starter-web</artifactId>
            <exclusions>
                <exclusion>
                    <groupId>org.springframework.boot</groupId>
                    <artifactId>spring-boot-starter-tomcat</artifactId>
                </exclusion>
            </exclusions>
        </dependency>
        <dependency>
            <groupId>org.springframework.boot</groupId>
            <artifactId>spring-boot-starter-undertow</artifactId>
        </dependency>
        <dependency>
            <groupId>org.springframework.boot</groupId>
            <artifactId>spring-boot-starter-actuator</artifactId>
        </dependency>
        <dependency>
            <groupId>org.springframework.boot</groupId>
            <artifactId>spring-boot-starter-test</artifactId>
            <scope>test</scope>
            <exclusions>
                <exclusion>
                    <groupId>junit</groupId>
                    <artifactId>junit</artifactId>
                </exclusion>
                <exclusion>
                    <groupId>org.junit.vintage</groupId>
                    <artifactId>junit-vintage-engine</artifactId>
                </exclusion>
            </exclusions>
        </dependency>

        <!--        camel   -->
        <dependency>
            <groupId>org.apache.camel.springboot</groupId>
            <artifactId>camel-spring-boot-starter</artifactId>
        </dependency>
        <dependency>
            <groupId>org.apache.camel</groupId>
            <artifactId>camel-test-spring-junit5</artifactId>
            <scope>test</scope>
        </dependency>

        <!--        unit test   -->
        <dependency>
            <groupId>org.junit.jupiter</groupId>
            <artifactId>junit-jupiter-api</artifactId>
            <scope>test</scope>
        </dependency>
        <dependency>
            <groupId>org.junit.jupiter</groupId>
            <artifactId>junit-jupiter-engine</artifactId>
            <scope>test</scope>
        </dependency>
        <dependency>
            <groupId>io.rest-assured</groupId>
            <artifactId>rest-assured</artifactId>
            <scope>test</scope>
        </dependency>
        <dependency>
            <groupId>io.rest-assured</groupId>
            <artifactId>json-path</artifactId>
            <scope>test</scope>
        </dependency>
    </dependencies>

    <build>
        <plugins>
            <plugin>
                <groupId>org.springframework.boot</groupId>
                <artifactId>spring-boot-maven-plugin</artifactId>
                <version>${spring-boot.version}</version>
                <configuration>
                    <mainClass>${start-class}</mainClass>
                </configuration>
                <executions>
                    <execution>
                        <goals>
                            <goal>repackage</goal>
                        </goals>
                    </execution>
                </executions>
            </plugin>
            <plugin>
                <artifactId>maven-compiler-plugin</artifactId>
                <configuration>
                    <source>11</source>
                    <target>11</target>
                </configuration>
            </plugin>

            <plugin>
                <groupId>org.apache.maven.plugins</groupId>
                <artifactId>maven-failsafe-plugin</artifactId>
                <version>3.0.0-M5</version>
                <executions>
                    <execution>
                        <goals>
                            <goal>integration-test</goal>
                            <goal>verify</goal>
                        </goals>
                    </execution>
                </executions>

                <configuration>
                    <classpathDependencyExcludes>
                        <classpathDependencyExcludes>${project.groupId}:${project.artifactId}
                        </classpathDependencyExcludes>
                    </classpathDependencyExcludes>
                    <additionalClasspathElements>
                        <additionalClasspathElement>${project.build.outputDirectory}</additionalClasspathElement>
                    </additionalClasspathElements>
                    <reportsDirectory>${project.build.directory}/surefire-reports</reportsDirectory>
                </configuration>
            </plugin>

        </plugins>
    </build>

</project>

Create a java main class,

package com.edw;

import org.springframework.boot.SpringApplication;
import org.springframework.boot.autoconfigure.SpringBootApplication;

@SpringBootApplication
public class Application {
    public static void main(String[] args) {
        SpringApplication.run(Application.class, args);
    }
}

A Spring controller, where we call Camel’s route

package com.edw.controller;

import org.apache.camel.ProducerTemplate;
import org.springframework.beans.factory.annotation.Autowired;
import org.springframework.web.bind.annotation.GetMapping;
import org.springframework.web.bind.annotation.RequestMapping;
import org.springframework.web.bind.annotation.RequestParam;
import org.springframework.web.bind.annotation.RestController;
import java.util.HashMap;

@RestController
@RequestMapping("/api")
public class ApiController {

    @Autowired
    private ProducerTemplate template;

    @GetMapping("/v1/hello")
    public HashMap getHello(@RequestParam("name") String name) {
        return (HashMap) template.requestBody("direct:getHelloWorld", name);
    }
}

And a Camel Route to do all the Enterprise Integration Pattern, where it do a json response

package com.edw.route;

import org.apache.camel.builder.RouteBuilder;
import org.springframework.stereotype.Component;
import java.util.HashMap;

@Component
public class ApiRoute extends RouteBuilder {

    @Override
    public void configure() {
        // say helloworld
        from("direct:getHelloWorld")
                .routeId("getHelloWorld")
                .tracing()
                .log("calling getHelloWorld")
                .process(exchange -> {
                    String name = (String) exchange.getIn().getBody();
                    exchange.getMessage().setBody(new HashMap<>(){{
                        put("hello", name);
                    }});
                })
                .end();
    }
}

Code for this post can be found on below github repo,

https://github.com/edwin/spring-boot-camel-hello-world

Have fun with Spring Boot and Camel 🙂

Deploy a Spring Boot App with HTTPS by using JKS File into OpenShift 4

For this sample, im planning on creating a spring boot but with an SSL endpoint and deploy it to OpenShift 4 with a passthrough route.

So lets start with creating a JKS file, and put “password” as its password variable.

$ keytool -genkey -alias app-key -keyalg RSA -keystore app.jks

where for this example im using below variables for creating JKS file

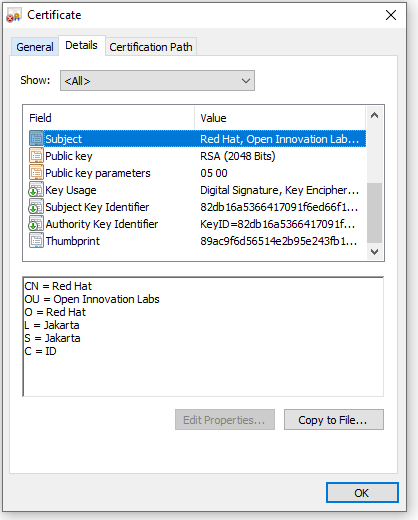
C=ID; ST=Jakarta; L=Jakarta; O=Red Hat; OU=Open Innovation Labs; CN=Red Hat

Now we start creating a spring boot app,

package com.redhat.openinnovationlabs.sample.jks;

import org.springframework.boot.SpringApplication;
import org.springframework.boot.autoconfigure.SpringBootApplication;

@SpringBootApplication
public class Application {
    public static void main(String[] args) {
        SpringApplication.run(Application.class, args);
    }
}
package com.redhat.openinnovationlabs.sample.jks.controller;

import org.springframework.web.bind.annotation.GetMapping;
import org.springframework.web.bind.annotation.RestController;

import java.util.HashMap;
import java.util.Map;

@RestController
public class HelloWorldController {
    @GetMapping("/")
    public Map index() {
        return new HashMap() {{
            put("hello", "world");
        }};
    }
}

Now is the most important thing, a properties file where we store all the configurations. For this sample, we would take the configurations from environment variables.

server.port=8443

server.ssl.enabled=true
server.ssl.key-alias=app-key
server.ssl.key-store-type=JKS
server.ssl.key-store-password=${JKS_PASSWORD}
server.ssl.key-store=file:${JKS_LOCATION}

Create a Dockerfile to create our java image

FROM openjdk:11.0.7-jre-slim-buster

LABEL base-image="openjdk:11.0.7-jre-slim-buster" \
      java-version="11.0.7" \
      purpose="Hello World with SSL, Java and Dockerfile"

MAINTAINER Muhammad Edwin < edwin at redhat dot com >

WORKDIR /deployments

COPY target/*.jar app.jar

USER 185

EXPOSE 8443

CMD ["java", "-jar","app.jar"]

And deploy it into OpenShift 4

$ oc new-build --strategy docker --binary \ 
	--docker-image openjdk:11.0.7-jre-slim-buster --name spring-boot-jks

$ oc start-build spring-boot-jks --from-dir . --follow

$ oc new-app --name=spring-boot-jks \ 
	--image-stream=test-project/spring-boot-jks:latest -n test-project

But apps will not work since it is missing a JKS file and some configurations. Therefore we need to create some Secrets in OpenShift 4 by using below command,

$ oc create secret generic spring-boot-jks-file --from-file app.jks

$ oc create secret generic spring-boot-secrets \
	--from-literal=JKS_PASSWORD=password \ 
	--from-literal=JKS_LOCATION=/tmp/jks/app.jks

And assign them into our apps,

$ oc set volume dc/spring-boot-jks --add \
	--name=spring-boot-jks-mnt --secret-name=spring-boot-jks-file \
	--mount-path=/tmp/jks/

$ oc set env dc/spring-boot-jks --from=secret/spring-boot-secrets

Expose our apps endpoint by using a passthrough Route

$ oc create route passthrough  --service spring-boot-jks --port=8443

And run some curl to our apps to see our application’s ssl configuration.

curl -kv https://<apps-ip>

* SSL connection using TLSv1.2 / ECDHE-RSA-AES256-GCM-SHA384
* ALPN, server did not agree to a protocol
* Server certificate:
*  subject: C=ID; ST=Jakarta; L=Jakarta; O=Red Hat; OU=Open Innovation Labs; CN=Red Hat
*  start date: Apr 11 12:27:14 2022 GMT
*  expire date: Jul 10 12:27:14 2022 GMT
*  issuer: C=ID; ST=Jakarta; L=Jakarta; O=Red Hat; OU=Open Innovation Labs; CN=Red Hat
*  SSL certificate verify result: self signed certificate (18), continuing anyway.
Code for this sample can be accessed here,

https://github.com/edwin/spring-boot-jks
Deploying a Dockerfile and Jar file into OpenShift 4

Lets say i have a spring boot Jar file, and i want to run it in directly. We can run it by using below command.

$ java -jar existing-app.jar

But somewhere in the future i want to containerized them so that we can run it anywhere have to worry about infrastructure dependencies. For that purpose I need to have a Dockerfile, copy, and run my jar file inside it.

FROM openjdk:11.0.7-jre-slim-buster

LABEL base-image="openjdk:11.0.7-jre-slim-buster" \
      java-version="11.0.7" \
      purpose="Hello World with Java and Dockerfile"

MAINTAINER Muhammad Edwin < edwin at redhat dot com >

# set working directory at /deployments
WORKDIR /deployments

# copy my jar file
COPY existing-app.jar app.jar

# gives uid
USER 185

EXPOSE 8080

# run it
CMD ["java", "-jar","app.jar"]

I can build the container by running below command,

$ docker build -t hello-world-snowdrop .

And run it.

$ docker run -p 8080:8080 hello-world-snowdrop

In order to have above commands runs well, we need to have below structure in our folder.

$ tree
.
+--- Dockerfile
+--- existing-app.jar

The same concept we can use when we want to deploy our app into Openshift. The only difference is the docker build process is being done in Openshift.

$ oc new-build --strategy docker --binary \ 
		--docker-image openjdk:11.0.7-jre-slim-buster \
		--name hello-world-snowdrop
		
$ oc start-build hello-world-snowdrop \ 
		--from-dir . --follow

And below are the commands we can use for deploy, run and expose our app into Openshift.

$ oc new-app hello-world-snowdrop

$ oc create route edge --service hello-world-snowdrop

Dont forget to run above command within the same folder with our Dockerfile and jar files.
Hope it helps, and dont forget to have fun with Openshift 4.