Server Configuration

Where is the Location of Podman’s auth.json

There are times when we want to get the list of credentials that Podman is using, but sometimes it is hard to locate them.
The exact location would be vary depending on our userid, but it is pretty much straight forward.

For this sample im using 1005 as my userid. So the location of my credentials would be like this,

$ vi /run/user/1005/containers/auth.json

the result would be something like this

{
   "auths": {
		"docker.io": {
			 "auth": "xxxx="
		},
		"quay.io": {
			 "auth": "xxxx="
		}
   }
}

Importing a Custom SPI into Keycloak Operator in Openshift

Keycloak Operator provide a convenient method for uploading a custom SPI into Keycloak instances, and that is by using an extensions inside Keycloak YAML operator.

apiVersion: keycloak.org/v1alpha1
kind: Keycloak
metadata: 
  namespace: my-redhat-sso
  labels:
    app: sso
spec:
  extensions:
    - >-
      https://url/custom-sso-spi-1.0.0.jar
  externalAccess:
    enabled: true
  externalDatabase:
    enabled: true
  instances: 1

Rollout your Keycloak pod, and you can see that Keycloak instance is now having a custom SPI embedded within it.

Keycloak redirect_uri is Not HTTPS when Spring Boot is Behind Reverse Proxy

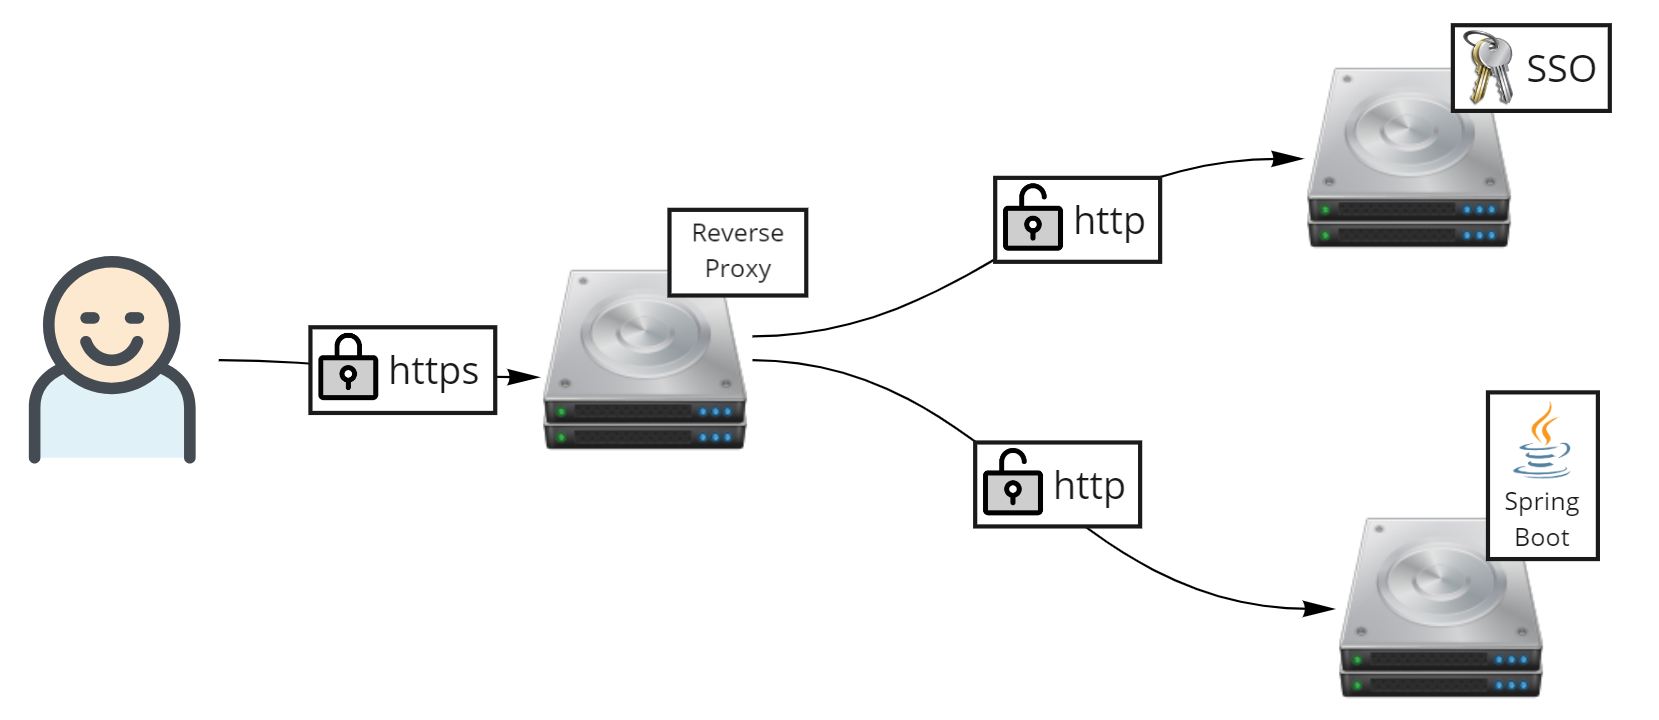
Recently i have a regular Keycloak deployment with the high level concept like below image,

But during implementation, i had this weird condition when Keycloak, behind a reverse proxy for SSL offloader, is redirecting to my Spring Boot application. But Keycloak is not detecting my Spring Boot application as https.

https://keycloak/auth/realms/realm/protocol/openid-connect/auth?
response_type=code&client_id=client-id&redirect_uri=http%3A%2F%2Fspring-boot-app%2Fsso&state=123&
login=true&scope=openid

As we can see, redirect_uri is having http as its protocol, instead of https. Despite my Spring Boot application is being deployed behind a reverse proxy with an SSL offloader.

The workaround is actually quite simple, first thing is that we need to forward request from users into downstream apps, which is Keycloak and Spring Boot. This is primarily being done on reverse proxy or Load Balancer such as F5 or Nginx

X-Forwarded-For: 10.20.81.131
X-Forwarded-Proto: https
X-Forwarded-Host: my.apps.com

But sometimes even after above headers being forwarded, Spring Boot still unaware that it is being accessed as HTTPS. Therefore we need to add one more configuration line in our Spring Boot’s application.properties configuration.

server.forward-headers-strategy=NATIVE

This should be sufficient enough.

Using Containerized Nexus as Image Registry for Storing Docker Images

There are alot of image registries when we are talking about docker images, such as Quay, Docker Hub, or Nexus. And on this writing, we are trying to create a docker image repository by using Nexus.

Lets start by installing Nexus to our system,

docker run -d -p 8081:8081 -p 7000:7000 --name nexus sonatype/nexus3

After logging in by using admin credentials, and yes we need to read the generated password which is located at /nexus-data/admin.password, we need to update our admin password and after that we can create a new docker image repository.

and create a new repository by using a docker (hosted) recipe. Open port 7000 for http connection

we can test login to our Nexus image repository by using below docker command,

$ docker login localhost:7000

try pulling a new image from external, and push it into our newly created Nexus

$ docker pull alpine
Using default tag: latest
latest: Pulling from library/alpine
59bf1c3509f3: Pull complete
Digest: sha256:21a3deaa0d32a8057914f36584b5288d2e5ecc984380bc0118285c70fa8c9300
Status: Downloaded newer image for alpine:latest

tag it, and push into Nexus image repository,

$ docker tag alpine localhost:7000/dev/alpine

$ docker push localhost:7000/dev/alpine

and finally we can see our images in Nexus.

How to Remove Docker’s Dangling Image on Windows 10

There are times where i need to clean all unused, dangling docker images on my laptop. Previously im running below command,

docker image prune -a

But it seems like altho almost all images are gone, i can see still some images are still occupying my laptop’s disk. So i have to do something to delete them.

The workaround is quite easy, run PowerShell as Administrator and run below command,

docker rmi $(docker images --quiet --filter "dangling=true") -f

Executing that command will generates this log,

And i can see that my harddisk is now have more free spaces 🙂