Creating A Simple Java Database Integration Test with Openshift 4 and Jenkins Pipeline

During testing phase, there are time when we want to do an automated testing against a real temporary database. For example, if my database in production environment is MySql means i need to have the exact same MySql for testing, with the same version and structure. And one of the most important thing is the test database lifespan is only as long as the test case lifespan which means that once test is done, either success or failed, the temporary database shall be destroyed.

There are multiple ways of achieving this, we can use database sidecar pattern, install a MySql service on our jenkins slave base image, or create a temporary MySql pod on our Openshift cluster specifically for testing purpose. The last approach is the one i choose and i will share how to achieve it on this blog.

Lets start by creating a very simple java web apps with Spring Boot and JUnit, it is basically a simple java apps but the only difference is the database url for testing is not hardcoded, but parameterized.

spring.datasource.url=jdbc:mysql://${MYSQL_URL}:3306/db_test
spring.datasource.driver-class-name=com.mysql.cj.jdbc.Driver
spring.datasource.username=user1
spring.datasource.password=password
spring.jpa.database-platform=org.hibernate.dialect.MySQL5InnoDBDialect

spring.jpa.hibernate.ddl-auto=update

and a simple integration test,

package com.edw.controller;

import com.edw.entity.Account;
import com.edw.repository.AccountRepository;
import io.restassured.RestAssured;
import org.apache.http.HttpStatus;
import org.junit.Before;
import org.junit.Test;
import org.junit.runner.RunWith;
import org.springframework.beans.factory.annotation.Autowired;
import org.springframework.boot.test.context.SpringBootTest;
import org.springframework.boot.web.server.LocalServerPort;
import org.springframework.test.annotation.DirtiesContext;
import org.springframework.test.context.junit4.SpringJUnit4ClassRunner;

import static io.restassured.RestAssured.given;

@RunWith(SpringJUnit4ClassRunner.class)
@SpringBootTest(webEnvironment = SpringBootTest.WebEnvironment.RANDOM_PORT)
@DirtiesContext
public class AccountControllerIT {
    @LocalServerPort
    private int port;

    @Autowired
    private AccountRepository accountRepository;

    @Before
    public void setup() {
        RestAssured.port = this.port;

        accountRepository.delete(new Account(10));

        Account account = new Account();
        account.setId(10);
        account.setAccountNumber("ten ten");
        accountRepository.save(account);
    }

    @Test
    public void getSuccess() throws Exception {
        given()
                .when()
                .get("/10")
                .then()
                .assertThat()
                .statusCode(HttpStatus.SC_OK);
    }

    @Test
    public void getFailed() throws Exception {
        given()
                .when()
                .get("/7")
                .then()
                .assertThat()
                .statusCode(HttpStatus.SC_INTERNAL_SERVER_ERROR);
    }
}

Once created, next step is to create a Jenkins setup for code build and deployment pipeline. Im using a simple a simple maven image which comes with OCP,

Next step is to create a pipeline to spawn database, do integration testing, build apps and destroy database once everything is completed. One think that i need to do is to create a unique database service between build, it will prevent database overlapping between different build and maintain a testing isolation. That is the reason why im appending build number on every temporary database services. And i will inject the database url thru maven build parameter in order to make sure that testing database are pointing to my newly created database.

node('maven') {
    try {
        stage ('pull code') {
            sh "git clone https://github.com/edwin/springboot-integration-test.git source"
        }
        stage('spawn db') {
            sh "oc new-app mysql-ephemeral --name mysql -p MYSQL_USER=user1 -p MYSQL_PASSWORD=password -p MYSQL_DATABASE=db_test -p DATABASE_SERVICE_NAME=mysql${env.BUILD_NUMBER}"
            
            // wait until db is ready
            sh """
            sleep 10
            while oc get po --field-selector=status.phase=Running | grep mysql${env.BUILD_NUMBER}-1-deploy; do
                sleep 2
            done
            """
        }
        stage ('test') {
            dir("source") {
                sh "mvn verify -DMYSQL_URL=mysql${env.BUILD_NUMBER}"
            }
        }
        stage ('build') {
            dir("source") {
                sh "mvn clean package -DskipTests=true"
            }
        }
    } catch (error) {
       throw error
    } finally {
        stage('destroy db') {
            sh "oc delete dc mysql${env.BUILD_NUMBER}"
            sh "oc delete svc mysql${env.BUILD_NUMBER}"
            sh "oc delete secret mysql${env.BUILD_NUMBER}"
        }
    }    
}

It will generates this output on Jenkins dashboard,

If we check the content of our database while testing is happen, we can see that a table is created and a data is automatically inserted there for testing purpose.

And after test and build is done, we can see that database is deleted automatically from our Openshift cluster.

So basically it is very simple to do an integration test on Openshift 4 and Jenkins, and the code for testing is available on my github repository.

https://github.com/edwin/springboot-integration-test

Error “verifying certificate: x509: certificate signed by unknown authority” When Creating HTTPS on Openshift

I had this error when creating a reeencrypt secure route on Openshift,

spec.tls.certificate: Invalid value: "redacted certificate data": error verifying certificate: x509: certificate signed by unknown authority
reason: ExtendedValidationFailed

this is the oc command that im using,

oc create route reeencrypt my-https --service my-gateway-https --key private.key --cert server.pem --cacert cacert.pem -n my-project

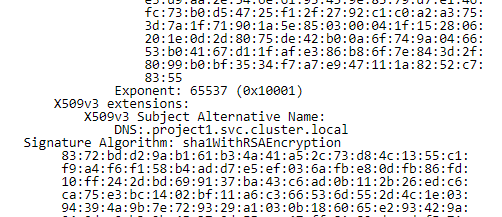
This error is due to im using an incorrect certificate for reencrypting. Using certificate decoder shows whats wrong with my certificate,

The correct certificate should show this,

Regenerating my certificate fix this issue.

Reusing Your Workflow and Assets on Red Hat Process Automation Manager

Sometimes you want to reuse the assets which you are already creating, and “import” it on multiple other projects. We can use that on RHPAM (or its opensource version, which is jBPM) because the output of it is actually a kjar (knowledge jar) file, which is just a jar library where you can import it by using a simple maven.

For this example im creating two different project, Project 01 and Project 02. Where Project 01 have a workflow that will import a Decision Table which is created on Project 02. It is basically a simple calculator to measure how wealthy someone is, based on one’s salary.

Lets start with Project02 first, and as always we start with a simple Java bean

And a Decision Table,

We will use that decision table in a very simple workflow,

Next is the unique part, where we need to create a KIE base for Project02

And a KIE session,

“Default” option should be un-check for KIE bases and KIE session on Project02.

The last step for Project02 is to build, and install it.


Next is how to import Project02 into Project01. First thing that we need to do is to import Project02 on Project01’s dependency.

Create a workflow, and put a “Reusable Sub-Process” referring to our Project02 workflow.

And finally, create a KIE base for Project01

and a KIE session,

Make sure you check “Default” option for KIE bases and KIE session on Project01.

Build, Install and Deploy Project01 to KIE server, and we can test by using a simple CURL REST API command or by using Postman

For complete code, can be accessed here.

https://github.com/edwin/Project01

https://github.com/edwin/Project02

Creating a Rest API Call with WorkItemHandler on Red Hat Process Automation Manager

Usually we are using tasks for showing steps of process on top of Red Hat Process Automation Manager (RHPAM). But most of the time we need a customized task involved, thats where WorkItemHandler comes in handy.
For this demo, im trying to create a simple WorkItemHandler to create a custom task on top of RHPAM which is getting some response from a third party api provider.

So here is pretty much the raw concept,

As usual, for beginning we need to create a pom xml file, and it is important to put “scope” variable as provided.

<?xml version="1.0" encoding="UTF-8"?>
<project xmlns="http://maven.apache.org/POM/4.0.0"
         xmlns:xsi="http://www.w3.org/2001/XMLSchema-instance"
         xsi:schemaLocation="http://maven.apache.org/POM/4.0.0 http://maven.apache.org/xsd/maven-4.0.0.xsd">
    <modelVersion>4.0.0</modelVersion>

    <groupId>com.edw</groupId>
    <artifactId>AnimeWorkItemHandler</artifactId>
    <version>1.0.4</version>
    <description>a simple rest api to be used within RHPAM</description>
    <packaging>jar</packaging>


    <properties>
        <maven.compiler.source>1.8</maven.compiler.source>
        <maven.compiler.target>1.8</maven.compiler.target>
    </properties>

    <distributionManagement>
        <repository>
            <id>repo-custom</id>
            <url>http://nexus:8081/repository/pam/</url>
        </repository>
        <snapshotRepository>
            <id>repo-custom</id>
            <url>http://nexus:8081/repository/pam/</url>
        </snapshotRepository>
    </distributionManagement>

    <dependencies>
        <dependency>
            <groupId>org.jbpm</groupId>
            <artifactId>jbpm-flow</artifactId>
            <version>7.38.0.Final</version>
            <scope>provided</scope>
        </dependency>

        <dependency>
            <groupId>org.codehaus.jackson</groupId>
            <artifactId>jackson-core-asl</artifactId>
            <version>1.9.9</version>
            <scope>provided</scope>
        </dependency>
        <dependency>
            <groupId>org.codehaus.jackson</groupId>
            <artifactId>jackson-mapper-asl</artifactId>
            <version>1.9.9</version>
            <scope>provided</scope>
        </dependency>
        <dependency>
            <groupId>org.codehaus.jackson</groupId>
            <artifactId>jackson-xc</artifactId>
            <version>1.9.9</version>
            <scope>provided</scope>
        </dependency>

    </dependencies>
</project>

and simple java class to do a simple REST Api call,

package com.edw;

import java.io.BufferedReader;
import java.io.InputStreamReader;
import java.net.URL;
import java.net.URLConnection;
import java.util.HashMap;
import java.util.List;

import org.codehaus.jackson.map.ObjectMapper;
import org.drools.core.process.instance.WorkItemHandler;
import org.kie.api.runtime.process.WorkItem;
import org.kie.api.runtime.process.WorkItemManager;

public class AnimeWorkItemHandler implements WorkItemHandler {
    public void abortWorkItem(WorkItem wi, WorkItemManager wim) {
        wim.abortWorkItem(wi.getId());
    }

    // will try fire to https://jikan.moe/ api
    public void executeWorkItem(WorkItem wi, WorkItemManager wim) {
        String name = (String) wi.getParameter("name");

        String nameResponse = "";
        String imageUrl = "";

        try {
            // api endpoint = https://api.jikan.moe/v3/search/character?q=???&limit=1
            URL url = new URL(String.format("https://api.jikan.moe/v3/search/character?q=%s&limit=1", name));

            URLConnection urlConnection = url.openConnection();
            BufferedReader in = new BufferedReader(
                    new InputStreamReader(
                            urlConnection.getInputStream()));
            String inputLine;
            StringBuffer stringBuffer = new StringBuffer();
            while ((inputLine = in.readLine()) != null) {
                stringBuffer.append(inputLine);
            }

            ObjectMapper objectMapper = new ObjectMapper();
            HashMap jsonResult = objectMapper.readValue(stringBuffer.toString(), HashMap.class);
            List<HashMap> results = (List<HashMap>) jsonResult.get("results");

            nameResponse = (String) results.get(0).get("name");
            imageUrl = (String) results.get(0).get("image_url");

            in.close();
        } catch (Exception e) {
            e.printStackTrace();
        }

        HashMap result = new HashMap();
        result.put("nameResponse", nameResponse);
        result.put("imageUrl", imageUrl);
        wim.completeWorkItem(wi.getId(), result);
    }
}

Once created, we need to build it by using an mvn command

mvn clean package

After jar has been build, next step is to upload that jar thru your Business Central,

If uploading success, we can see the uploaded jar file within our Nexus

Next is lets go to RHPAM dashboard, and create a work item definition

And put this values, make sure that the content of “parameters” and “result” is the same as on your java class, which in my case is “name”, “nameResponse” and “imageUrl”.

[
  [
    "name" : "AnimeWorkItemHandler", 
    "parameters" : [ 
        "name" : new StringDataType() 
    ], 
    "results" : [ 
        "nameResponse" : new StringDataType(),
        "imageUrl" : new StringDataType() 
    ], 
    "displayName" : "AnimeWorkItemHandler", 
    "icon" : "" 
  ]
]

The next step, and pehaps the most important is, include our newly created jar file into RHPAM project. We can do so by going thru “Settings” tab, and create a new Work Item Handlers,

And import the library and dependency needed

The last is adding our new WorkItemHandler to our existing workflow,

So as you can see, it’s not that difficult to create a custom task on RHPAM. And for the full code for this project can be accessed on my github page,

https://github.com/edwin/anime-work-item-handler

How to Create and Test Workflow on Red Hat Process Automation Manager with REST API

Red Hat Process Automation Manager, or RHPAM, is a platform that are being use for automating business decisions and processes. It enables enterprise business and IT users to document, simulate, manage, automate and monitor business processes and decisions.

And for today’s example im trying to simulate a logic to validate a very simple condition, to check whether a user registration data is valid or not. The parameter is, a user should have a valid name, and age between 21 and 49.

First we need to create a simple Data Object to accomodate our parameter data and result,

Next is creating a simple decision table,

Put data constraint there,

Create expected result,

After adding some decision logic, the end result should be like this,

Next is creating a workflow (Business Processes), in here we are doing some data unmarshalling, logging, validating the data with our existing data table, and providing the result. The result of this workflow is going to be stored in a “status” variable.

The whole project structure will looks like this,

Next, we can do build, and deploy after that. This will make our project deployed to Kie Server.

Now here comes the exciting part, how to access and test our deployed pam project thru REST API. First we need to understand that our project is being deployed to a Kie Server, therefore we need to see what api services that are provided there. We can check easily by seeing our Kie Server’s swagger link,

https://kieserver-url/docs/

We can list all projects available on our Kie Server with this curl command, dont forget replacing pamuser and pampassword with your actual RHPAM username and password

curl -kv https://pamuser:pampassword@kieserver-url/services/rest/server/containers/

Use this curl command to see the api endpoint for our business process workflow,

curl -kv https://pamuser:pampassword@kieserver-url/services/rest/server/containers/Project01_1.0.0-SNAPSHOT/processes

Once we found our business process id, we can start our workflow by using this curl command,

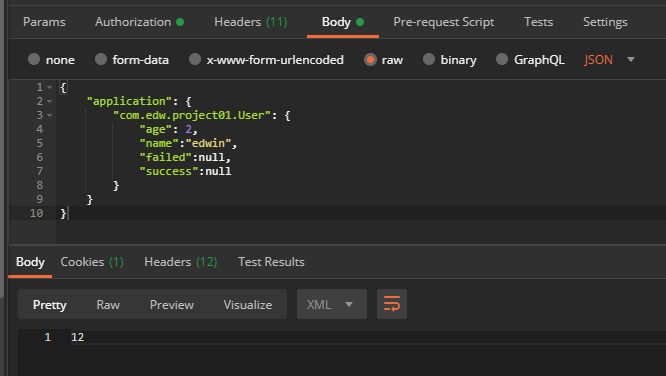
curl -kv https://pamuser:pampassword@kieserver-url/services/rest/server/containers/Project01_1.0.0-SNAPSHOT/processes/Project01.Business01/instances \
-H 'Content-Type: application/json' \
--data-raw '{
    "application": {
        "com.edw.project01.User": {
            "age": 2,
            "name":"edwin",
            "failed":null,
            "success":null
        }
    }
}'

This curl command will return a specific numerical id,

We can see the progress result of corresponding id on “Process Instances” menu,

Or by using a curl api call,

curl -kv https://pamuser:pampassword@kieserver-url/services/rest/server/containers/Project01_1.0.0-SNAPSHOT/processes/instances/12

Next is seeing what is the workflow result, by seeing that we are giving “age” parameter below 20 means we are expeting the registration result to be “false”. We can achieve that by using this curl command,

curl -kv https://pamuser:pampassword@kieserver-url/services/rest/server/containers/Project01_1.0.0-SNAPSHOT/processes/instances/12/variables/instances/status

And it is showing that value is “false”,

<?xml version="1.0" encoding="UTF-8" standalone="yes"?>
<variable-instance-list>
    <variable-instance>
        <name>status</name>
        <old-value></old-value>
        <value>false</value>
        <process-instance-id>12</process-instance-id>
        <modification-date>2020-05-29T16:37:14.382Z</modification-date>
    </variable-instance>
</variable-instance-list>

Lets try with a correct data,

curl -kv https://pamuser:pampassword@kieserver-url/services/rest/server/containers/Project01_1.0.0-SNAPSHOT/processes/Project01.Business01/instances \
-H 'Content-Type: application/json' \
--data-raw '{
    "application": {
        "com.edw.project01.User": {
            "age": 25,
            "name":"edwin",
            "failed":null,
            "success":null
        }
    }
}'

This time it will shows “true”

<?xml version="1.0" encoding="UTF-8" standalone="yes"?>
<variable-instance-list>
    <variable-instance>
        <name>status</name>
        <old-value></old-value>
        <value>true</value>
        <process-instance-id>13</process-instance-id>
        <modification-date>2020-05-29T16:58:26.244Z</modification-date>
    </variable-instance>
</variable-instance-list>

You can check my sample code on github,

https://github.com/edwin/rhpam-hello-world-example

So, it’s pretty much simple right.
Have fun with RHPAM (Y)