Programming

A Simple JSon Requestor using Java

In my latest project, i found the needed to simulate a json request from my local computer. After do some research, i created a simple java class to simulate json request to my servlet. Im using GSon to format my java class to json string, and Apache HttpComponents.

Im trying to do json request to my servlet, to do an invoice payment. First, as always, is an Incoice javabean.

package com.edw.bean;

/**
 *  com.edw.bean.Invoice
 *
 *  @author edw
 *
 */
public class Invoice {
    private String username;
    private String po_number;
    private int bill;

    // other setter and getter
}

and this is my main java class, it will do a simple Request to my servlet

package com.edw.json;

import com.edw.bean.Invoice;
import com.google.gson.Gson;
import java.net.URL;
import org.apache.http.HttpEntity;
import org.apache.http.HttpResponse;
import org.apache.http.client.HttpClient;
import org.apache.http.entity.StringEntity;
import org.apache.http.client.methods.HttpPost;
import org.apache.http.impl.client.DefaultHttpClient;
import org.apache.http.util.EntityUtils;

/**
 *  com.edw.json.JSonRequestor
 *
 *  @author edw
 *
 */
public class JSonRequestor {

    public JSonRequestor() {
    }

    private void doRequest() {
        URL serverURL = null;
        try {
            
            Invoice invoice = new Invoice();
            invoice.setBill(2000);
            invoice.setPo_number("2000");
            invoice.setUsername("edw");
            
            Gson g = new Gson();
            String json = g.toJson(invoice);
            
            System.out.println(json);

            HttpClient httpclient = new DefaultHttpClient();
            
            HttpPost httppost = new HttpPost("http://localhost:18000/EPay/CreateInvoice");
            StringEntity stringEntity = new StringEntity(json);
            stringEntity.setContentType("application/json");
            httppost.setEntity(stringEntity);
            
            System.out.println("executing request " + httppost.getRequestLine());
            HttpResponse response = httpclient.execute(httppost);
            HttpEntity resEntity = response.getEntity();
            
            System.out.println("----------------------------------------");
            System.out.println(response.getStatusLine());
            if (resEntity != null) {
                System.out.println("Response content length: " + resEntity.getContentLength());
                System.out.println("Chunked?: " + resEntity.isChunked());
            }
            EntityUtils.consume(resEntity);
            
        } catch (Exception e) {
            e.printStackTrace();
        }
    }

    public static void main(String[] args) {
        JSonRequestor jSonRequestor = new JSonRequestor();
        jSonRequestor.doRequest();
    }
}

and this is how my request will looks like

this is libraries that i used

I hope it would help others,
have fun and dont forget to visit Indonesia 🙂

Get Absolute File Path Using ServletFilter

It’s all begin when i need to get a text file content from a servlet filter, after spent some amount of time googling i’ve found a good solution. This is how i do it.

package com.edw.filter;

import java.io.File;
import java.io.IOException;
import javax.servlet.Filter;
import javax.servlet.FilterChain;
import javax.servlet.FilterConfig;
import javax.servlet.ServletException;
import javax.servlet.ServletRequest;
import javax.servlet.ServletResponse;
import org.apache.log4j.Logger;

/**
 *
 * @author edw
 */
public class MyFilter implements Filter {

    private FilterConfig filterConfig = null;
    private Logger logger = Logger.getLogger(this.getClass());

    public MyFilter() {
        
    }    

    public void doFilter(ServletRequest request, ServletResponse response,
                         FilterChain chain)
	throws IOException, ServletException {
	
	try {
		String pathName = filterConfig.getServletContext().getRealPath("/");
		File file = new File(pathName);

		logger.debug(file.getAbsolutePath());

		chain.doFilter(request, response);
	}
	catch(Throwable t) {
	    logger.error(t,t);
	}
    }    

    public void destroy() { 
    }

    public void init(FilterConfig filterConfig) { 
		this.filterConfig = filterConfig;
    }    

}

Hope it can help others, thank you (*)

How to Get Offline Message’s Timestamp on Openfire

I had a simple project using Openfire and Smack library, i found an obstacle when i had to display offline message’s timestamp. I usually use local timestamp for simple messages, but when dealing with offline messages i had to use server’s timestamp, that’s the tricky part.

It is actually very simple to solve it, only several lines of codes. But i’ve spend ridiculously amount of time searching the net for it. That’s why i try to posted it in my blog in case of others might need it.

This is an ordinary packet received,

<message id="Vw7cj-13" to="gajah@edw/Smack" from="kelinci@edw/Smack">
  <body>ordinary message</body>
</message>

while this is what received offline packet looks like

<message id="Vw7cj-12" to="gajah@edw/Smack" from="kelinci@edw/Smack">
  <body>example of offline message</body>
  <thread>U249D0</thread>
  <x xmlns="jabber:x:delay" stamp="20110625T06:53:52" from="edw"/>
</message>

As you can see, offline messages send its timestamp on line 4. Now the problem is how to get it.
But before testing, dont forget to store your message offline policy. And btw, my server name is “edw”.

This is how i solve it,

DelayInformation inf = null;
try {
	inf = (DelayInformation)packet.getExtension("x","jabber:x:delay");
} catch (Exception e) {
	log.error(e);
}
// get offline message timestamp
if(inf!=null){
	Date date = inf.getStamp();

And please dont forget to include smackx.jar.

Im using Openfire 3.6.4 and Smack. I am very recommend these libraries for creating a simple yet powerful instant messaging application based on Java. Have fun 🙂

Simple Messaging Example using Hessian

According to Wikipedia, Hessian is a binary web service protocol that makes web services usable without requiring a large framework, and without learning a new set of protocols. Because it is a binary protocol, it is well-suited to sending binary data without any need to extend the protocol with attachments.

From what i’ve tested, perhaps it is somekind of light version of remote EJB3 because i dont have to include so many libraries like EJB3. Altough EJB3 and Hessian are not apple-to-apple comparable, because both arent using the same messaging protocol. EJB3 use RMI-IIOP while Hessian use WebService.

So let’s start with the code. First, for the server part (im using tomcat), create a web project on Netbeans 6.9 and creating a simple interface class,

package com.edw.service;

public interface HelloService {
    String sayHelloTo(String target);
}

after that, i create a simple servlet which implements HelloService interface,

package com.edw.servlet;

import com.caucho.hessian.server.HessianServlet;
import com.edw.service.HelloService;

public class HelloServlet extends HessianServlet implements HelloService {

    public String sayHelloTo(String target) {
        return "hello "+target+", have a nice day";
    }
    
}

dont forget to register your servlet to web.xml

<?xml version="1.0" encoding="UTF-8"?>
<web-app version="2.5" xmlns="http://java.sun.com/xml/ns/javaee" xmlns:xsi="http://www.w3.org/2001/XMLSchema-instance" xsi:schemaLocation="http://java.sun.com/xml/ns/javaee http://java.sun.com/xml/ns/javaee/web-app_2_5.xsd">
    <servlet>
        <servlet-name>HelloServlet</servlet-name>
        <servlet-class>com.edw.servlet.HelloServlet</servlet-class>
    </servlet>
    <servlet-mapping>
        <servlet-name>HelloServlet</servlet-name>
        <url-pattern>/HelloServlet</url-pattern>
    </servlet-mapping>
    <session-config>
        <session-timeout>
            30
        </session-timeout>
    </session-config>
    <welcome-file-list>
        <welcome-file>index.jsp</welcome-file>
    </welcome-file-list>
</web-app>

next, is creating the client application. I start with a simple java netbeans project, a main class and an interface, i copied the exact copy of HelloService and then put it on my client project,

package com.edw.service;

public interface HelloService {
    String sayHelloTo(String target);
}

and my main class

package com.edw.main;

import com.caucho.hessian.client.HessianProxyFactory;
import com.edw.service.HelloService;

public class Main {

    String url = "http://localhost:809/HessianServer/HelloServlet";
    HessianProxyFactory factory = new HessianProxyFactory();

    public Main() {
    }

    private void doTest() {
        try {
            HelloService hello = (HelloService) factory.create(HelloService.class, url);
            System.out.println(hello.sayHelloTo("si pepe"));
        } catch (Exception e) {
            e.printStackTrace();
        }
    }

    public static void main(String[] args) {
        Main main = new Main();
        main.doTest();
    }
}

here is the screenshot of my project

This is what the messaging looks like

another good competitor for Spring Http Invoker.
Have fun 😉

Beginning Apache Velocity : Creating A Simple Web Application

Today im going to try create a simple web application using Apache Velocity. From what is written on its wiki, Apache Velocty is a simple yet powerful Java-based template engine that renders data from plain Java objects to text, xml, email, SQL, Post Script, HTML etc. The template syntax and rendering engine are both easy to understand and quick to learn and implement.
In this example i’m using Velocity 1.7 and Velocity Tools View 2.0, Netbeans 6.9 and Apache Tomcat 6. Im using a simple Servlet acting as Controller, Velocity file with extension .vm as View and a simple ArrayList to mimic ResultSets as the Model.

Lets start with a simple Velocity file

<html>
<head> <title>Hello Velocity</title> </head>
<body>
<h1>Hello World..!!</h1>
<br />
## this is a comment, set variable name with "Edw" value
#set( $name = "Edw" )

<h2> $name is using velocity</h2>

## if-else statement
#if($name.equals("NotEdw"))
    <br />
    not an Edw
#else
    <br />
    Only the Paranoid Survive
#end

<br />
<br />

<table>
<tr>
    <td>Name</td>
    <td>Address</td>
<tr>
## for each statement to iterate over a collection
#foreach($user in $users)
<tr>
    <td>$user.name</td>
    <td>$user.address</td>
<tr>
#end
</table>

## simple velocity method
Today is :  $date.medium
</body>
</html>

i named it index.vm and put it under the Web Pages folder.

Next is creating an xml file, toolbox.xml for registering classes that is needed by Velocity. In this example im only registering a simple DateTool class.

<toolbox>
    <tool>
        <key>date</key>
        <scope>application</scope>
        <class>org.apache.velocity.tools.generic.DateTool</class>
    </tool>
</toolbox>

Next is a simple javabean

package com.edw.bean;

public class User {

    private String name;
    private String address;

    public User() {
    }

    public User(String name, String address) {
        this.name = name;
        this.address = address;
    }

	// other setter - getter
}

And a simple Servlet, im using it simply just for Controller function, it forward my requests-responses to index.vm

package com.edw.servlet;

import com.edw.bean.User;
import java.io.IOException;
import java.util.ArrayList;
import java.util.List;
import javax.servlet.RequestDispatcher;
import javax.servlet.ServletException;
import javax.servlet.http.HttpServlet;
import javax.servlet.http.HttpServletRequest;
import javax.servlet.http.HttpServletResponse;
import org.apache.log4j.Logger;

public class VelocityServlet extends HttpServlet {

    private Logger logger = Logger.getLogger(getClass());

    @Override
    protected void doGet(HttpServletRequest request, HttpServletResponse response)
    throws ServletException, IOException {        
        try {
            // simulate a database query
            List<User> users = new ArrayList<User>();
            for (int i = 0; i < 5; i++) {
                User user = new User("name "+i, "Address "+i);
                users.add(user);
            }
            // set values
            request.setAttribute("users", users);

            // get UI
            RequestDispatcher requestDispatcher =  request.getRequestDispatcher("index.vm");
            requestDispatcher.forward(request, response);
        } catch(Exception ex){
            logger.error(ex);
        }
    } 
}
&#91;/code&#93;

And the most important part is web.xml
&#91;code language="xml" highlight="10,20,25"&#93;
<?xml version="1.0" encoding="UTF-8"?>
<web-app version="2.5" xmlns="http://java.sun.com/xml/ns/javaee" xmlns:xsi="http://www.w3.org/2001/XMLSchema-instance" xsi:schemaLocation="http://java.sun.com/xml/ns/javaee http://java.sun.com/xml/ns/javaee/web-app_2_5.xsd">
    <!--    register servlet    -->
    <servlet>
        <servlet-name>ServletVelocity</servlet-name>
        <servlet-class>com.edw.servlet.VelocityServlet</servlet-class>
    </servlet>
    <servlet-mapping>
        <servlet-name>ServletVelocity</servlet-name>
        <url-pattern>/velocity.service</url-pattern>
    </servlet-mapping>
    
    <!--    mapping all .vm files to velocity servlets  -->
    <servlet>
        <servlet-name>velocity</servlet-name>
        <servlet-class>org.apache.velocity.tools.view.servlet.VelocityViewServlet</servlet-class>
        <!--    load my toolbox -->
        <init-param>
             <param-name>org.apache.velocity.toolbox</param-name>
             <param-value>/WEB-INF/toolbox.xml</param-value>
        </init-param>
    </servlet>
    <servlet-mapping>
        <servlet-name>velocity</servlet-name>
        <url-pattern>*.vm</url-pattern>
    </servlet-mapping>
    
    <!--    session timeout -->
    <session-config>
        <session-timeout>
            30
        </session-timeout>
    </session-config>
    
    <!--    welcome file    -->
    <welcome-file-list>
        <welcome-file>velocity.service</welcome-file>
    </welcome-file-list>


</web-app>

This is my Netbeans project structure

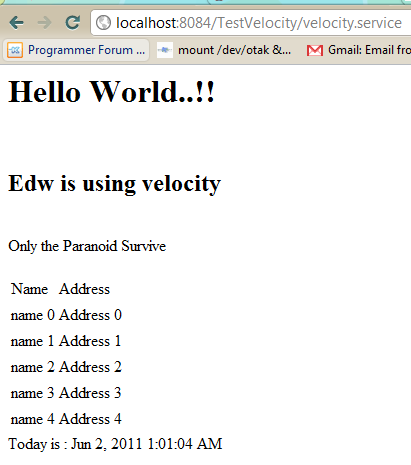
And this is what my browser displayed

In case of anybody asked about my log4j.properties, here is my configuration

# Global logging configuration
log4j.rootLogger=DEBUG,stdout

# Console output...
log4j.appender.stdout=org.apache.log4j.ConsoleAppender
log4j.appender.stdout.layout=org.apache.log4j.PatternLayout
log4j.appender.stdout.layout.ConversionPattern=%d{yyyy-MM-dd HH:mm:ss.SSS} %-5p %c:%L - %m%n

Well it’s not too difficult isn’t it? (H)