openshift

A Simple Load Testing Pipeline on Openshift 4 and Jenkins

Theres one thing needed to be done before deploying your app to production environment, and that is ensuring that your app able to perform well under a high load of transaction. One way to achieve that is by doing a load testing and stress testing internally before deploying to production, but there are times when load testing are being done at the end of development phase with not many time left for developer to do performance tuning. Therefore the better approach is by “shifting left” both load and stress testing phase to an earlier phase, and that is since development phase.

The concept on this blog is doing a load testing on a temporary deployed application, with a maximum one percent acceptable fail. Why i need to deploy the application first before doing a load testing? Because im trying to simulate the exact same condition with production, where each application is a standalone pod, with a specific memory and cpu allocation.

Everything is automated, monitored and managed thru jenkins pipeline with a specific load testing scenario created separatedly in a regular JMeter desktop ui, saved and mapped to a specific application. The detail can be see on on below image where scenario 1 is a scenario created for application 1.

The hard part is creating a JMeter application that is able to consume different scenario, with a parameterized thread and testing endpoint. Thats why im leveraging jmeter-maven-plugin for this, because it’s so lightweight and have a dynamic configuration.

It consist only a one pom file with multiple parameterized fields,

<?xml version="1.0" encoding="UTF-8"?>
<project xmlns="http://maven.apache.org/POM/4.0.0"
         xmlns:xsi="http://www.w3.org/2001/XMLSchema-instance"
         xsi:schemaLocation="http://maven.apache.org/POM/4.0.0 http://maven.apache.org/xsd/maven-4.0.0.xsd">
    <modelVersion>4.0.0</modelVersion>

    <groupId>com.edw</groupId>
    <artifactId>JMeterLoadTesting</artifactId>
    <version>1.0-SNAPSHOT</version>
    <name>JMeterLoadTesting</name>
    <description>A Load Testing tool</description>

    <properties>
        <java.version>11</java.version>
    </properties>

    <dependencies>

    </dependencies>

    <build>
        <plugins>
            <plugin>
                <groupId>com.lazerycode.jmeter</groupId>
                <artifactId>jmeter-maven-plugin</artifactId>
                <version>3.1.0</version>
                <executions>
                    <execution>
                        <id>configuration</id>
                        <goals>
                            <goal>configure</goal>
                        </goals>
                    </execution>
                    <execution>
                        <id>jmeter-tests</id>
                        <phase>integration-test</phase>
                        <goals>
                            <goal>jmeter</goal>
                        </goals>
                    </execution>
                    <execution>
                        <id>jmeter-check-results</id>
                        <goals>
                            <goal>results</goal>
                        </goals>
                    </execution>
                </executions>
                <configuration>
                    <testFilesIncluded>
                        <jMeterTestFile>${testfile}</jMeterTestFile>
                    </testFilesIncluded>
                    <propertiesJMeter>
                        <threads>${threads}</threads>
                        <rampup>${rampup}</rampup>
                        <loops>${loops}</loops>
                        <url>${url}</url>
                        <port>${port}</port>
                    </propertiesJMeter>
                    <errorRateThresholdInPercent>1</errorRateThresholdInPercent>
                </configuration>
            </plugin>
        </plugins>
    </build>
</project>

Next is we need to create a JMeter test scenario, a simple http GET to root url. And save it to test01.jmx, and put it on /test/jmeter folder so that jmeter-maven-plugin can detect this scenario.

We can test our JMeter script with below command, below example we are running test01.jmx which is doing a 25 hit testing within a 5 seconds timeframe.

mvn clean verify -Dthreads=5 -Dloops=5 -Drampup=5 \
 -Durl=localhost -Dport=8080 -Dtestfile=test01.jmx

The next complicated task is to create a simple Jenkins pipeline script to run this. It needs to have the ability to build and deploy an apps on a temporary pod, do load testing, and clean all resources once load testing is done.

node('maven2') {
    def appname = "app-loadtest-${env.BUILD_NUMBER}"
    try {
        stage ('pull code') {
            sh "git clone https://github.com/edwin/app-loadtest.git source"
        }
        stage ('deploy to ocp') {
            dir("source") {
                sh "oc new-build jenkins2/openjdk-11-rhel7 --name=${appname} --binary "
                sh "oc start-build ${appname} --from-dir=. --follow --wait"
                sh "oc new-app --docker-image=image-registry.openshift-image-registry.svc:5000/jenkins2/${appname}:latest --name=${appname} || true"
                sh "oc set resources dc ${appname} --limits=cpu=500m,memory=1024Mi --requests=cpu=200m,memory=256Mi"
            }
        }
        stage ('do load test') {
            sh "git clone https://github.com/edwin/jmeter-loadtesting.git load"
            dir("load") {
                // 5 threads x 5 loops in 5 seconds
                sh "mvn clean verify -Dthreads=5 -Dloops=5 -Drampup=5 -Durl=${appname} -Dport=8080 -Dtestfile=test01.jmx"
            }
        }
    } catch (error) {
       throw error
    } finally {
        stage('housekeeping') {
            sh "oc delete svc ${appname}"
            sh "oc delete bc ${appname}"
            sh "oc delete is ${appname}"
            sh "oc delete dc ${appname}"
        }
    }
}

If we run the pipeline, we can see that it will spawn an appication pod. We can check whether application runs perfectly or not, by running terminal directly inside it.

The result on Jenkins Dashboard will be like this,

As for the loadtest result, we can see those on our Jenkins logs

All codes are available on github,

https://github.com/edwin/app-loadtest

https://github.com/edwin/jmeter-loadtesting

So, have fun with Jenkins and JMeter 🙂

Creating A Simple Java Database Integration Test with Openshift 4 and Jenkins Pipeline

During testing phase, there are time when we want to do an automated testing against a real temporary database. For example, if my database in production environment is MySql means i need to have the exact same MySql for testing, with the same version and structure. And one of the most important thing is the test database lifespan is only as long as the test case lifespan which means that once test is done, either success or failed, the temporary database shall be destroyed.

There are multiple ways of achieving this, we can use database sidecar pattern, install a MySql service on our jenkins slave base image, or create a temporary MySql pod on our Openshift cluster specifically for testing purpose. The last approach is the one i choose and i will share how to achieve it on this blog.

Lets start by creating a very simple java web apps with Spring Boot and JUnit, it is basically a simple java apps but the only difference is the database url for testing is not hardcoded, but parameterized.

spring.datasource.url=jdbc:mysql://${MYSQL_URL}:3306/db_test
spring.datasource.driver-class-name=com.mysql.cj.jdbc.Driver
spring.datasource.username=user1
spring.datasource.password=password
spring.jpa.database-platform=org.hibernate.dialect.MySQL5InnoDBDialect

spring.jpa.hibernate.ddl-auto=update

and a simple integration test,

package com.edw.controller;

import com.edw.entity.Account;
import com.edw.repository.AccountRepository;
import io.restassured.RestAssured;
import org.apache.http.HttpStatus;
import org.junit.Before;
import org.junit.Test;
import org.junit.runner.RunWith;
import org.springframework.beans.factory.annotation.Autowired;
import org.springframework.boot.test.context.SpringBootTest;
import org.springframework.boot.web.server.LocalServerPort;
import org.springframework.test.annotation.DirtiesContext;
import org.springframework.test.context.junit4.SpringJUnit4ClassRunner;

import static io.restassured.RestAssured.given;

@RunWith(SpringJUnit4ClassRunner.class)
@SpringBootTest(webEnvironment = SpringBootTest.WebEnvironment.RANDOM_PORT)
@DirtiesContext
public class AccountControllerIT {
    @LocalServerPort
    private int port;

    @Autowired
    private AccountRepository accountRepository;

    @Before
    public void setup() {
        RestAssured.port = this.port;

        accountRepository.delete(new Account(10));

        Account account = new Account();
        account.setId(10);
        account.setAccountNumber("ten ten");
        accountRepository.save(account);
    }

    @Test
    public void getSuccess() throws Exception {
        given()
                .when()
                .get("/10")
                .then()
                .assertThat()
                .statusCode(HttpStatus.SC_OK);
    }

    @Test
    public void getFailed() throws Exception {
        given()
                .when()
                .get("/7")
                .then()
                .assertThat()
                .statusCode(HttpStatus.SC_INTERNAL_SERVER_ERROR);
    }
}

Once created, next step is to create a Jenkins setup for code build and deployment pipeline. Im using a simple a simple maven image which comes with OCP,

Next step is to create a pipeline to spawn database, do integration testing, build apps and destroy database once everything is completed. One think that i need to do is to create a unique database service between build, it will prevent database overlapping between different build and maintain a testing isolation. That is the reason why im appending build number on every temporary database services. And i will inject the database url thru maven build parameter in order to make sure that testing database are pointing to my newly created database.

node('maven') {
    try {
        stage ('pull code') {
            sh "git clone https://github.com/edwin/springboot-integration-test.git source"
        }
        stage('spawn db') {
            sh "oc new-app mysql-ephemeral --name mysql -p MYSQL_USER=user1 -p MYSQL_PASSWORD=password -p MYSQL_DATABASE=db_test -p DATABASE_SERVICE_NAME=mysql${env.BUILD_NUMBER}"
            
            // wait until db is ready
            sh """
            sleep 10
            while oc get po --field-selector=status.phase=Running | grep mysql${env.BUILD_NUMBER}-1-deploy; do
                sleep 2
            done
            """
        }
        stage ('test') {
            dir("source") {
                sh "mvn verify -DMYSQL_URL=mysql${env.BUILD_NUMBER}"
            }
        }
        stage ('build') {
            dir("source") {
                sh "mvn clean package -DskipTests=true"
            }
        }
    } catch (error) {
       throw error
    } finally {
        stage('destroy db') {
            sh "oc delete dc mysql${env.BUILD_NUMBER}"
            sh "oc delete svc mysql${env.BUILD_NUMBER}"
            sh "oc delete secret mysql${env.BUILD_NUMBER}"
        }
    }    
}

It will generates this output on Jenkins dashboard,

If we check the content of our database while testing is happen, we can see that a table is created and a data is automatically inserted there for testing purpose.

And after test and build is done, we can see that database is deleted automatically from our Openshift cluster.

So basically it is very simple to do an integration test on Openshift 4 and Jenkins, and the code for testing is available on my github repository.

https://github.com/edwin/springboot-integration-test

Error “verifying certificate: x509: certificate signed by unknown authority” When Creating HTTPS on Openshift

I had this error when creating a reeencrypt secure route on Openshift,

spec.tls.certificate: Invalid value: "redacted certificate data": error verifying certificate: x509: certificate signed by unknown authority
reason: ExtendedValidationFailed

this is the oc command that im using,

oc create route reeencrypt my-https --service my-gateway-https --key private.key --cert server.pem --cacert cacert.pem -n my-project

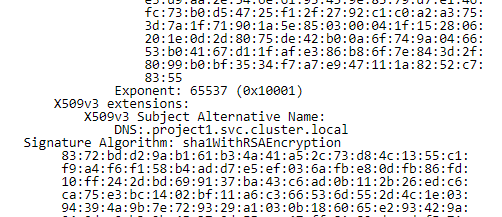
This error is due to im using an incorrect certificate for reencrypting. Using certificate decoder shows whats wrong with my certificate,

The correct certificate should show this,

Regenerating my certificate fix this issue.

Migrating ReplicationController Between Openshift Cluster

For this scenario, im trying to migrate replicationcontroller (RC) between two OCP with different version. One OCP is on version 3.x, while the other one is 4.x.
So, it’s actually quite tricky. This is the first method that im doing, a simple export on OCP 3

oc get rc -o yaml -n projectname --export > rc.yaml

And do a simple import on OCP 4

oc create -n projectname -f rc.yaml

But there are some error happens,

Error from server (Forbidden): replicationcontrollers "rc-1" is forbidden: 
cannot set blockOwnerDeletion if an ownerReference refers to a resource you can't set finalizers on: no RBAC policy matched, <nil>

It seems like despite im using –export parameter, somehow still exporting the previous DC uid on rc.yaml

    labels:
      app: HelloWorld
      group: com.redhat.edw
      openshift.io/deployment-config.name: helloworld
      provider: fabric8
      version: "1.0"
    name: helloworld-5
    namespace: project
    ownerReferences:
    - apiVersion: apps.openshift.io/v1
      blockOwnerDeletion: true
      controller: true
      kind: DeploymentConfig
      name: helloworld
      uid: 8a96de62-9be4-11ea-a05c-0a659b38d468
    resourceVersion: "65350349"
    selfLink: /api/v1/namespaces/project/replicationcontrollers/helloworld-5
    uid: 257eda84-9be7-11ea-a05c-0a659b38d468

The solution is by removing ownerReferences tag from yaml,

sed -i '/ownerReferences/,+6 d' rc.yaml

It will regenerate ownerReference tag once successfully imported to a new project.


But another problem arise. It seems like despite i’ve successfully import all my RCs, they are not showing when i do a oc get rc command. The culprit is revisionHistoryLimit, removing it from our dc solve this problem.

oc patch  dc helloworld -n project --type json --patch '[{ "op": "remove", "path": "/spec/revisionHistoryLimit" }]'