Java

java programming

How to Create A Java Class Performance Test Using JMeters AbstractJavaSamplerClient

JMeter is a very powerfull tools to do performance testing. In this tutorial, im going to simulate a heavy load on a java object to test its strength and performance testing. My java class is very simple, only an ordinary java class to do inserts into mysql database using Hibernate framework.

first is a sample database and a table

CREATE DATABASE test;
USE test;
CREATE
    TABLE student
    (
        id INT NOT NULL AUTO_INCREMENT,
        studentname VARCHAR(60) NOT NULL,
        PRIMARY KEY (id)
    );

a java class and xml as representation for database’s table

package com.edw.bean;

public class Student implements java.io.Serializable {

    private Integer id;
    private String studentname;

    public Student() {
    }

    public Student(String studentname) {
       this.studentname = studentname;
    }
	
	// other setter and getter
<?xml version="1.0"?>
<!DOCTYPE hibernate-mapping PUBLIC "-//Hibernate/Hibernate Mapping DTD 3.0//EN"
"http://hibernate.sourceforge.net/hibernate-mapping-3.0.dtd">
<hibernate-mapping>
    <class name="com.edw.bean.Student" table="student" catalog="test">
        <id name="id" type="java.lang.Integer">
            <column name="id" />
            <generator class="identity" />
        </id>
        <property name="studentname" type="string">
            <column name="studentname" length="60" not-null="true" />
        </property>
    </class>
</hibernate-mapping>

this is my Hibernate main configuration xml

<?xml version="1.0" encoding="UTF-8"?>
<!DOCTYPE hibernate-configuration PUBLIC "-//Hibernate/Hibernate Configuration DTD 3.0//EN" "http://hibernate.sourceforge.net/hibernate-configuration-3.0.dtd">
<hibernate-configuration>
  <session-factory>
    <property name="hibernate.dialect">org.hibernate.dialect.MySQLDialect</property>
    <property name="hibernate.connection.driver_class">com.mysql.jdbc.Driver</property>
    <property name="hibernate.connection.url">jdbc:mysql://localhost:3306/test</property>
    <property name="hibernate.connection.username">root</property>
	<property name="hibernate.connection.password">xxxxxx</property>
    <property name="hibernate.connection.autocommit">true</property>
    <mapping resource="com/edw/bean/Student.hbm.xml"/>
  </session-factory>
</hibernate-configuration>

and my java class to load Hibernate’s configuration

package com.edw.hbm;

import org.hibernate.cfg.AnnotationConfiguration;
import org.hibernate.SessionFactory;

/**
 * @author edw
 */
public class HibernateUtil {
    private static final SessionFactory sessionFactory;

    static {
        try {
            sessionFactory = new AnnotationConfiguration().configure().buildSessionFactory();
        } catch (Throwable ex) {            
            System.err.println("Initial SessionFactory creation failed." + ex);
            throw new ExceptionInInitializerError(ex);
        }
    }

    public static SessionFactory getSessionFactory() {
        return sessionFactory;
    }
}

This is my tested java class, it has to extends AbstractJavaSamplerClient so the jmeter application can test it

package com.edw.test;

import com.edw.bean.Student;
import com.edw.hbm.HibernateUtil;
import java.util.Date;
import java.util.HashMap;
import java.util.Iterator;
import java.util.Map;
import org.apache.jmeter.config.Arguments;
import org.apache.jmeter.protocol.java.sampler.AbstractJavaSamplerClient;
import org.apache.jmeter.protocol.java.sampler.JavaSamplerContext;
import org.apache.jmeter.samplers.SampleResult;
import org.apache.jmeter.threads.JMeterContextService;
import org.apache.jmeter.threads.JMeterVariables;
import org.hibernate.Session;
import org.hibernate.SessionFactory;

/**
 *  com.edw.test.StudentStressTest
 *
 *  @author edw
 */
public class StudentStressTest extends AbstractJavaSamplerClient {

    private Map<String, String> mapParams = new HashMap<String, String>();
    private SessionFactory sessionFactory = HibernateUtil.getSessionFactory();

    public StudentStressTest() {
        super();
    }

    @Override
    public void setupTest(JavaSamplerContext context) {
        for (Iterator<String> it = context.getParameterNamesIterator(); it.hasNext();) {
            String paramName =  it.next();
            mapParams.put(paramName, context.getParameter(paramName));
        }
    }

    public SampleResult runTest(JavaSamplerContext context) {
        SampleResult result = new SampleResult();

        try {

            JMeterVariables vars = JMeterContextService.getContext().getVariables();
            vars.put("demo", "demoVariableContent");

            result.sampleStart();

            Student student = new Student();
            student.setStudentname(mapParams.get("name")+" "+new Date().getTime());
            Session session = sessionFactory.openSession();
            session.save(student);
            session.flush();
            session.close();

            result.sampleEnd();

            
            result.setSuccessful(true);
            result.setSampleLabel("SUCCESS: " + student.getStudentname());

        } catch (Throwable e) {
            result.sampleEnd();
            result.setSampleLabel("FAILED: '" + e.getMessage() + "' || " + e.toString());
            result.setSuccessful(false);

            e.printStackTrace();
            System.out.println("\n\n\n");
        }

        return result;
    }

    @Override
    public Arguments getDefaultParameters() {

        Arguments params = new Arguments();

        params.addArgument("name", "edw");

        return params;
    }
}

Next is build your project into jar and put it into jmeter’s path ( \lib\ext ), dont forget to copy your application library such as hibernate3.jar.
If you open your JMeter ui, you can see your java class on Add > Sampler > Java Request. You can see the results sumamry on tab summary report.

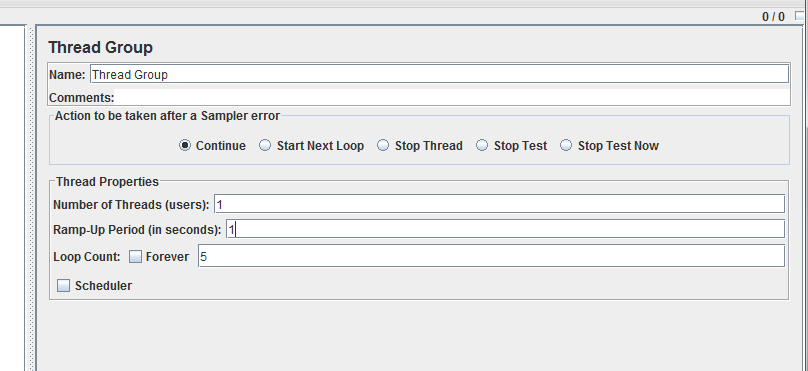
This is my Netbeans project structure, and my jmeter configuration.

Have fun working with JMeter 🙂

Creating A New WebSphere Instance

Im planning to create more than 1 WebSphere instance on my box, im using a CentOS for development, and IBM AIX for production. On this example i have an instance named “AppSrv01” and trying to create a new WebSphere instance “AppSrvTeller”. Btw, im using WAS 6.1 on my box.

Okay here we go,
first is executing manageprofiles.sh to create a new profiles, when im executing manageprofiles.sh -help -create, it will print

The following command line arguments are required for this mode.
Command-line arguments are case sensitive.
-create: Creates a new profile. Specify -help -create -templatePath <path> to get template-specific help information.
-templatePath: The fully qualified path name of the profile template that is located on the file system. The following example selects a template: -templatePath <app_server_home>/profileTemplates/<Template_name>
-profileName: The name of the profile.
-profilePath: The intended location of the profile in the file system.

The following command line arguments are optional, and have no default values.
Command-line arguments are case sensitive.
-isDefault: Make this profile the default target of commands that do not use their profile parameter.
-omitAction: Omit optional features.

you just provide the needed parameters, well in my case i’ll show you what i write on my console

[root@localhost bin]# uname -a
Linux localhost.localdomain 2.6.18-128.el5 #1 SMP Wed Jan 21 10:44:23 EST 2009 i686 i686 i386 GNU/Linux
[root@localhost bin]# pwd
/opt/IBM/WebSphere/AppServer/bin
[root@localhost bin]# sh manageprofiles.sh -create -profileName AppSrvTeller -templatePath /opt/IBM/WebSphere/AppServer/profileTemplates/default/ -profilePath /opt/IBM/WebSphere/AppServer/profiles/AppSrvTeller
INSTCONFSUCCESS: Success: Profile AppSrvTeller now exists. Please consult /opt/IBM/WebSphere/AppServer/profiles/AppSrvTeller/logs/AboutThisProfile.txt for more information about this profile.

Hope it can help others (H)

How to Set Timezone on WebSphere Application Server

It’s actually quite easy, but a little tricky. This is how i do it,

1. Start the administrative console.
2. In the topology tree, expand Servers and click Application Servers.
3. Click the name of the application server for which you want to set the time zone.
4. On the application server page, click Process Definition.
Process Definition
5. On the Process Definition page, click Java Virtual Machine.
6. On the Java Virtual Machine page, click Custom Properties.
7. On the Custom Properties page, click New.
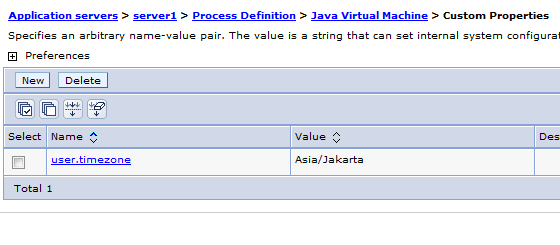
8. Specify user.timezone in the Name field and timezone in the Value field, where timezone is the supported value for your time zone.
9. Click Apply.
10. Save the configuration

In this example, i’m setting my timezone as Asia/Jakarta

user.timezone=Asia/Jakarta  

Timezone Success

Have fun with WebSphere (*)

A Simple Hibernate Caching Example using OSCache and EHCache

In this example im trying to create a simple application using Hibernate’s caching feature. What is cache anyway? A cache is designed to reduce traffic between your application and the database by conserving data already loaded from the database and put it whether in memory or in file. Database access is necessary only when retrieving data that is not currently available in the cache. So basically not all queries are taken from database, but from cache instead.

Hibernate use EHCache for default caching, but now im trying to demonstrate both OSCache and EHCache caching library. But you can only use one of it at one time. Both of them only differ in caching configuration, but the rest are still the same.

First is a simple sql file, a java bean and its hibernate xml configuration

CREATE
    TABLE matakuliah
    (
        kodematakuliah VARCHAR(10) NOT NULL,        
        namamatakuliah VARCHAR(20),
        PRIMARY KEY (kodematakuliah)
    )
    ENGINE=InnoDB DEFAULT CHARSET=latin1;
INSERT
INTO
    matakuliah
    (
        kodematakuliah,        
        namamatakuliah
    )
    VALUES
    (
        '123',        
        'ccc'
    );
package com.edw.bean;

public class Matakuliah  implements java.io.Serializable {

     public class Matakuliah  implements java.io.Serializable {

     private String kodematakuliah;
     private String namamatakuliah;

    public Matakuliah() {
    }

    public Matakuliah(String kodematakuliah) {
        this.kodematakuliah = kodematakuliah;
    }
    public Matakuliah(String kodematakuliah, String namamatakuliah) {
       this.kodematakuliah = kodematakuliah;      
       this.namamatakuliah = namamatakuliah;
    }
   
    // other setters and getters   
}
<?xml version="1.0" encoding="UTF-8"?>
<!DOCTYPE hibernate-mapping PUBLIC "-//Hibernate/Hibernate Mapping DTD 3.0//EN" "http://hibernate.sourceforge.net/hibernate-mapping-3.0.dtd">
<hibernate-mapping>
  <class catalog="kampus" name="com.edw.bean.Matakuliah" table="matakuliah">

    <!-- caching configuration -->
    <cache usage="read-write" />
    
    <id name="kodematakuliah" type="string">
      <column length="10" name="kodematakuliah"/>
      <generator class="assigned"/>
    </id>
      
    <property name="namamatakuliah" type="string">
      <column length="20" name="namamatakuliah"/>
    </property>       
  </class>
</hibernate-mapping>

please take a look at line 7, im using read-write because my data sometimes get updated. If you are planning to have static data that never changes, use read-only.

Next is registering EhCacheProvider on hibernate.cfg.xml file

<?xml version="1.0" encoding="UTF-8"?>
<!DOCTYPE hibernate-configuration PUBLIC "-//Hibernate/Hibernate Configuration DTD 3.0//EN" "http://hibernate.sourceforge.net/hibernate-configuration-3.0.dtd">
<hibernate-configuration>
  <session-factory>
    <property name="hibernate.dialect">org.hibernate.dialect.MySQLDialect</property>
    <property name="hibernate.connection.driver_class">com.mysql.jdbc.Driver</property>
    <property name="hibernate.connection.url">jdbc:mysql://localhost:3307/kampus</property>
    <property name="hibernate.connection.username">root</property>
    <property name="hibernate.connection.autocommit">true</property>
    <property name="hibernate.cache.use_second_level_cache">true</property>
    <property name="hibernate.cache.use_query_cache">true</property>
    <property name="hibernate.cache.provider_class">org.hibernate.cache.EhCacheProvider</property>
    <property name="hibernate.show_sql">true</property>
    <property name="hibernate.format_sql">true</property>
    <mapping resource="com/edw/bean/Matakuliah.hbm.xml"/>    
  </session-factory>
</hibernate-configuration>

create a java file to load your hibernate configuration file

package com.edw.util;

import org.hibernate.cfg.AnnotationConfiguration;
import org.hibernate.SessionFactory;

public class HiberUtil {
    private static final SessionFactory sessionFactory;

    static {
        try {
            sessionFactory = new AnnotationConfiguration().configure().buildSessionFactory();
        } catch (Throwable ex) {
            throw new ExceptionInInitializerError(ex);
        }
    }

    public static SessionFactory getSessionFactory() {
        return sessionFactory;
    }
}

and dont forget your ehcache.xml configuration

<?xml version="1.0" encoding="UTF-8"?>
<!--
    caching configuration
-->
<ehcache>
    <defaultCache
        maxElementsInMemory="10"
        eternal="false"
        timeToIdleSeconds="0"
        timeToLiveSeconds="0"
        overflowToDisk="false"/>
</ehcache>

and this is my java file to test hibernate’s caching ability

package com.edw.main.caching;

import com.edw.bean.Matakuliah;
import com.edw.util.HiberUtil;
import java.util.Date;
import org.hibernate.Session;

public class CachingMain {

    public CachingMain() {
    }   

    /**
     *  do some repeated queries for table Matakuliah
     *  query results are taken from cache memory instead of database     
     */
    private void withCache() {

        Session session = null;
        try {            
            for (int i = 0; i < 3; i++) {

                // open session
                session = HiberUtil.getSessionFactory().openSession();                

                // time needed
                long now = new Date().getTime();

                // select
                Matakuliah matakuliah = (Matakuliah)session.load(Matakuliah.class, "123");

                // print
                System.out.println("matakuliah "+matakuliah.getNamamatakuliah());
                System.out.println("Time : " + (new Date().getTime() - now) + " ms");

                // sleep for 3seconds
                Thread.sleep(3000);
            }
        } catch (Exception e) {
            e.printStackTrace();
        } finally {
            if (session != null) {
                session.close();
            }
        }
    }

    public static void main(String[] args) {
        CachingMain main = new CachingMain();
        main.withCache();
    }
}

you can see in your console, if you use log4j, this is what happen when Hibernate is querying from cache instead of database

DEBUG org.hibernate.impl.SessionImpl:220 - opened session at timestamp: 5364197853302784
DEBUG org.hibernate.jdbc.ConnectionManager:404 - aggressively releasing JDBC connection
DEBUG org.hibernate.impl.SessionImpl:832 - initializing proxy: [com.edw.bean.Matakuliah#123]
DEBUG org.hibernate.cache.EhCache:68 - key: com.edw.bean.Matakuliah#123
DEBUG org.hibernate.engine.StatefulPersistenceContext:790 - initializing non-lazy collections
matakuliah ccc
Time : 1 ms

Moving from EhCache to OsCache is very simple, all you have to do is replacing 1 line in your xml file, and adding an oscache.properties file.

<?xml version="1.0" encoding="UTF-8"?>
<!DOCTYPE hibernate-configuration PUBLIC "-//Hibernate/Hibernate Configuration DTD 3.0//EN" "http://hibernate.sourceforge.net/hibernate-configuration-3.0.dtd">
<hibernate-configuration>
  <session-factory>
    <property name="hibernate.dialect">org.hibernate.dialect.MySQLDialect</property>
    <property name="hibernate.connection.driver_class">com.mysql.jdbc.Driver</property>
    <property name="hibernate.connection.url">jdbc:mysql://localhost:3307/kampus</property>
    <property name="hibernate.connection.username">root</property>
    <property name="hibernate.connection.autocommit">false</property>
    <property name="hibernate.cache.use_second_level_cache">true</property>
    <property name="hibernate.cache.use_query_cache">true</property>
    <property name="hibernate.cache.provider_class">org.hibernate.cache.OSCacheProvider</property>
    <property name="hibernate.show_sql">true</property>
    <property name="hibernate.format_sql">true</property>
    <mapping resource="com/edw/bean/Matakuliah.hbm.xml"/>
  </session-factory>
</hibernate-configuration>

and this is my oscache.properties

cache.capacity=1000
cache.path=c:\\cache\\
cache.persistence.class=com.opensymphony.oscache.plugins.diskpersistence.HashDiskPersistenceListener

this is what happen on my Netbeans console when im using OsCache

DEBUG org.hibernate.impl.SessionImpl:220 - opened session at timestamp: 5364208706285568
DEBUG org.hibernate.jdbc.ConnectionManager:404 - aggressively releasing JDBC connection
DEBUG org.hibernate.impl.SessionImpl:832 - initializing proxy: [com.edw.bean.Matakuliah#123]
DEBUG com.opensymphony.oscache.base.algorithm.AbstractConcurrentReadCache:694 - get called (key=com.edw.bean.Matakuliah#123.com.edw.bean.Matakuliah)
DEBUG org.hibernate.engine.StatefulPersistenceContext:790 - initializing non-lazy collections
matakuliah ccc
Time : 1 ms

This is my project structure,

Hope it can help others. Have fun. (*)

How to Get Offline Message’s Timestamp on Openfire

I had a simple project using Openfire and Smack library, i found an obstacle when i had to display offline message’s timestamp. I usually use local timestamp for simple messages, but when dealing with offline messages i had to use server’s timestamp, that’s the tricky part.

It is actually very simple to solve it, only several lines of codes. But i’ve spend ridiculously amount of time searching the net for it. That’s why i try to posted it in my blog in case of others might need it.

This is an ordinary packet received,

<message id="Vw7cj-13" to="gajah@edw/Smack" from="kelinci@edw/Smack">
  <body>ordinary message</body>
</message>

while this is what received offline packet looks like

<message id="Vw7cj-12" to="gajah@edw/Smack" from="kelinci@edw/Smack">
  <body>example of offline message</body>
  <thread>U249D0</thread>
  <x xmlns="jabber:x:delay" stamp="20110625T06:53:52" from="edw"/>
</message>

As you can see, offline messages send its timestamp on line 4. Now the problem is how to get it.
But before testing, dont forget to store your message offline policy. And btw, my server name is “edw”.

This is how i solve it,

DelayInformation inf = null;
try {
	inf = (DelayInformation)packet.getExtension("x","jabber:x:delay");
} catch (Exception e) {
	log.error(e);
}
// get offline message timestamp
if(inf!=null){
	Date date = inf.getStamp();

And please dont forget to include smackx.jar.

Im using Openfire 3.6.4 and Smack. I am very recommend these libraries for creating a simple yet powerful instant messaging application based on Java. Have fun 🙂