javaee

Error “java.lang.ClassNotFoundException: com.ibm.icu.text.SimpleDateFormat” When Deploying GWT Application

Today i’ve met a very weird error when trying to deploy my GWT application to my tomcat 7,

SEVERE: Exception while dispatching incoming RPC call
com.google.gwt.user.server.rpc.UnexpectedException: Service method 'public abstract java.util.List id.net.baculsoft.app.client.service. LoginService.getUtilDao(java.lang.String,java.util.Map)' 
threw an unexpected exception: java.lang.NoClassDefFoundError: com/ibm/icu/text/SimpleDateFormat
	at com.google.gwt.user.server.rpc.RPC. encodeResponseForFailure(RPC.java:385)
	at com.google.gwt.user.server.rpc.RPC. invokeAndEncodeResponse(RPC.java:588)
	at com.google.gwt.user.server.rpc.RPC. invokeAndEncodeResponse(RPC.java:551)
	at org.gwtrpcspring.RemoteServiceDispatcher. invokeAndEncodeResponse(RemoteServiceDispatcher.java:57)
	at org.gwtrpcspring.RemoteServiceDispatcher. processCall(RemoteServiceDispatcher.java:38)
	at com.google.gwt.user.server.rpc. RemoteServiceServlet.processPost(RemoteServiceServlet.java:248)
	at com.google.gwt.user.server.rpc. AbstractRemoteServiceServlet.doPost(AbstractRemoteServiceServlet.java:62)

which somehow, never happen on my development mode. After searching and trying various workarounds for several hours, i finally make it work by adding icu4j.jar. Well despite icu4j.jar’s size is more than 3mb, at least i’ve make my application running well. Thank God 😉

A Simple HTTPS Configuration Example on Apache Tomcat 6

This idea comes suddenly on my head while i was reading a question on Kaskus’ programmer forum about how to setup a https connection on Apache Tomcat, thats why today im trying to write a simple how-to example on creating a simple HTTPS connection using Apache Tomcat 6. Who knows perhaps someone would find it useful.

Let’s start with creating a simple certificate file using keytool.exe

C:\Program Files\Java\jdk1.6.0_19\bin>keytool.exe -genkey -alias tomcat -keyalg RSA -keystore edw.jks

after you insert your keystore password (i entered “secret” as my password) and several simple questions such as “What is your first and last name?”, it would create a file.

What you need to do next is to link your certificate to Tomcat’s server.xml configuration. This is what i add to my server.xml configuration.

<Connector port="8443" protocol="HTTP/1.1" SSLEnabled="true"
               maxThreads="150" scheme="https" secure="true"
               clientAuth="false" sslProtocol="TLS" keystoreFile="D:\edw.jks" 
               keystorePass="secret" />
<!-- keystorePass use the same password -->

And i also add this to my web.xml file, located under my tomcat’s conf folder

	<security-constraint>
		<web-resource-collection>
			<web-resource-name>Automatic SLL Forwarding</web-resource-name>
			<url-pattern>/*</url-pattern>
		</web-resource-collection>
		<user-data-constraint>
			<transport-guarantee>CONFIDENTIAL</transport-guarantee>
		</user-data-constraint>
	</security-constraint>

This is what my page will look like,

Hope it would help others, cheers (B)

Creating A New WebSphere Instance

Im planning to create more than 1 WebSphere instance on my box, im using a CentOS for development, and IBM AIX for production. On this example i have an instance named “AppSrv01” and trying to create a new WebSphere instance “AppSrvTeller”. Btw, im using WAS 6.1 on my box.

Okay here we go,
first is executing manageprofiles.sh to create a new profiles, when im executing manageprofiles.sh -help -create, it will print

The following command line arguments are required for this mode.
Command-line arguments are case sensitive.
-create: Creates a new profile. Specify -help -create -templatePath <path> to get template-specific help information.
-templatePath: The fully qualified path name of the profile template that is located on the file system. The following example selects a template: -templatePath <app_server_home>/profileTemplates/<Template_name>
-profileName: The name of the profile.
-profilePath: The intended location of the profile in the file system.

The following command line arguments are optional, and have no default values.
Command-line arguments are case sensitive.
-isDefault: Make this profile the default target of commands that do not use their profile parameter.
-omitAction: Omit optional features.

you just provide the needed parameters, well in my case i’ll show you what i write on my console

[root@localhost bin]# uname -a
Linux localhost.localdomain 2.6.18-128.el5 #1 SMP Wed Jan 21 10:44:23 EST 2009 i686 i686 i386 GNU/Linux
[root@localhost bin]# pwd
/opt/IBM/WebSphere/AppServer/bin
[root@localhost bin]# sh manageprofiles.sh -create -profileName AppSrvTeller -templatePath /opt/IBM/WebSphere/AppServer/profileTemplates/default/ -profilePath /opt/IBM/WebSphere/AppServer/profiles/AppSrvTeller
INSTCONFSUCCESS: Success: Profile AppSrvTeller now exists. Please consult /opt/IBM/WebSphere/AppServer/profiles/AppSrvTeller/logs/AboutThisProfile.txt for more information about this profile.

Hope it can help others (H)

How to Set Timezone on WebSphere Application Server

It’s actually quite easy, but a little tricky. This is how i do it,

1. Start the administrative console.
2. In the topology tree, expand Servers and click Application Servers.
3. Click the name of the application server for which you want to set the time zone.
4. On the application server page, click Process Definition.
Process Definition
5. On the Process Definition page, click Java Virtual Machine.
6. On the Java Virtual Machine page, click Custom Properties.
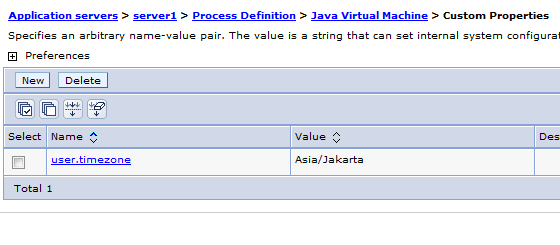
7. On the Custom Properties page, click New.
8. Specify user.timezone in the Name field and timezone in the Value field, where timezone is the supported value for your time zone.
9. Click Apply.
10. Save the configuration

In this example, i’m setting my timezone as Asia/Jakarta

user.timezone=Asia/Jakarta  

Timezone Success

Have fun with WebSphere (*)

Clustering and Session Replication Using Glassfish 3.1

Sometimes we need to replicate sessions between clustered environment to make sure session failovers. In this tutorial im trying to clustered 2 Glassfish instances located in the same computer, create a simple webapps and try to see whether session in instance 1 replicated to instance 2. I dont know why but Glassfish 3.0 seems doesnt support clustering so im using Glassfish version 3.1 instead.

Lets start by starting Glassfish, go to /bin and start it from command promt by typing asadmin start-domain domain1.

After it started, go to Glassfish console from your browser. Glassfish console URL will be http://localhost:4848/. Login and start creating a cluster from Clusters menu.

Start your cluster,

congratulation, you have started your cluster. Lets see details from each instances,

it shows your instance’s http port.

To test our session replication, i create a simple web application using Netbeans 6.9.
First is a simple jsp file, index.jsp

<%@page import="java.util.Enumeration"%>
<%@page contentType="text/html" pageEncoding="UTF-8"%>
<!DOCTYPE HTML PUBLIC "-//W3C//DTD HTML 4.01 Transitional//EN"
    "http://www.w3.org/TR/html4/loose.dtd">

<html>
    <head>
        <meta http-equiv="Content-Type" content="text/html; charset=UTF-8">
        <title>JSP Page</title>
    </head>
    <body>
        <h1>Session Form</h1>

        <%
                    if (request.getParameter("sessionName") != null && request.getParameter("sessionValue") != null) {
                        HttpSession httpSession = request.getSession();
                        httpSession.setAttribute(request.getParameter("sessionName"), request.getParameter("sessionValue"));
                    }
        %>

        <form action="index.jsp" method="POST">

            your session name : <input type="text" name="sessionName" /> <br />
            your session value : <input type="text" name="sessionValue" /> <br />
            <input type="submit" />

        </form>

        <h1>Your Sessions</h1>

        <%
                    Enumeration sessionNames = session.getAttributeNames();
                    while (sessionNames.hasMoreElements()) {
                        String mySessionName = sessionNames.nextElement().toString();
                        String mySession = request.getSession().getAttribute(mySessionName).toString();
                        out.print(mySessionName+ " --> "+mySession + " <br />");
                    }
        %>

    </body>
</html>

And the most important is the web.xml configuration,

<?xml version="1.0" encoding="UTF-8"?>
<web-app version="2.5" xmlns="http://java.sun.com/xml/ns/javaee" xmlns:xsi="http://www.w3.org/2001/XMLSchema-instance" xsi:schemaLocation="http://java.sun.com/xml/ns/javaee http://java.sun.com/xml/ns/javaee/web-app_2_5.xsd">
    <distributable id="sessionDistribute" />
    <session-config>
        <session-timeout>
            30
        </session-timeout>
    </session-config>
    <welcome-file-list>
        <welcome-file>index.jsp</welcome-file>
    </welcome-file-list>
</web-app>

Build it into a war app and deploy it to our clustered environment, always make sure the Availability option checked as enabled.

After you launch it, input some value to jsp page in instance1 and save it. It will save your values to a session.

open instance2’s jsp page and check whether your instance1’s session is there.

As you can see, your sessions from instance 1 is replicated and available from instance 2.

Have fun using Glassfish. 🙂