Programming

basic programming

Beginning Apache Velocity : Creating A Simple Web Application

Today im going to try create a simple web application using Apache Velocity. From what is written on its wiki, Apache Velocty is a simple yet powerful Java-based template engine that renders data from plain Java objects to text, xml, email, SQL, Post Script, HTML etc. The template syntax and rendering engine are both easy to understand and quick to learn and implement.
In this example i’m using Velocity 1.7 and Velocity Tools View 2.0, Netbeans 6.9 and Apache Tomcat 6. Im using a simple Servlet acting as Controller, Velocity file with extension .vm as View and a simple ArrayList to mimic ResultSets as the Model.

Lets start with a simple Velocity file

<html>
<head> <title>Hello Velocity</title> </head>
<body>
<h1>Hello World..!!</h1>
<br />
## this is a comment, set variable name with "Edw" value
#set( $name = "Edw" )

<h2> $name is using velocity</h2>

## if-else statement
#if($name.equals("NotEdw"))
    <br />
    not an Edw
#else
    <br />
    Only the Paranoid Survive
#end

<br />
<br />

<table>
<tr>
    <td>Name</td>
    <td>Address</td>
<tr>
## for each statement to iterate over a collection
#foreach($user in $users)
<tr>
    <td>$user.name</td>
    <td>$user.address</td>
<tr>
#end
</table>

## simple velocity method
Today is :  $date.medium
</body>
</html>

i named it index.vm and put it under the Web Pages folder.

Next is creating an xml file, toolbox.xml for registering classes that is needed by Velocity. In this example im only registering a simple DateTool class.

<toolbox>
    <tool>
        <key>date</key>
        <scope>application</scope>
        <class>org.apache.velocity.tools.generic.DateTool</class>
    </tool>
</toolbox>

Next is a simple javabean

package com.edw.bean;

public class User {

    private String name;
    private String address;

    public User() {
    }

    public User(String name, String address) {
        this.name = name;
        this.address = address;
    }

	// other setter - getter
}

And a simple Servlet, im using it simply just for Controller function, it forward my requests-responses to index.vm

package com.edw.servlet;

import com.edw.bean.User;
import java.io.IOException;
import java.util.ArrayList;
import java.util.List;
import javax.servlet.RequestDispatcher;
import javax.servlet.ServletException;
import javax.servlet.http.HttpServlet;
import javax.servlet.http.HttpServletRequest;
import javax.servlet.http.HttpServletResponse;
import org.apache.log4j.Logger;

public class VelocityServlet extends HttpServlet {

    private Logger logger = Logger.getLogger(getClass());

    @Override
    protected void doGet(HttpServletRequest request, HttpServletResponse response)
    throws ServletException, IOException {        
        try {
            // simulate a database query
            List<User> users = new ArrayList<User>();
            for (int i = 0; i < 5; i++) {
                User user = new User("name "+i, "Address "+i);
                users.add(user);
            }
            // set values
            request.setAttribute("users", users);

            // get UI
            RequestDispatcher requestDispatcher =  request.getRequestDispatcher("index.vm");
            requestDispatcher.forward(request, response);
        } catch(Exception ex){
            logger.error(ex);
        }
    } 
}
&#91;/code&#93;

And the most important part is web.xml
&#91;code language="xml" highlight="10,20,25"&#93;
<?xml version="1.0" encoding="UTF-8"?>
<web-app version="2.5" xmlns="http://java.sun.com/xml/ns/javaee" xmlns:xsi="http://www.w3.org/2001/XMLSchema-instance" xsi:schemaLocation="http://java.sun.com/xml/ns/javaee http://java.sun.com/xml/ns/javaee/web-app_2_5.xsd">
    <!--    register servlet    -->
    <servlet>
        <servlet-name>ServletVelocity</servlet-name>
        <servlet-class>com.edw.servlet.VelocityServlet</servlet-class>
    </servlet>
    <servlet-mapping>
        <servlet-name>ServletVelocity</servlet-name>
        <url-pattern>/velocity.service</url-pattern>
    </servlet-mapping>
    
    <!--    mapping all .vm files to velocity servlets  -->
    <servlet>
        <servlet-name>velocity</servlet-name>
        <servlet-class>org.apache.velocity.tools.view.servlet.VelocityViewServlet</servlet-class>
        <!--    load my toolbox -->
        <init-param>
             <param-name>org.apache.velocity.toolbox</param-name>
             <param-value>/WEB-INF/toolbox.xml</param-value>
        </init-param>
    </servlet>
    <servlet-mapping>
        <servlet-name>velocity</servlet-name>
        <url-pattern>*.vm</url-pattern>
    </servlet-mapping>
    
    <!--    session timeout -->
    <session-config>
        <session-timeout>
            30
        </session-timeout>
    </session-config>
    
    <!--    welcome file    -->
    <welcome-file-list>
        <welcome-file>velocity.service</welcome-file>
    </welcome-file-list>


</web-app>

This is my Netbeans project structure

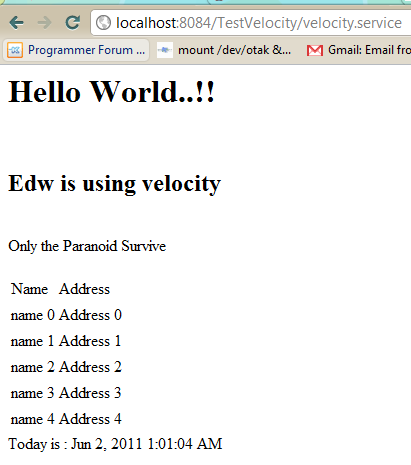
And this is what my browser displayed
In case of anybody asked about my log4j.properties, here is my configuration

# Global logging configuration
log4j.rootLogger=DEBUG,stdout

# Console output...
log4j.appender.stdout=org.apache.log4j.ConsoleAppender
log4j.appender.stdout.layout=org.apache.log4j.PatternLayout
log4j.appender.stdout.layout.ConversionPattern=%d{yyyy-MM-dd HH:mm:ss.SSS} %-5p %c:%L - %m%n

Well it’s not too difficult isn’t it? (H)

Create New Trac Users on Windows

Trac is an interesting project management software, wiki and issue tracking system. Very light yet powerfull, thats why i use Trac to handle almost every project im involved with. One drawback is that you cannot manually add user account for accessing Trac, unless you installed Trac’s AccountManagerPlugin. Too bad im not able to installed it, thats why i need to find a workaround for handling users.

Trac is using web server authentication by default. To add new users, i need to add the new users in the Apache password file. In my Win32 environment it’s easy, just use htpasswd.exe application in my apache installation directory. Below here is my commands

C:\>cd C:\Program Files\BitNami Trac Stack\apache2\bin
C:\Program Files\BitNami Trac Stack\apache2\bin>htpasswd.exe -cs htpwd.txt edw

It will create a new file named htpwd.txt with user edw inside it. Next is just a simple copy paste from values created in htpwd.txt to my Trac’s htpasswd file. And just restart my Trac to apply my changes.

Another workaround for htpasswd.exe is using online htpasswd generator such as here or here. Just copy the generated output and paste it in your htpasswd file.
(B)

How to Fix Netbeans’ GroupLayout Incompatibility with Java 5.0 (and Less)

Netbeans has a very powerful feature for its Swing designer, but too bad the default swing designer generates soucecode using javax.swing.GroupLayout and it’s only available at Java 6. I found this problem early this morning, somehow i design the Swing UI using Netbeans but i have to deploy my application in a Java 5 environment. Btw, im using Netbeans 6.9.

Below is the screenshot for Netbeans’ free design layout.

And this is the generated sourcecode, it works well with java 6.0

But when im using Java 5, it generates lots of errors

So, the workarouds are whether i change all the UI layout designs from GroupLayout to NullLayout, or find a way so GroupLayout is compatible with Java 5.

Because the second workaround is much promising, so i googled a while and found out that it’s actually not to difficult to make GroupLayout is compatible with Java 5. This is how i do it.

Right click, and choose Properties

And choose Swing Layout Extension Library.

Suddenly all the javax.swing.GroupLayout changed into org.jdesktop.layout.GroupLayout. And dont forget to include swing-layout*.jar, because org.jdesktop.layout.GroupLayout located in it.

See, it’s not that hard right? (H)

Beginning MyBatis : DataSource, JNDI and Apache DBCP

In this tutorial, im trying to connect a servlet to mysql database using Apache DBCP. Im using mybatis and accessing Apache DBCP’s datasource via JNDI. Btw, im using Netbeans 6.9 and Apache Tomcat 6.

First as always, a table named “contoh” on a database “test”

CREATE
    TABLE contoh
    (
        nama VARCHAR(30) NOT NULL,
        alamat VARCHAR(100),
        PRIMARY KEY (nama)
    )

insert into contoh (nama, alamat) values ('edwin', 'singapore');
insert into contoh (nama, alamat) values ('kamplenk', 'ciledug');
insert into contoh (nama, alamat) values ('nugie', 'pamulang');
insert into contoh (nama, alamat) values ('samsu', 'dago');
insert into contoh (nama, alamat) values ('tebek', 'karawaci');	

and a simple java bean

package com.edw.mybatis.bean;

import java.io.Serializable;

public class Contoh implements Serializable {
    private String nama;
    private String alamat;

	// other setter and getter
	
    @Override
    public String toString(){
        return nama+" : "+alamat;
    }
}

next is creating a simple xml query, ContohMapper.xml.

<?xml version="1.0" encoding="UTF-8" ?>
<!DOCTYPE mapper PUBLIC "-//mybatis.org//DTD Mapper 3.0//EN" "http://mybatis.org/dtd/mybatis-3-mapper.dtd" >
<mapper namespace="com.edw.mybatis.mapper.ContohMapper" >

    <resultMap id="ContohMap" type="com.edw.mybatis.bean.Contoh" >
        <id column="nama" property="nama" jdbcType="VARCHAR" />
        <result column="alamat" property="alamat" jdbcType="VARCHAR" />
    </resultMap>
    

    <select id="selectAll" resultMap="ContohMap">
        SELECT * FROM contoh
    </select>

</mapper>

and an interface class to map my queries

package com.edw.mybatis.mapper;

import com.edw.mybatis.bean.Contoh;
import java.util.List;

public interface ContohMapper {    
    List<Contoh> selectAll();
}

Dont forget to create a connection pooling configuration on context.xml, which located under META-INF folder.

<?xml version="1.0" encoding="UTF-8"?>
<Context antiJARLocking="true" path="/MyBatisDBCP">
    
    <Resource name="jdbc/test" auth="Container"
            type="javax.sql.DataSource"
            driverClassName="com.mysql.jdbc.Driver"
            url="jdbc:mysql://localhost:3306/test"
            username="root"
            password="xxxx"
            maxActive="100" maxIdle="30" maxWait="10000"
            removeAbandoned="true"
            removeAbandonedTimeout="60"
            logAbandoned="true"
            />
            
</Context>

an xml configuration, Configuration.xml. This is where i put my connection properties.

<?xml version="1.0" encoding="UTF-8" ?>
<!DOCTYPE configuration
PUBLIC "-//mybatis.org//DTD Config 3.0//EN"
"http://mybatis.org/dtd/mybatis-3-config.dtd">
<configuration>
    <environments default="development">
        <environment id="development">
            <transactionManager type="JDBC"/>
            <dataSource type="JNDI">
                <property name="data_source" value="java:/comp/env/jdbc/test"/>
            </dataSource>
        </environment>
    </environments>
    <mappers>
        <mapper resource="com/edw/mybatis/xml/ContohMapper.xml" />
    </mappers>
</configuration>

and a singleton class to load my configuration class,

package com.edw.mybatis.config;

import java.io.Reader;
import org.apache.ibatis.io.Resources;
import org.apache.ibatis.session.SqlSessionFactory;
import org.apache.ibatis.session.SqlSessionFactoryBuilder;


/**
 *
 * @author edw
 */
public class MyBatisSqlSessionFactory {

    protected static final SqlSessionFactory FACTORY;

    static {
        try {
            Reader reader = Resources.getResourceAsReader("com/edw/mybatis/xml/Configuration.xml");
            FACTORY = new SqlSessionFactoryBuilder().build(reader);
        } catch (Exception e){
            throw new RuntimeException("Fatal Error.  Cause: " + e, e);
        }
    }

    public static SqlSessionFactory getSqlSessionFactory() {
        return FACTORY;
    }
}

and a simple servlet to call mybatis query

package com.edw.servlet;

import com.edw.mybatis.bean.Contoh;
import com.edw.mybatis.config.MyBatisSqlSessionFactory;
import com.edw.mybatis.mapper.ContohMapper;
import java.io.IOException;
import java.io.PrintWriter;
import java.util.List;
import javax.servlet.ServletException;
import javax.servlet.http.HttpServlet;
import javax.servlet.http.HttpServletRequest;
import javax.servlet.http.HttpServletResponse;
import org.apache.ibatis.session.SqlSession;
import org.apache.log4j.Logger;

/**
 *
 * @author edw
 */
public class MainServlet extends HttpServlet {

    private Logger logger = Logger.getLogger(MainServlet.class);

    protected void processRequest(HttpServletRequest request, HttpServletResponse response)
    throws ServletException, IOException {
        response.setContentType("text/html;charset=UTF-8");
        PrintWriter out = response.getWriter();
        try {

            SqlSession session = MyBatisSqlSessionFactory.getSqlSessionFactory().openSession();

            ContohMapper contohMapper = session.getMapper(ContohMapper.class);
            List<Contoh> contohs = contohMapper.selectAll();

            out.println("<html>");
            out.println("<head>");
            out.println("<title>DBCP Example MainServlet</title>");
            out.println("</head>");
            out.println("<body>");
            
            for (Contoh contoh : contohs) {
                out.println(contoh.getNama()+" "+contoh.getAlamat()+"<br />");
                logger.debug(contoh.getNama()+" "+contoh.getAlamat());
            }

            out.println("</body>");
            out.println("</html>");

        }catch(Exception ex){
            logger.error(ex.getMessage(), ex);
            out.println(ex.getMessage());
        } finally {
            out.close();
        }
    } 

    @Override
    protected void doGet(HttpServletRequest request, HttpServletResponse response)
    throws ServletException, IOException {
        processRequest(request, response);
    } 

    @Override
    protected void doPost(HttpServletRequest request, HttpServletResponse response)
    throws ServletException, IOException {
        processRequest(request, response);
    }
}

and dont forget to register your jndi and servlet to web.xml

<?xml version="1.0" encoding="UTF-8"?>
<web-app version="2.5" xmlns="http://java.sun.com/xml/ns/javaee" xmlns:xsi="http://www.w3.org/2001/XMLSchema-instance" xsi:schemaLocation="http://java.sun.com/xml/ns/javaee http://java.sun.com/xml/ns/javaee/web-app_2_5.xsd">

    <!-- Session -->
    <session-config>
        <session-timeout>
            30
        </session-timeout>
    </session-config>

    <!-- Welcome file -->
    <welcome-file-list>
        <welcome-file>mainServlet</welcome-file>
    </welcome-file-list>

    <!--  Servlet -->
    <servlet>
        <servlet-name>mainServlet</servlet-name>
        <servlet-class>com.edw.servlet.MainServlet</servlet-class>
    </servlet>
    <servlet-mapping>
        <servlet-name>mainServlet</servlet-name>
        <url-pattern>/mainServlet</url-pattern>
    </servlet-mapping>

    <!-- JNDI -->
    <resource-ref>
        <description>DB Connection</description>
        <res-ref-name>jdbc/test</res-ref-name>
        <res-type>javax.sql.DataSource</res-type>
        <res-auth>Container</res-auth>
    </resource-ref>
    
</web-app>

And also, dont forget to put your mysql-connector.jar to tomcat lib. And if you see this error, Cannot create JDBC driver of class '' for connect URL 'null', it means there’s something wrong with your JNDI configuration on context.xml.

This is my netbeans project screenshot

and this is what the result will look like

Have fun, cheers. (B)

Clustering and Session Replication Using Glassfish 3.1

Sometimes we need to replicate sessions between clustered environment to make sure session failovers. In this tutorial im trying to clustered 2 Glassfish instances located in the same computer, create a simple webapps and try to see whether session in instance 1 replicated to instance 2. I dont know why but Glassfish 3.0 seems doesnt support clustering so im using Glassfish version 3.1 instead.

Lets start by starting Glassfish, go to /bin and start it from command promt by typing asadmin start-domain domain1.

After it started, go to Glassfish console from your browser. Glassfish console URL will be http://localhost:4848/. Login and start creating a cluster from Clusters menu.

Start your cluster,

congratulation, you have started your cluster. Lets see details from each instances,

it shows your instance’s http port.

To test our session replication, i create a simple web application using Netbeans 6.9.
First is a simple jsp file, index.jsp

<%@page import="java.util.Enumeration"%>
<%@page contentType="text/html" pageEncoding="UTF-8"%>
<!DOCTYPE HTML PUBLIC "-//W3C//DTD HTML 4.01 Transitional//EN"
    "http://www.w3.org/TR/html4/loose.dtd">

<html>
    <head>
        <meta http-equiv="Content-Type" content="text/html; charset=UTF-8">
        <title>JSP Page</title>
    </head>
    <body>
        <h1>Session Form</h1>

        <%
                    if (request.getParameter("sessionName") != null && request.getParameter("sessionValue") != null) {
                        HttpSession httpSession = request.getSession();
                        httpSession.setAttribute(request.getParameter("sessionName"), request.getParameter("sessionValue"));
                    }
        %>

        <form action="index.jsp" method="POST">

            your session name : <input type="text" name="sessionName" /> <br />
            your session value : <input type="text" name="sessionValue" /> <br />
            <input type="submit" />

        </form>

        <h1>Your Sessions</h1>

        <%
                    Enumeration sessionNames = session.getAttributeNames();
                    while (sessionNames.hasMoreElements()) {
                        String mySessionName = sessionNames.nextElement().toString();
                        String mySession = request.getSession().getAttribute(mySessionName).toString();
                        out.print(mySessionName+ " --> "+mySession + " <br />");
                    }
        %>

    </body>
</html>

And the most important is the web.xml configuration,

<?xml version="1.0" encoding="UTF-8"?>
<web-app version="2.5" xmlns="http://java.sun.com/xml/ns/javaee" xmlns:xsi="http://www.w3.org/2001/XMLSchema-instance" xsi:schemaLocation="http://java.sun.com/xml/ns/javaee http://java.sun.com/xml/ns/javaee/web-app_2_5.xsd">
    <distributable id="sessionDistribute" />
    <session-config>
        <session-timeout>
            30
        </session-timeout>
    </session-config>
    <welcome-file-list>
        <welcome-file>index.jsp</welcome-file>
    </welcome-file-list>
</web-app>

Build it into a war app and deploy it to our clustered environment, always make sure the Availability option checked as enabled.

After you launch it, input some value to jsp page in instance1 and save it. It will save your values to a session.

open instance2’s jsp page and check whether your instance1’s session is there.

As you can see, your sessions from instance 1 is replicated and available from instance 2.

Have fun using Glassfish. 🙂